
How to Find the Snaps You Want in the Mac’s Photos App

Did You Know You Can Save and Share Voicemail Files from Your iPhone?

Use Your Apple Watch to Unlock Your Mac, and Apps in Catalina

The iPhone 11 Camera App’s Shutter Button Works Differently—Here’s How
The iPhone 11 Camera App’s Shutter Button Works Differently—Here’s How
With the iPhone 11, iPhone 11 Pro, and iPhone 11 Pro Max, Apple changed the way the Camera app’s shutter button works in ways that could cause confusion. Tapping it once still takes a single still photo, but if you press and hold on the shutter button, it now captures a quick video. (Previously, pressing and holding on the button took photos in burst mode; to do that on the iPhone 11 models, slide the shutter button to the left.) Once you’ve started taking a quick video, slide your finger to the right to lock recording, so you don’t have to keep holding the button down. Tap the white shutter button to take a still image while recording; tap the red record button to stop recording. For even easier quick video recording, press and hold either of the volume buttons; a single press still takes a photo. Note that quick videos always record with mono sound and at a resolution of 1920-by-1440; for stereo sound and the resolution set in Settings > Camera, use the Camera app’s Video mode.

(Featured image by Agê Barros on Unsplash)
A few of the 437 times we talked about cameras.
(Just kidding… or are we?)
- Tired of Skewed Lines in Your Photos? Use the Camera App’s Hidden Level.
- Use Continuity Camera to Scan Documents and Take Photos Right into Mac Documents
- Remember That You Can Search for Nearly Anything in Your Photos Library
- The Secret Keyboard Shortcut for Comparing Before/After Edits in Photos on the Mac

Need to Move Lots of Data Between Macs? Try Target Disk Mode

Did You Know You Can Drag the Scroll Bar in iOS 13?
Did You Know You Can Drag the Scroll Bar in iOS 13?
In previous versions of iOS, a scroll bar would appear on the right edge of the screen while you were swiping through a long Web page, email message, or document. But the scroller was merely an indicator of where in the page you were and how much content there was (the bigger the scroller, the less content). In iOS 13 and iPadOS 13, however, Apple has made the scroll bar more helpful, and you’ll want to use it to scroll long pages more quickly than you can with swiping. To use the scroll bar, swipe slightly to make it appear, press and hold the scroller, and drag it to scroll. The only hard part is that it can be tricky to grab since it disappears a few seconds after you stop scrolling, and it’s a thin target to hit with a thick finger. But give it a try since it makes scrolling in long pages so much easier.
(Featured image background by Paweł Czerwiński on Unsplash)
More iOS tips just for you.
- iPhone Not Charging Reliably? Clean Its Lightning Port with a Toothpick
- Try Using a Magic Trackpad 2 with Your iPad Running iPadOS 13.4
- The Fastest Way to Change Wi-Fi Networks in iOS 13
- Set Your Preferred Name and Photo for Messages in iOS 13

Use the Driving ETA Feature in iOS 13’s Maps App to Share Your Arrival Time
Use the Driving ETA Feature in iOS 13’s Maps App to Share Your Arrival Time
A small but welcome new feature of iOS 13 is Driving ETA, which helps you share your estimated time of arrival with a contact whenever you’re navigating with the Maps app. To use Driving ETA, start navigating to a destination in Maps, tap Share ETA at the bottom of the screen, and pick the person with whom you want to share your location and arrival time. (You’ll share in Maps with iOS 13 users and via Messages with everyone else.) The other person will receive a notification of your ETA and if you’re delayed, updated times. You do have to start navigation in Maps to use Driving ETA, so it’s a little inconvenient when you already know the route, but it’s a brilliant feature for long-distance trips.

(Featured image by Dan Gold on Unsplash)
We’ve got tips and tips and tips…
- Set Your Preferred Name and Photo for Messages in iOS 13
- iCloud Photo Library Users: Do NOT Turn Off iCloud
- iPhone Not Charging Reliably? Clean Its Lightning Port with a Toothpick
- In Case of Emergency, Create an iPhone Medical ID
- Did You Know You Can Save and Share Voicemail Files from Your iPhone?
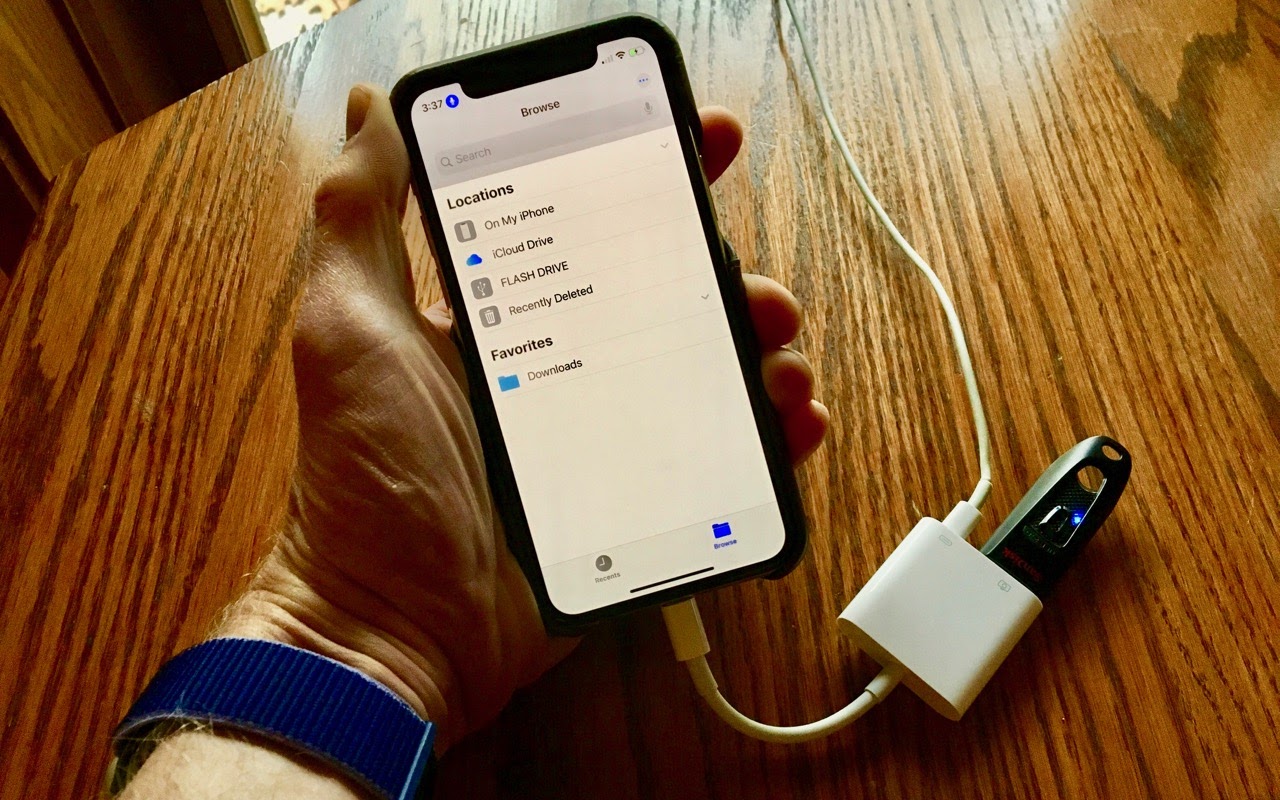
You Can Now Access Flash Drives on an iPhone or iPad—Here’s How

Do You Put Dates in Filenames? Use This Format for Best Sorting
Do You Put Dates in Filenames? Use This Format for Best Sorting
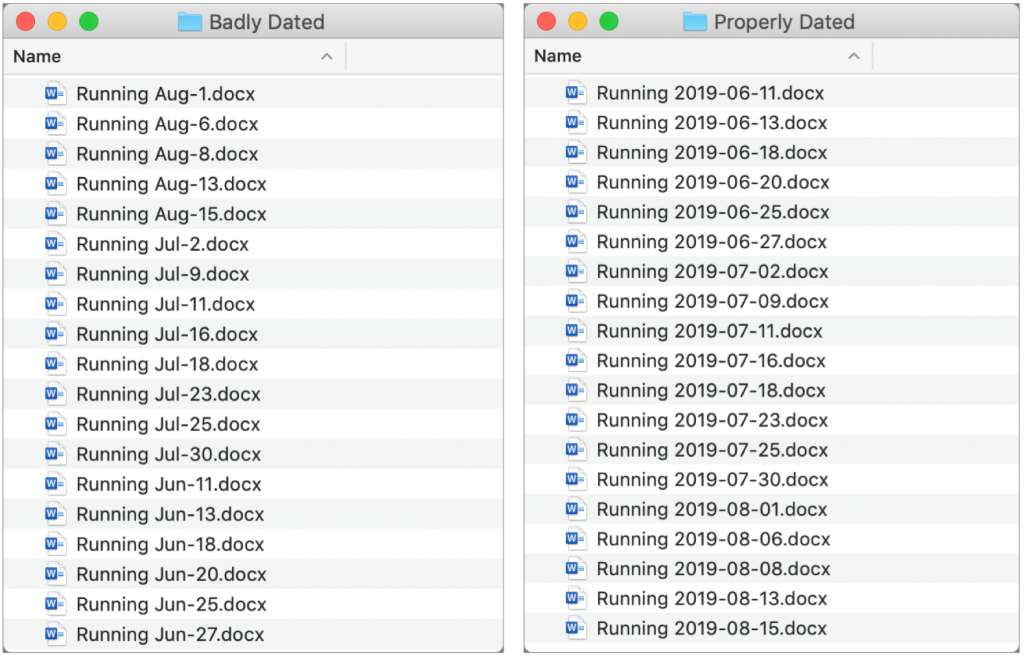
There are plenty of situations where it makes sense to put a date in a filename, but if you don’t use the right date format, the files may sort in unhelpful ways. For instance, using the names of months is a bad idea, since they’ll sort alphabetically, putting April before January. And although the Mac’s Finder is smart enough to sort filename-3 before filename-20, most other operating systems are not (because 2 comes before 3). So, to make your life—and the lives of everyone with whom you share files—a little easier, use this date format, which is guaranteed to sort correctly everywhere: YYYY-MM-DD. That translates to a four-digit year, followed by a two-digit month (with a leading zero if necessary), and a two-digit day (again, with a leading zero if need be).
(Featured image by Henry & Co. on Unsplash)
Got another minute? Check these tips out.
- Avoid Ransom Requests with a Unique iCloud Password
- Apple Music Can Be Your Personal DJ
- Did You Know You Can Make a Video of Anything on Your iPhone or iPad Screen?
- Did You Know Families Can Share Mac and iOS Apps Purchased from the App Store?