
Data Backup Strategies Go Only So Far—What’s Your Plan If Your Mac Dies?

What Does Having a T2 Chip in Your Mac Mean to You?

Do You Put Dates in Filenames? Use This Format for Best Sorting
Do You Put Dates in Filenames? Use This Format for Best Sorting
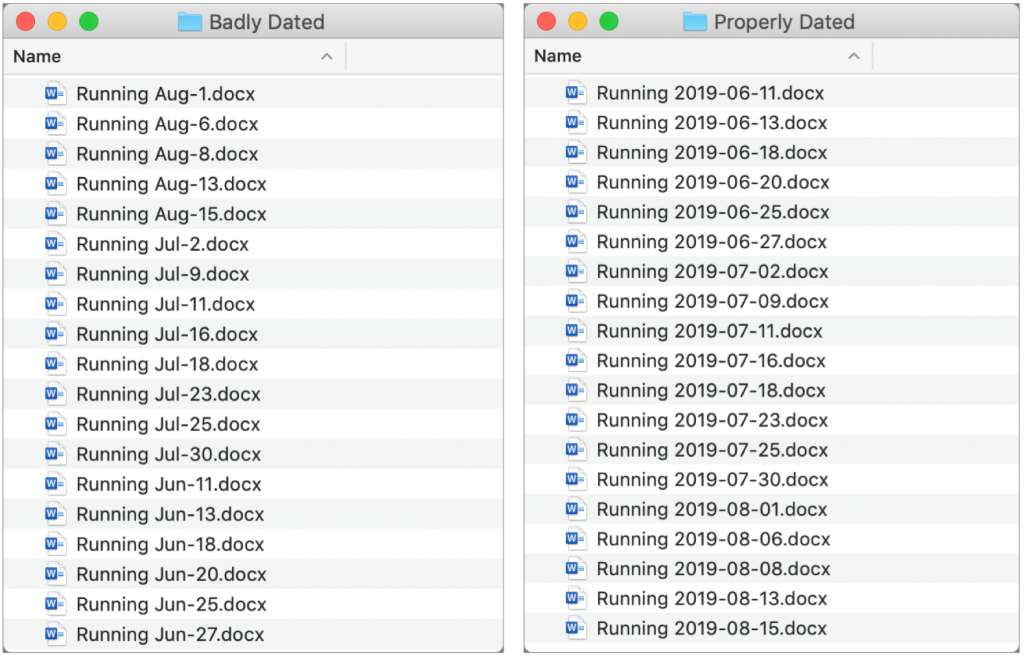
There are plenty of situations where it makes sense to put a date in a filename, but if you don’t use the right date format, the files may sort in unhelpful ways. For instance, using the names of months is a bad idea, since they’ll sort alphabetically, putting April before January. And although the Mac’s Finder is smart enough to sort filename-3 before filename-20, most other operating systems are not (because 2 comes before 3). So, to make your life—and the lives of everyone with whom you share files—a little easier, use this date format, which is guaranteed to sort correctly everywhere: YYYY-MM-DD. That translates to a four-digit year, followed by a two-digit month (with a leading zero if necessary), and a two-digit day (again, with a leading zero if need be).
(Featured image by Henry & Co. on Unsplash)
Got another minute? Check these tips out.
- Avoid Ransom Requests with a Unique iCloud Password
- Apple Music Can Be Your Personal DJ
- Did You Know You Can Make a Video of Anything on Your iPhone or iPad Screen?
- Did You Know Families Can Share Mac and iOS Apps Purchased from the App Store?

Do not upgrade to Catalina MacOS 10.15 until we give you the go-ahead. (.2 or .3 ask after Thanksgiving)

Make a Backup before Upgrading to Catalina or iOS 13!
Make a Backup before Upgrading to Catalina or iOS 13!
Confession time. If there’s one topic we can’t stop talking about, it’s backups. Backups are essential, since no one can guarantee that your Mac or iPhone won’t be lost or stolen, be caught in a flood from a broken pipe, or just fail silently. It happens.
You should have a good backup strategy that ensures backups happen regularly, but it’s not paranoid to make double extra sure when you’re doing something that’s more likely to cause problems than everyday activity. And by that we’re thinking about upgrading to a major new operating system, such as macOS 10.15 Catalina or iOS 13.
The reason is simple. As much as Apple tests the heck out of these upgrades, so many files are in play that all it takes is one unexpected glitch to render the entire Mac or iPhone non-functional. Wouldn’t you like to be able to revert instantly if something does go wrong?
Mac Backups before Upgrading
On the Mac side, most people should be using Time Machine. It ensures that you can not only restore your entire drive if necessary but also easily recover a previous version of a corrupted file. The other advantage of having Time Machine backups (and a bootable duplicate, discussed next) is that you can use either to migrate all your apps, data, and settings back to a new installation of macOS, should that become necessary.

As useful as Time Machine is, a bootable duplicate made with SuperDuper or Carbon Copy Cloner is the best insurance right before you upgrade to Catalina. If an installation goes south, you can also boot from your duplicate and get back to work right away.

Finally, although it’s not directly related to backing up before upgrading, we always recommend an offsite backup made via an Internet backup service like Backblaze. This is because a fire or flood would likely destroy your backup drive along with your Mac.
So please, back up your Mac before something goes wrong. It’s fast, easy, and inexpensive to get started, and we’re happy to help.
iOS Backups before Upgrading
Although upgrade-related problems are less common with iPhones and iPads, they can still happen. It’s more likely that you’d drop your little friend accidentally while juggling groceries or forget it after your workout at the gym, but regardless, a backup ensures that you don’t lose precious photos if you’re not using iCloud Photos or My Photo Stream, and backups make migrating to a new device like a fancy new iPhone as painless as possible.
With iOS, though, you don’t need extra software or hardware to make a backup. Apple provides two ways of backing up your iPhone or iPad: iTunes and iCloud. We generally recommend backing up to iCloud if your backups will fit in the free 5 GB of space Apple provides or if you’re already paying for more iCloud space. If you’re not a fan of the cloud or don’t have space, there’s nothing wrong with iTunes backups, though they’re a bit fussier to set up and manage.
There’s also no harm in using both, with iCloud for nightly automatic backups and iTunes for an extra backup just before upgrading to iOS 13 or to a new iPhone or iPad. A second backup can be useful—we’ve seen situations where an iPhone would refuse to restore its files from iTunes but would from iCloud.
To back up to iCloud, go to Settings > Your Name > iCloud > iCloud Backup, turn the switch on, and tap Back Up Now. For backups to happen automatically in the future, you must have sufficient space in your iCloud account (you can buy more), and your device must be on a Wi-Fi network, connected to power, and have its screen locked.

To back up to iTunes, connect your device to your Mac via a Lightning-to-USB cable, launch iTunes, and click the device icon to the right of the media menu.

Then, in the Backups section, click the Back Up Now button. If you’re prompted to encrypt your backups, we encourage you to agree since otherwise your backup won’t include passwords, Health information, or HomeKit data. For automatic backups via iTunes, select This Computer. After that, every time you plug into your Mac, it will back up.

The eagle-eyed among you will have noticed that we’re not talking about how to restore if something goes wrong during an upgrade. That’s because it’s impossible to predict exactly what might happen or what state your device will end up in. So if you’re unfortunate enough to have such problems—or to have some other catastrophic failure—get in touch and we’ll be happy to help.
(Featured image based on an original by Alejandro Escamilla on Unsplash)
Just a few of the other 67 times we talk about backup…
- Recover Drive Space by Deleting Old and Unnecessary iOS Device Backups
- Make Sure to Test Your Backup System with Occasional Restores
- Data Backup Strategies Go Only So Far. What’s Your Plan If Your Mac Dies?
And a few all time favorites…
More great tips from the archives…
- Two Secret Key Combos for Forward Delete on the Magic and MacBook Keyboards
- iCloud Photo Library Users: Do NOT Turn Off iCloud
- Ever Wondered Which Words to Capitalize in a Title? Use Capitalize My Title!
- Tips for Setting Up a Comfortable and Effective Home Work Space
- Tips for Better Videoconferencing
- Set Your Preferred Name and Photo for Messages on iOS
- The Fastest Way to Change Wi-Fi Networks in iOS
- What to Put at the End of Your Emails
- Apple Business Manager Is a Win for Apple-Driven Workplaces
- Find Wasted Space with Storage Management
- Forrester Research and IBM Studies Show Macs Are Cheaper than PCs
- Being an Apple User Means You’re Not the Product
- How to Ask for Tech Support So You Get Good Answers Quickly
- Apple Business Manager Is a Win for Apple-Driven Workplaces

Two Secret Key Combos for Forward Delete on the Magic and MacBook Keyboards
Two Secret Key Combos for Forward Delete on the Magic and MacBook Keyboards
Traditionally, extended keyboards come with a Forward Delete key that, when you press it, deletes characters to the right of the insertion point, unlike the main Delete key, which deletes to the left of the insertion point. Forward Delete still exists on Apple’s Magic Keyboard with Numeric Keypad, but it’s missing from the Magic Keyboard and all Mac laptop keyboards. If you like using Forward Delete (and well you should!), the secret key combinations that simulate it for any Apple keyboard that lacks it are Fn-Delete and Control-D. You can often add Option to the mix to delete the word to the right of the insertion point instead of just a character.

(Featured image by Adam Engst)
Some of the “greatest hits”…
More great tips from the archives…
- Two Secret Key Combos for Forward Delete on the Magic and MacBook Keyboards
- iCloud Photo Library Users: Do NOT Turn Off iCloud
- Ever Wondered Which Words to Capitalize in a Title? Use Capitalize My Title!
- Tips for Setting Up a Comfortable and Effective Home Work Space
- Tips for Better Videoconferencing
- Set Your Preferred Name and Photo for Messages on iOS
- The Fastest Way to Change Wi-Fi Networks in iOS
- What to Put at the End of Your Emails
- Apple Business Manager Is a Win for Apple-Driven Workplaces
- Find Wasted Space with Storage Management
- Forrester Research and IBM Studies Show Macs Are Cheaper than PCs
- Being an Apple User Means You’re Not the Product
- How to Ask for Tech Support So You Get Good Answers Quickly
- Apple Business Manager Is a Win for Apple-Driven Workplaces

Need to Restart a Mac That Has Frozen? Here’s How
Need to Restart a Mac That Has Frozen? Here’s How
It’s extremely uncommon for a Mac to freeze or crash these days, but it can happen. What should you do if your Mac locks up and becomes completely unresponsive to the mouse and keyboard? The trick is to press and hold the power button until the Mac turns off. Wait 5 or 10 seconds, and press it again to turn the Mac back on. You will lose any unsaved changes if you do this, so use it only as a last resort when you can’t restart normally. Look for the power button on the back of a desktop Mac, and at the top right of the keyboard on most laptop Macs. For a recent MacBook Air or a MacBook Pro with a Touch Bar, press and hold the Touch ID button.

(Featured image by Adam Engst)
More great mac troubleshooting tips…
- How to Ask for Tech Support So You Get Great Answers Fast
- Having Mac Troubles? Running Apple Diagnostics May Help Identify the Problem
- Consider USB Peripherals When Troubleshooting Mac Problems
- Troubles with Messages?

Annoyed by Your Holiday Music Playing out of Season? Stop It with This Tip
Annoyed by Your Holiday Music Playing out of Season? Stop It with This Tip
“Winter Wonderland” may be a great song to listen to when the snow flies, but if you’re sweltering in the summer heat, having it pop up while iTunes is shuffling through your music feels wrong. Happily, there’s a way to prevent holiday music from playing out of season—this trick is also useful for keeping children’s songs from shuffling alongside tracks from Abba, Beethoven, and The Clash. In iTunes, select the songs you want to prevent from being included when you shuffle all tracks, and choose Edit > Get Info. In the Get Info dialog, switch to the Options pane, select Skip When Shuffling, and click OK to save your changes. Note that the easiest way to find such music may be by selecting Genres in the sidebar and then Children’s Music or Holiday in the list that appears.

Image by Malachi Witt from Pixabay
Random tips to make you happy…
- Tips for Better Videoconferencing
- How to Ask for Tech Support So You Get Good Answers Quickly
- Do You Know Who Can Track Your Location? It’s Worth Checking Periodically
- Apple Unleashes COVID-19 Screening Tool App and Web Site
- Customize What Appears in New Finder Windows with This Tip

Go Beyond External Hard Drives with Network-Attached Storage

Use macOS’s Guest Account to Protect Your Privacy from Temporary Users
Use macOS’s Guest Account to Protect Your Privacy from Temporary Users
We’ve all had it happen. “Can I use your Mac for a minute to check my email?” The answer can be “Yes,” but to keep people from poking around on your Mac, have your visitor log in as Guest. To enable the Guest account, go to System Preferences > Users & Groups. If the lock at the bottom left is closed, click it and enter your admin credentials. Then click Guest User in the list, and select “Allow guests to log in to this computer.” To switch to the Guest account, go to the Apple menu and choose Log Out YourAccountName to access the login screen. Your guest can then click the Guest User icon, at which point they’ll have a clean account to work in. When they log out, the account—including any files they created or downloaded—will be deleted, thus protecting their privacy as well.

(Featured image by Apple)
More privacy tips…
More great tips from the archives…
- Two Secret Key Combos for Forward Delete on the Magic and MacBook Keyboards
- iCloud Photo Library Users: Do NOT Turn Off iCloud
- Ever Wondered Which Words to Capitalize in a Title? Use Capitalize My Title!
- Tips for Setting Up a Comfortable and Effective Home Work Space
- Tips for Better Videoconferencing
- Set Your Preferred Name and Photo for Messages on iOS
- The Fastest Way to Change Wi-Fi Networks in iOS
- What to Put at the End of Your Emails
- Apple Business Manager Is a Win for Apple-Driven Workplaces
- Find Wasted Space with Storage Management
- Forrester Research and IBM Studies Show Macs Are Cheaper than PCs
- Being an Apple User Means You’re Not the Product
- How to Ask for Tech Support So You Get Good Answers Quickly
- Apple Business Manager Is a Win for Apple-Driven Workplaces
- The Hidden Dangers of Shadow IT on your business
- Need to Stay in Touch? Try One of These Videoconferencing Apps
- Never Send Someone a Password in Mail or Messages: Do This Instead!
- What Are All These New Privacy Request Dialogs in Mojave?
- The Importance of Productivity Tech for Your Road Warriors