An extremely welcome under-the-hood change in iOS 11 and macOS 10.13 High Sierra is that Photos facial recognition syncs across iCloud Photo Library. Previously, people you identified on one of your devices remained unidentified on others. But what if Photos now identifies the same person twice, such that they have two separate entries in the People album? Just drag one entry on top of the other, in either the Mac or iOS version of Photos, and agree that they’re the same person when Photos asks.
Please, Please, Use iOS 11’s Do Not Disturb While Driving Feature
Distracted driving may not make headlines, but it’s a huge problem. In the United States in 2015, the National Highway Traffic Safety Administration says that 391,000 people were injured and 3477 killed in accidents caused by distracted driving.
Many things can distract drivers, but the most concerning—and the most avoidable—is texting. Given that the iPhone has a 30–40% share of the market, it might have been involved in as many as 100,000 injuries and 1000 deaths in just 2015. Not good.
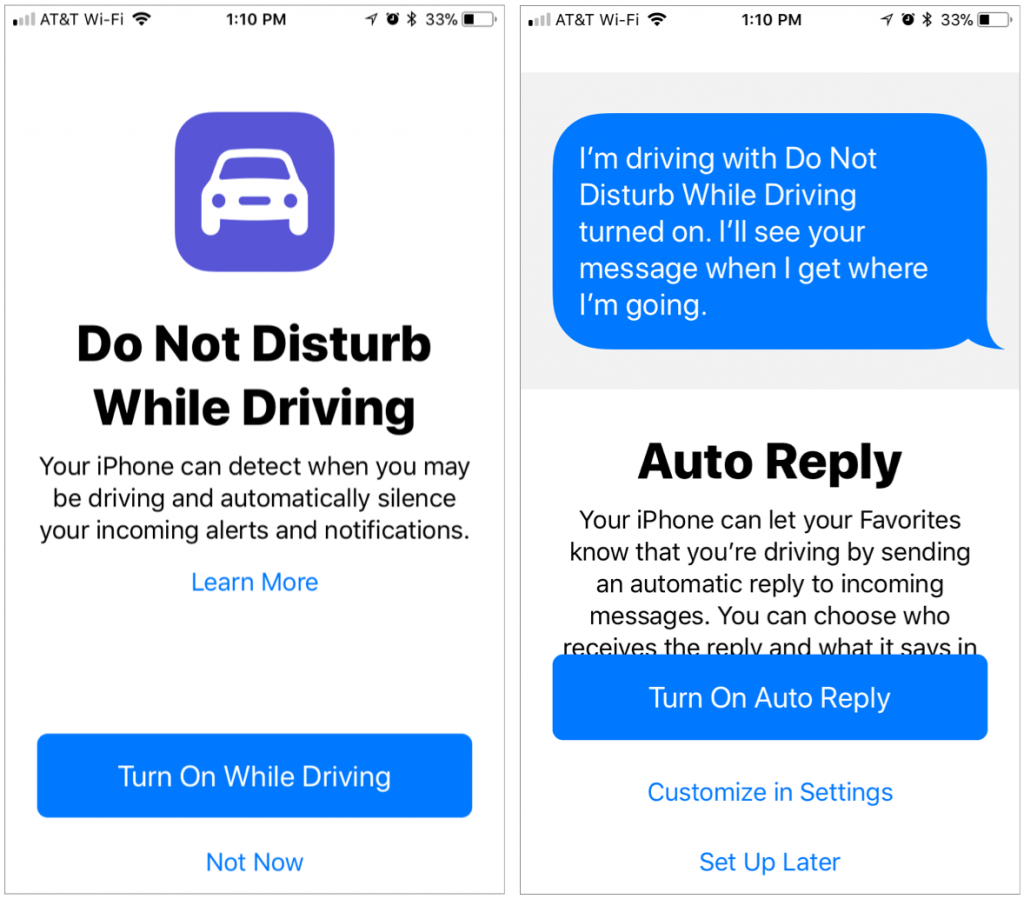
Apple has stepped up to the plate by introducing the Do Not Disturb While Driving (DNDWD) feature in iOS 11. You’ll be prompted to enable DNDWD when it first detects that you’re driving in a car after you install iOS 11. In normal use, it activates automatically when you’re driving, blocking notifications and preventing you from using apps until you stop the car. Here are answers to the most common questions we get about DNDWD.
How does the iPhone know that I’m driving?
The most reliable way is that your iPhone has connected to a car via Bluetooth. Obviously, that requires the car to support Bluetooth, and that you pair your iPhone with it. If there’s no Bluetooth connection, the iPhone uses its accelerometer and signals from nearby Wi-Fi networks to figure out that you’re driving.
In Settings > Do Not Disturb > Activate, you can choose from Automatically, When Connected to Car Bluetooth, or Manually. Stick with one of the first two options unless the iPhone regularly fails to detect that you’re driving, at which point you can add the Do Not Disturb While Driving button to Control Center, and activate DNDWD with it.
Will any notifications break through the DNDWD cone of silence?
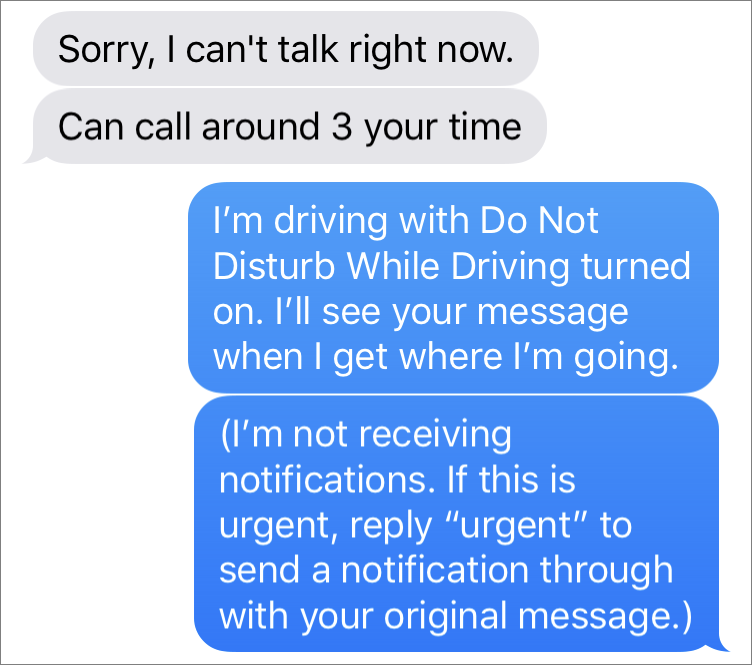
Yes. As with standard Do Not Disturb, timers, alarms, and emergency alerts will still work. Plus, you can opt to receive urgent text messages. To enable this feature, go to Settings > Do Not Disturb > Auto-Reply To and choose a group (Recents, Favorites, or All Contacts). Those people will get an auto-reply—which you can personalize—when they text you, and if they reply to that auto-reply with the word “urgent,” the message will be delivered.
What about phone calls?
If your car has a Bluetooth hands-free system, phone calls will come in as they always have, and you can answer them via your steering wheel controls and carry on the conversation using the car’s built-in mic and speakers.
However, if you don’t have car Bluetooth or another hands-free accessory, DNDWD will block calls just as they would be by standard Do Not Disturb. That means you can allow calls from specific groups in Settings > Do Not Disturb > Allow Calls From and let anyone through if they call twice within 3 minutes.
Can I still use Maps to navigate?
Yes! Maps works on the Lock screen just as it always has, though it’s best started before you begin driving. If you keep your iPhone in a car mount so you can use it for navigating, DNDWD won’t get in the way.
Will Siri still work while in DNDWD?
Indeed it will, both via Hey Siri and by holding the Home button. But don’t do that—Hey Siri is safer than taking your hand off the wheel to press the Home button.
Siri won’t do some things for you while you’re driving, like open apps. Plus, Siri tries to respond to you so that you won’t have to look at the iPhone, reading all responses instead of displaying them on the screen.
How do I turn off DNDWD if I’m a passenger?
If DNDWD is on and you try to use your iPhone, an I’m Not Driving button appears. Tap it, and you can use your iPhone normally for the rest of the trip. If you’re always a passenger, go to Settings > Do Not Disturb > Activate, and select Manually. Then, if you do want to turn DNDWD on, you can use its Control Center button.
So hey, if you didn’t turn on Do Not Disturb While Driving when you first set up iOS 11, do us and everyone else on the road a favor and turn it on now. The life you save could be your own.
Twitter: Are you using iOS 11’s new Do Not Disturb While Driving? If not, do us all a favor and turn it on today!
Facebook: Distracted driving kills thousands of people every year. Here’s how your iPhone can potentially save your life.
You Can Now Scan QR Codes with the Camera in iOS 11
You’ve undoubtedly seen those odd-looking square QR codes on product packaging, a business card, or a flyer. In the past, you needed a special app to scan a QR code to see what Web URL, contact card, Wi-Fi network, or other piece of information it held. In iOS 11, though, you can just point your iPhone or iPad camera at a QR code—no need to take a picture! Then tap the notification that appears at the top of the screen to display whatever data was encoded by the QR code.
The Best Apple-Related Gifts for 2017
It’s that time of year again, when many of us start wracking our brains for gift ideas for our loved ones—or for our own wish lists. If your special someone is an Apple user, we have a few suggestions.
Chargers, Cables, and Adapters, Oh My!
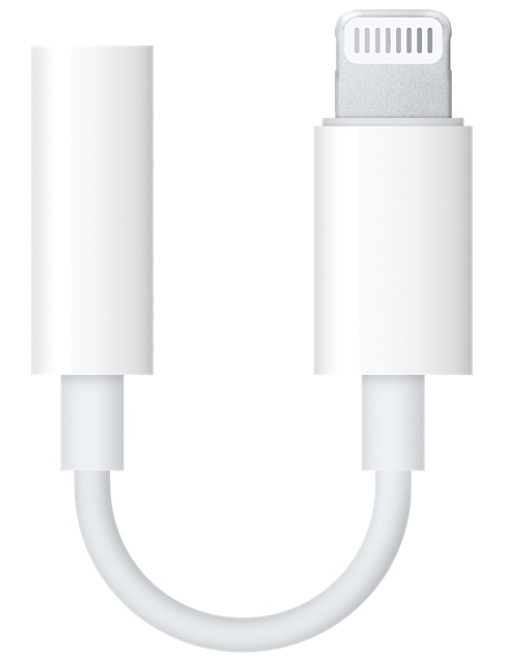
We know that giving someone a cable feels a bit like buying them socks, but Apple’s minimalist design and focus on USB-C and Lightning ports means that many users would appreciate extra cables or adapters. You’ll want to ask them what they find most annoying about their current cable situation—they might want an extra Lightning to headphone adapter, a USB-C to USB-A cable for connecting some peripheral, or an HDMI cable to run a big-screen TV.
Plus, giving someone a second iPhone, Mac, or Apple Watch charger could reduce battery anxiety or make it less likely that they’d forget to pack one while traveling.
AirPods
Apple’s most surprising hit of 2017 was the AirPods, svelte wireless earbuds that pair quickly and seamlessly to all Apple devices logged in to the same iCloud account. They’re light, stay in the ear well, and are comfortable even for many people who couldn’t wear the wired EarPods. At $159, they’re not cheap, but they’re still less expensive than many competing wireless earbuds.
The only catch? Apple has had trouble making AirPods fast enough, so don’t assume you can buy a pair as a last-minute gift.
Apple Watch
Apple always intended the Apple Watch as an iPhone accessory, so it makes a great add-on for any iPhone user who doesn’t already have their iPhone in hand most of the day. For most people, the $249 Apple Watch Series 1 is a fine gift, although the $329 Series 3 is faster and brighter, and doesn’t need the iPhone to track a run or bike ride via GPS.
Consider the $399 Series 3 with cellular access only if you’re certain the recipient will make use of the watch while out and about without the iPhone, since its data plan costs $10 extra per month.
And, if someone on your gift list already has an Apple Watch, a new band might make a great present—Apple offers a wide variety of attractive and comfortable bands.
Apple TV
Although it’s a few years old, the $149 fourth-generation Apple TV still makes a good present for anyone who watches TV shows and movies from Netflix, iTunes, Hulu, and other Internet streaming video services.
For most people, the $179 Apple TV 4K is overkill, since its support for 4K video and HDR color require a compatible 4K HDR TV purchased in the last year or so.
So stick with the previous Apple TV, and if you’re looking for a related stocking stuffer, search for silicone cases that protect the brittle Siri Remote and make it easier to orient in the dark.
iPad
Last, but far from least, if someone in your family has never tried an iPad or is limping along with one of the early models, the current fifth-generation iPad combines good performance and a gorgeous screen with a compellingly low price starting at $329.
At $399, the smaller iPad mini 4 doesn’t provide as much bang for the buck, but it could be the perfect present for a child.
Particularly when buying an iPad for a kid, a durable case is a must—perhaps suggest that as a gift idea to another family member.
Twitter: Looking for the perfect gift for that special Apple user in your life? Here are our choices for the best gifts.
Facebook: This should help make those holiday gift lists easier to complete!
The Swipes You Need to Know to Multitask in iOS 11 on an iPad
With iOS 11, the iPhone and iPad interfaces continue to diverge, which makes sense, since the iPad is not merely an overgrown iPhone. Particularly when you pair an iPad Pro with a Smart Keyboard and Apple Pencil, you can now get real work done on an iPad more fluidly than ever before. The “hard” part is learning how you switch between apps, display a second app in a Slide Over panel that floats on top of another app, or make two apps share the screen in Split View.
Switch Between Apps
Moving between apps is a key aspect of using the iPad. Apple has provided multiple ways to switch so you can pick those that best fit your style:
- Press the Home button, and on the Home screen, tap another app’s icon.
- On the Home screen, swipe down to show Siri app suggestions and search for another app.
- Within an app, swipe right or left with four fingers.
- Within an app, swipe up from below the bottom of the screen to reveal the new Dock, and then tap an icon on it. Note that the three rightmost icons are the most recently used apps.
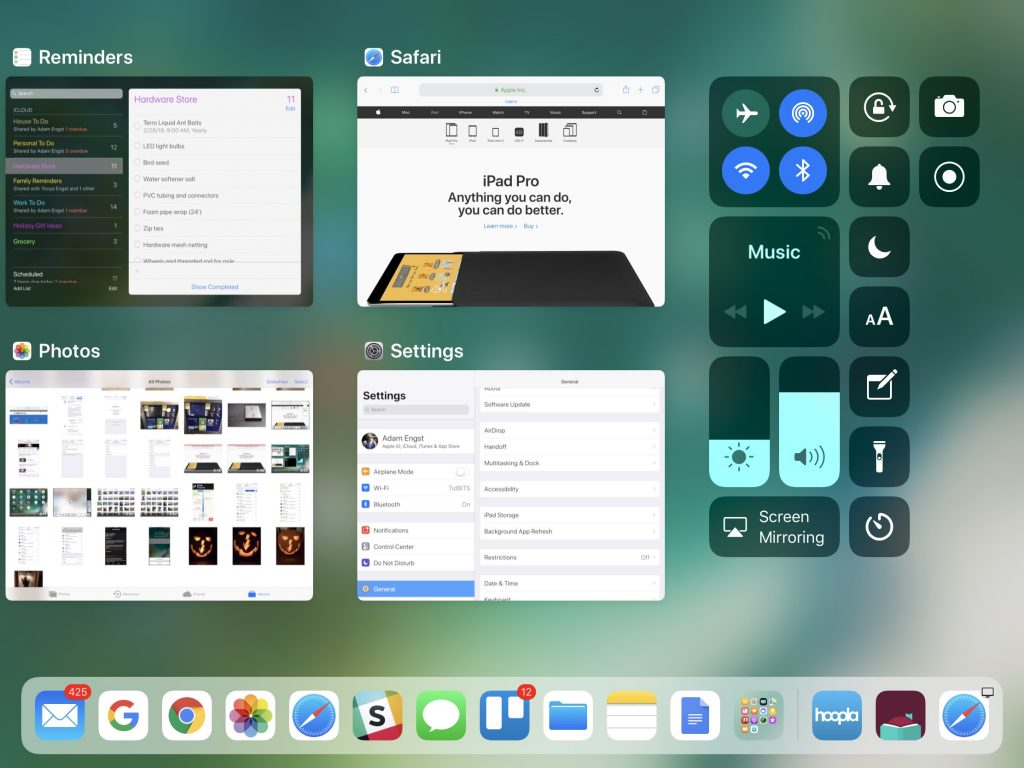
- After revealing the Dock, keep swiping up to reveal the new app switching screen, then tap an app thumbnail to switch to it. Swipe right to see less recently used apps.
- From a Smart Keyboard or other keyboard, press Command-Tab to bring up a Mac-like app switcher. Release both keys quickly to switch to the previous app instantly, or keep Command down while you press Tab repeatedly to move sequentially among the shown apps, letting up on Command to switch. While the app switcher is shown, you can also tap an icon in it.
Display an App in Slide Over
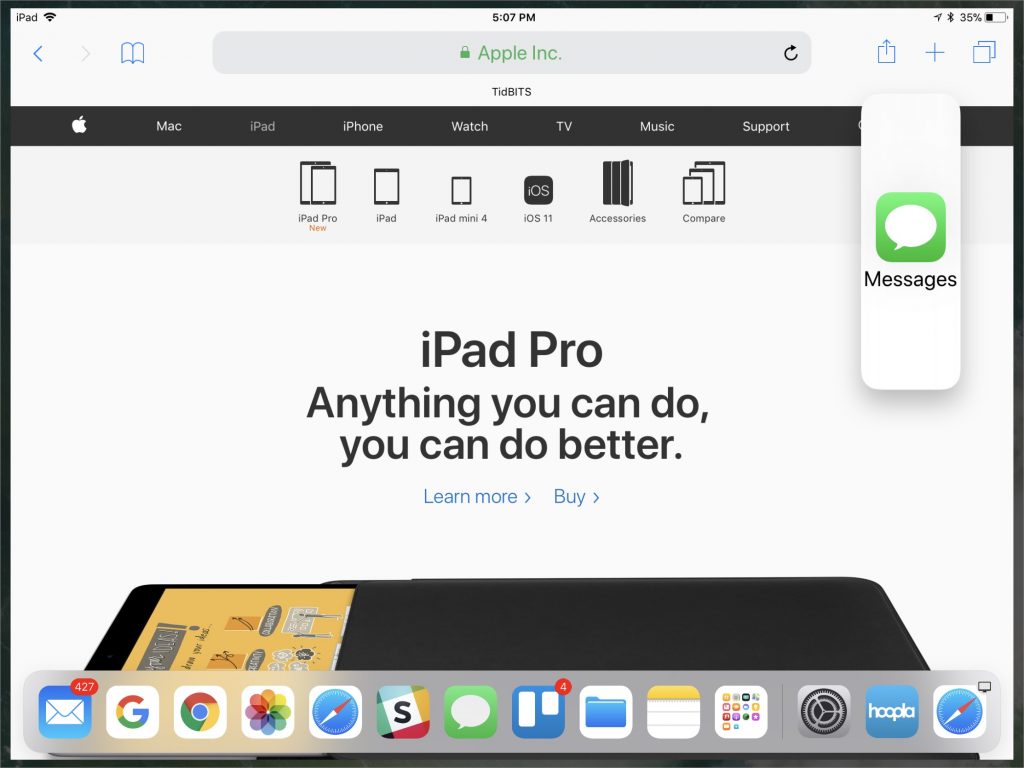
Say you’re having a sporadic conversation in Messages while browsing the Web in Safari. You don’t need to see both apps all the time, but you also don’t want to have to switch back and forth. With Slide Over, you can put Messages in a panel that floats over Safari and then hide and show it.
The easiest way to put an app in a Slide Over panel is to use the Dock, so this technique works if the app’s icon is already on the Dock. For instance, while you’re in Safari, swipe up from the bottom of the screen to display the Dock. Then touch and hold the Messages app’s icon until it dims slightly. Keeping your finger down, drag the icon over Safari until it becomes a vertical lozenge. Lift your finger, and Messages appears in Slide Over.
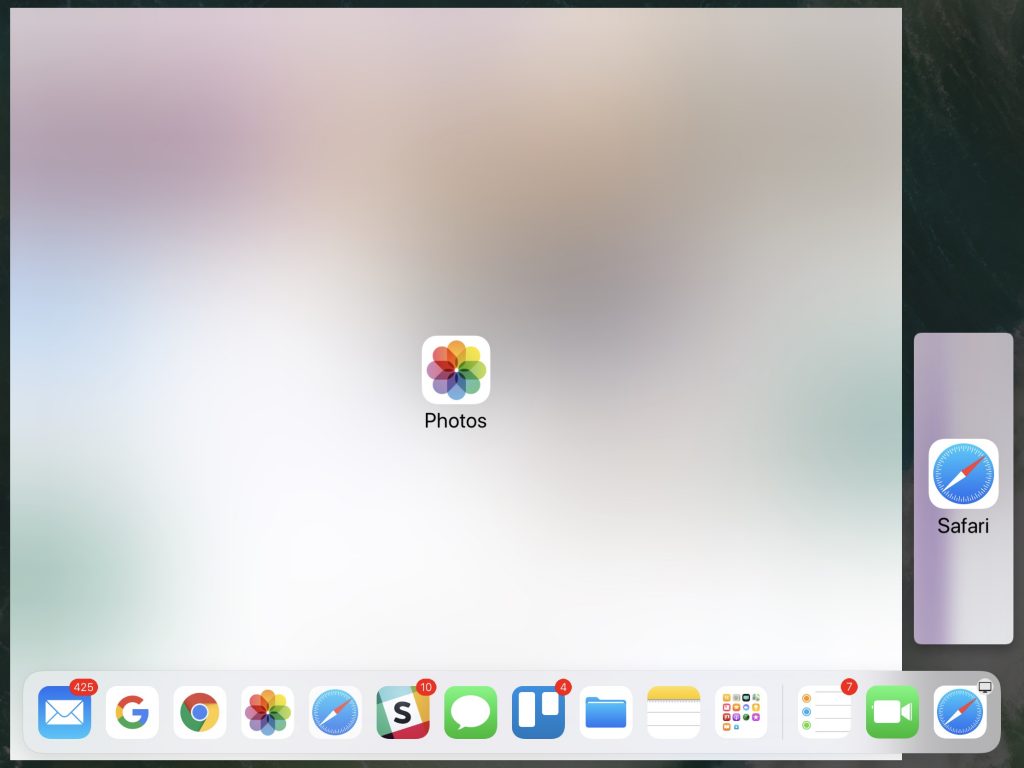
If the app you want to put in Slide Over isn’t on your Dock, you can use a two-handed procedure to get it from another location and drop it onto another app. For instance, you can start dragging an app icon from any place where app icons appear, including the Home screen or Siri search screen. Once you’ve started dragging it, use your other hand to switch to the other app (perhaps via the Dock or pressing Command-Tab on an external keyboard) and then drop it over the other app. Don’t worry if you find this approach confusing at first—it takes some time to become accustomed to two-handed usage.
Once an app is in Slide Over on the right side of the screen, you can swipe right on its left edge to hide it, or swipe left on its right edge to move it to the other side of the screen.
Put an App in Split View
Displaying two apps side-by-side in Split View is almost the same action as Slide Over. The only difference is that, instead of dropping the app lozenge on top of the current app, you drag it to the far left or right of the screen, and drop it once the screen shows a 90/10 split—after you drop, the split changes to 70/30.
Drag the handle between the apps to switch to a 50/50 split or a 30/70 split; if you drag the handle all the way to one side of the screen, the app that’s shrinking in size disappears entirely. One of the two apps in Split View will have a handle on its top as well, and dragging it down slightly converts that app into a Slide Over panel. (You can also drag a Slide Over panel’s handle down slightly to switch to Split View.)
Take a few minutes and try putting apps in Slide Over and Split View in different ways, since some of the actions require practice before they feel natural. Finally, if combining two particular apps doesn’t seem to work, don’t fret. Apps must specifically support both Slide Over and Split View, and not all do.
Twitter: Read this article to learn how to use multiple apps at the same time on an iPad running iOS 11.
Facebook: Want to run multiple apps at the same time on your iPad? Here’s what you need to know.
Making the Switch: Strategies for Switching from Windows PC to Mac
It’s a question that most modern professionals have pondered at one point: which is better, PC or Mac? There’s no clear-cut answer. However, while Windows PC has long been the popular choice among business owners, there is a significant pattern emerging. More and more companies are choosing to make the switch from Microsoft to Apple.
If you’re one of these companies, or if you’ve ever considered making the switch from PC to Mac, you probably have some questions and concerns about making the switch as seamless as possible. Check out the info below to get the inside scoop on streamlining your switch from PC to Mac.
Understanding the Mac Difference: What Draws Windows Users to Make the Switch?
There’s no point in waging a war between PC and Mac – people have preferences and some prefer to stick with what they know. However, there are some key benefits that a switch to Mac offers – especially for business owners. While the increased price tag often leaves business owners wary, there really are concrete reasons to support Mac investments. We’ll get into some of the leading security and functionality benefits later, but for now, let’s break down the basic benefits of switching to Mac.
Ease of Use
First and foremost, Mac users agree: the machines are easy to use and highly intuitive. Mac users rave about the usefulness of Mac keyboard shortcuts and the overall efficiency of the Mac interface and operating system. Safe to say, most business owners would agree: what’s better than a new device that’s easy to use?
Quality & Value
While Mac devices generally look sleeker and nicer than their Windows counterparts, Mac benefits aren’t limited to their good looks. Mac devices are built with high-end materials, they last for years longer than PC’s and they hold their value incredibly well. This means that while PC’s might be cheaper, you’ll spend a lot less on replacements and repairs in the long run with Apple.
Modernity & Connection
Another great thing about switching to Mac is saying goodbye to annoying and time-consuming driver updates. Mac’s updates are designed to be quick, easy and automatic – leaving professionals more time to work on core business tasks. Even better? As iPhones quickly become the dominating personal devices for modern professionals, switching to Mac makes the syncing of critical info more accessible.
Re-Examining Security: Security Considerations when Switching to Mac
Okay, let’s get to the really good stuff. For business owners in a modern business world, IT security is the leading technology priority. Business leaders want to know that no matter what tech tools their using, their company data is secure and protected from invasion. Many modern PC users might have their heart committed to Windows Defender, however, there are a variety of intuitive and built-in security tools that make the switch to Mac worth it.
Here are a few key security highlights that Mac machines offer:
- The great thing about Mac is that it offers countless security features directly built-in to its Unix-based operating system. In addition to this built-in threat management and detection features, Apple prides itself on implementing its own security protocols, meaning Mac’s have a reputation for being more secure than their Windows counterparts.
- Specifically, Mac programs like Gatekeeper use automatic controls to block any programs that have not been digitally approved by Apple. This means that no unauthorized programs can be run on a Mac without explicit approval from machine administrators.
- While many Mac users don’t use any external anti-virus programs, the most prudent of business professionals prefer to have an additional line of defense. Luckily, there are a variety of anti-virus programs designed to work optimally with Mac. You can check out the leading options
Operating a Mac: Functionality Considerations for Former Windows Users
Perhaps the most important consideration when making the switch from PC to Mac is making sure you know how to use your new machine. Without knowing the ins and outs of how Mac’s function – as compared to PC’s – business hours can be eaten up while employees try to figure out the lay of the land.
Here are some key functionality concerns to help new Mac users post-switch:
My system freezes or crashes – what do I do?
For life-long PC users, Ctrl-Alt-Delete is the go-to rescue command when a PC would freeze or an application would stall. New Mac users often get panicked when they realize their Mac keyboard doesn’t have the same function. However, you need not worry that your Mac is dead in the water when the system freezes.
In fact, many Mac users claim that crashes on Apple machines are so uncommon that a Ctrl-Alt-Delete function isn’t even necessary. However, in true Apple fashion, there is a command in place to force-quit crashed or frozen applications. Simply hit Command-Alt-Esc to reboot the app or your machine and get business moving again.
How in the world do I ‘right-click’ on a Mac?
So, you set up a bunch of brand new Mac’s for your team and all of a sudden you’re getting constant questions about the mousepad. On Mac laptops, the mousepad is a giant square with no separations to designate left and right click buttons.
However, there are, of course, a variety of ways for users to ‘right-click’ on a Mac. Users can hold down CTRL while clicking or they can add a ‘secondary click function’ by navigating System Preferences and selecting Trackpad. However, it should be noted that most modern Mac’s can deploy a right-click simply by clicking the bottom-right corner of the Trackpad.
How can I easily transfer my PC data to my new Mac machine?
Once the switch has been made, a huge challenge for business teams is ensuring that all previous PC data is successfully transferred to the new network of Mac’s.
If a company’s old PC’s are equipped with the Windows Vista Service Pack 2 or any later version of Windows, the file transfer process is very simple. Users simply have to download the iCloud application to the Windows Control Panel.
Then, it’s as simple as logging into the iCloud on the control panel using the new Apple ID associated with a Mac machine. Then, you’ll be able to easily sync all your PC files using the iCloud app and they’ll be automatically accessible on the new Mac. For Windows users who were operating on older versions of Window’s can still transfer files, but will need to use a third-party, cloud-based file sharing solution like Google Drive.
I like the Windows OS – is there any way I can use Windows 10 on my Mac?
For some tech users, coming to understand an entirely new operating system is especially challenging. A brand-new Mac will be no use to a veteran Windows user who can’t get a handle on the new OS.
In these cases, it is, in fact, possible to run Windows 10 on a new Mac. In fact, many experts claim that running Windows operating systems on Mac machines offers a much more stable operational experience. To run Windows on a Mac, however, businesses will need access to a virtual machine like those explained here.
Application Management: Navigating Business Apps After Switching from PC to Mac
Professionals rely on a variety of business applications to draft documents, connect with clients and colleagues and manage productivity. For most, the widespread application base is the Microsoft Office suite which includes Word, Excel, PowerPoint, Outlook etc. Luckily, for Office fans, Mac is equipped to support Office 365 subscriptions. Even better? The Mac-based Office apps function nearly identically to the Windows counterparts.
For most, sticking with what you know is the smartest option. However, for those looking to make a complete departure from Microsoft, there Apple offers its own collection of applications, called iWork. Check out some of the leading Mac apps below:
Pages
Pages is Apple’s equivalent to Word and it offers a variety of the same easy-to-use documentation features. The app also includes a variety of dynamic and eye-catching templates that help business drafts stand out.
Numbers
Numbers is Apple’s answer to Excel. Spreadsheets are a critical resource for business operations in any industry. Numbers tries to improve on the mundane Excel format by including colorful tabs and easy to understand features, making it a much less intimidating interface to use.
Keynote
Almost everyone who has worked in a professional setting has created or watched a PowerPoint presentation. Apple’s equivalent is called Keynote and helps users create appealing and professional presentations, with easy-to-use themes and dynamic transitions between slides.
Mail is the adequately named answer to Microsoft’s Outlook mail. The built-in mail app is straightforward, easy-to-use and sits readily available on the machine’s desktop.
There are also huge benefits to taking advantage of Apple’s dynamic and optimized photo and video-editing apps in more creative industries. Add the ability to collaborate with others, using cross-platform compatibility, and iWork becomes serious competition for Microsoft Office in the pursuit of creating a productivity powerhouse for businesses.
If you’ve decided to make the switch from Windows to Mac, that’s great! Keep the above considerations in mind and you should have nothing but smooth sailing. No matter what your reasons are for switching, Mac devices and operating systems bring a variety of benefits for the most dynamic and busy business professionals.
CreativeTechs has been helping professionals optimize Mac solutions for years. Their team has dynamic experience using and streamlining Mac technology to help businesses drive productivity and growth. If you’re considering making the switch from Windows to Mac or if you already have and need a hand with optimization, reach out to the Creative Techs team anytime at (206) 682-4315.
New Ways That High Sierra Protects Your Privacy and Security
Explore 7 Ways That macOS High Sierra Helps You Protect Your Privacy and Security
If you’re an Apple user, you have a lot of things to look forward to in the 13th release of the macOS operating system. Some highlights include new features, improvements to existing features, and a few updates that will pave the way for future releases. At the same time, device and internet security have become a growing concern with all internet and device users. It’s a good idea to learn more about High Sierra security and privacy features, so you know what to expect and what to be careful of.
What Privacy and Security Features Does High Sierra Include?
The October 5 Password Patch
It’s worth mentioning that two security vulnerabilities with High Sierra made the news by the first day of its release on September 25. These had to do with password hints and actual passwords stored in the keychain. You can now upload a patch to fix these issues from Apple. Apple released the patch on October 5.
Security analysts who had a chance to test the new operating system before it was released said they had notified the company about issues before release, so it is somewhat surprising that the company took several days to release this patch. Prior to that, the company said that users who only downloaded apps from the Apple Store could protect themselves from these issues, but some security analysts weren’t so sure. In any case, if you have already updated, you should certainly consider installing the patch.
High Sierra’s Built-In Privacy and Security
Besides the patches for these zero-day vulnerabilities, High Sierra also came bundled with plenty of new and updated privacy and security features on its own.
File System
Apple’s update to their new file system deserves the first mention. Called APFS, or the Apple File System, it now relies on flash technology. You should enjoy both better performance and improved security.
Improved security and protection features include:
- Improved encryption capabilities
- Crash protection
- Easier backups
Since the upgrade may totally change the way that your device stores all of its data, it’s a good idea to ensure that you have backed up your system before you start installing High Sierra.
Browser Tracking Protection
You probably already know that advertisers try to track your actions as you use your internet browser. They usually don’t have malicious intentions. They simply want to gather data that helps them target advertising better. At the same time, lots of Apple users would prefer to protect their privacy from this type of tracking software. The Safari web browser now includes intelligent anti-tracking features that are supposed to be as smart as the advertiser’s trackers.
Advanced Secure Internet Connections
When you visited secure sites, like your bank, you probably noticed that you had an https:// connection and not a https:// connection. Besides financial institutions, you might have also noticed this on many emails, downloads, or membership sites. This is an example of improved security through a TLS connection. This is important, but this kind of security relied upon SHA-1 certificates in the past. These old-style certificates are no longer secure enough to perform as intended.
Currently, Apple wants all developers to move to SHA-256. certification, which uses much more advanced encryption to protect privacy and security. This latest update actually applies quite a bit of pressure to get developers to change. Before High Sierra, your Apple device would offer you a warning that the connection wasn’t truly private and secure. Now, High Sierra will simply block your connection. Before you upgrade, you may want to check any secure connections that you rely upon to make sure they will still work.
Weekly Firmware Validation
Once a week, High Sierra will automatically run a firmware check to validate your hardware against any installed firmware on your device. According to Intego, most users should never see a warning from this check. A warning could mean that your device has been maliciously tampered with, but it might just mean that you purposefully installed a hack to allow you to run this new operating system upon an unsupported computer. If the weekly firmware validation does trip a warning, you will have the option to ignore it or to send a report to Apple for further investigation.
Kernel Extension Approvals
Some software will add kernel extensions that add certain functions to the operating system. For instance, antivirus programs may do this legitimately in order to work. Still, developers of malicious software may also add kernel extensions in order to cause mischief, so you should always know when it happens.
In any case, High Sierra will offer you a warning the very first time that any software tries to install a kernel extension. If the extension was already loaded before you installed High Sierra or you have previously approved the extension with High Sierra, you won’t get a warning. Some hackers have become clever at masking their work to look like legitimate software, so this system isn’t foolproof.
Mostly, High Sierra Offers Better Security and Privacy
This overview of new privacy and security features nitpicked a bit. It’s important to understand how your device protects you and how that protection may be limited. Mostly, you should enjoy better security and privacy with High Sierra than you have with your past macOS operating system versions.
New OS 10.13 High Sierra Drops Office for Mac 2011 Support
Mac users of Microsoft Office 2011 may be in for a nasty shock after upgrading to High Sierra, as Microsoft has announced that it’s no longer supported. Even Office 2016 users may encounter difficulties.
It may be no surprise that when you Google “MS Office for Mac”, that the majority of the results returned are alternatives to the popular office productivity software. The Mac to MS Office relationship has been rocky at best, which started decades ago with the competitive relationship between Steve Jobs and Bill Gates in the 1970s. While the early years may have been all about how Microsoft could support Apple’s vision, the current reality is quite different. While Apple now has the power to encourage users to move in different directions for their office productivity software, the prevalence of Microsoft Office and Excel dictates that many Mac users still require access to a version of the platforms for their OS. This makes it particularly challenging when Microsoft decides to deprecate support for a particular version, as they are with Office 2011 for Mac for users who update to the new Mac OS 10.13, codenamed High Sierra.
Preparing Your Mac for an OS Upgrade
The recently-released High Sierra OS has been in beta testing for several months now, giving users plenty of time to preview the new functionality. The majority of Macs that are newer than 2010 are fully compatible with the new OS, making the free upgrade very attractive to users. However, there are still a few steps you’ll want to take before you make the jump, including:
- Upgrade your apps to ensure compatibility with the new OS
- Check your available space, as you will need several GB’s of free space for the download
- Create a clean backup of your entire system “just in case”
If you’re already test-driving a beta version of High Sierra in a partition or otherwise, downloading the update is a snap. If there are files behind your partition, you’ll want to transition those back to your core before removing the partition, too. Many users prefer to run a clean version of a new operating system and install from scratch, while others simply run the upgrade and hope for the best. The popularity of cloud-based software and storage solutions makes this decision easier than ever — a clean install clears out any lingering after effects from previous software.
Staying Supported
If you’ve purchased a perpetual license version of Microsoft Office for Mac in the past, it may be time for an upgrade. While these perpetual licenses are technically yours to use “forever”, there is a functional lifespan for each release. With the Microsoft team dropping support for Office 2011, you do have several options for office productivity software such as upgrading to Office 365, moving to a new perpetual license version of Office 2016 or migrating to a new productivity platform completely. Making a shift can be a jarring transition, as users get used to keyboard shortcuts and the ability to collaborate with other Office users. Not only is Microsoft ending support for Office 2011 for Mac, the new macOS High Sierra will not support 32-bit apps like Office 2011 “without compromises”, as their developers say. Taken together, these two facts mean it could be nearly impossible to run High Sierra with Office 2011 without significant problems — if it works at all. While neither set of developers are saying that Office 2011 for Mac and High Sierra are completely incompatible, they are stating that users are on their own and completely unsupported if they choose to go in this direction.
Available Options
While perhaps the simplest option for Office for Mac aficionados is to delay upgrading their OS to High Sierra, this is a short-term solution at best. Anytime you avoid updates you’re opening your systems up to the potential for security vulnerabilities such as malware and ransomware. If you do wish to continue using both your Mac and Microsoft Office, the upgrade options are relatively straightforward. You can purchase a single-Mac perpetual license of Office 2016 for Mac for a reasonable one-time price, which will get you back up and running. However, there are challenges with this setup as well, as the upcoming Office 2019 will be rolling out new functionality and will require you to make an upgrade again in less than 18 months. Alternatively, you could begin a subscription with Office 365, which provides you with expanded access to productivity tools and even covers a tablet, phone and other devices for each individual subscription. The low monthly rate for the cloud-based software may be attractive for many users and businesses. Finally, you could take a different route entirely and decide to transfer to Apple’s iWork suite, Google Docs or Office Online — the completely free (but feature light) version of the most popular Office platforms.
Determining which version is right for your business needs can be challenging, so let the professionals at {company} work with your team to define the right solution. Contact us today at {phone} or via email to {email} for your free initial consultation.
iTunes 12.7 Can’t Download or Manage iOS Apps Anymore
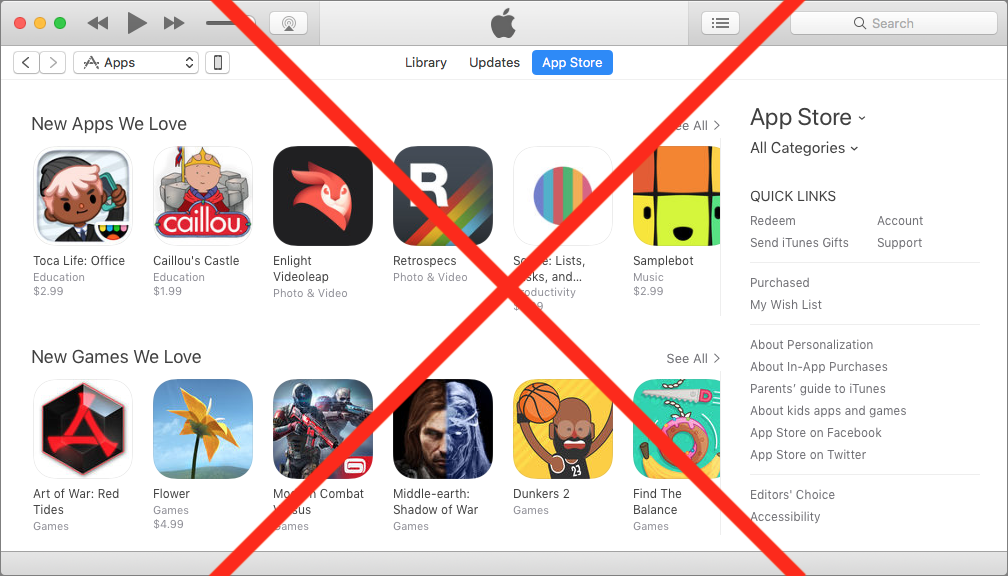
The writing is on the wall: Apple doesn’t want us downloading or managing iOS apps on our Macs anymore. Most of the changes in iTunes 12.7 revolve around features Apple removed, including ringtone management and iTunes U. But the kicker is the removal of the iOS App Store and support for app syncing. This means you won’t be able to click a link on a Web site on your Mac to download an iOS app to iTunes, nor will you be able to use iTunes to choose which apps are on your iOS device. You can’t even customize Home screen layouts from within iTunes. All those tasks must now be done on your iOS device. You can still back up your iOS devices to iTunes—but if you have to restore, your apps will be downloaded from the App Store. Sorry!
The New Two-Swipe Shortcut for the Camera in iOS 11
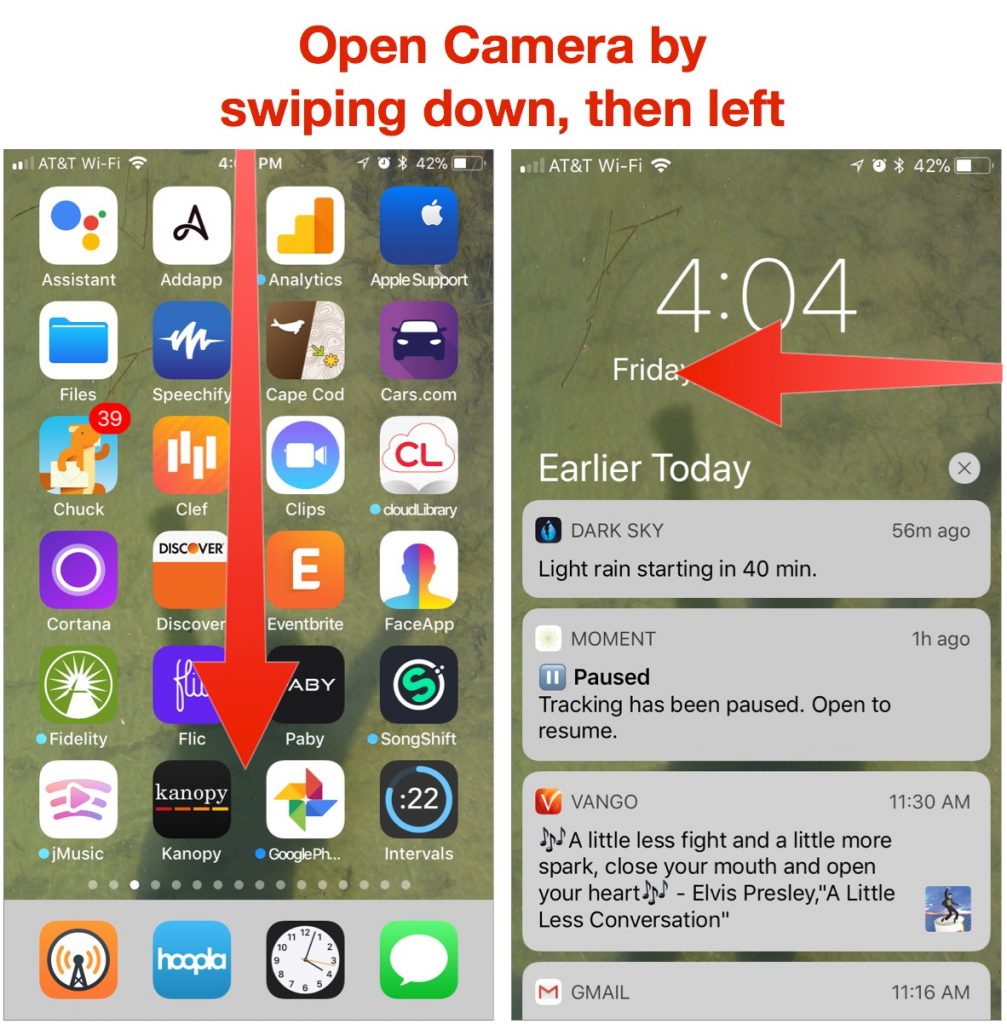
When you want to capture that perfect action shot or incriminating video, it’s a mad rush to open the Camera app as quickly as possible. That’s why Apple lets you get to the camera in multiple ways: by swiping left on the Lock screen, using the Camera button in Control Center, and tapping the Camera icon on the Home screen. iOS 11 adds another shortcut that could be useful: from within any app, swipe down from above the top of the screen to display the Lock screen, and then swipe left to get to the camera.