With last year’s macOS 10.13 High Sierra, Apple made no sweeping changes, instead focusing on refinements and bug fixes. In keeping with the company’s alternating cycle of releases, this year’s macOS 10.14 Mojave boasts plenty of new features.
Dark Mode and Dynamic Desktop
In a major visual change, Mojave features a new Dark mode that reverses the standard black-on-white look with light gray text on a dark background throughout the interface—change it in System Preferences > General. If your eyes find white window backgrounds too bright, Dark mode will be a boon. Or, if the current bright approach doesn’t bother you, Dark mode may seem muddy and hard to read because of its reduced contrast.
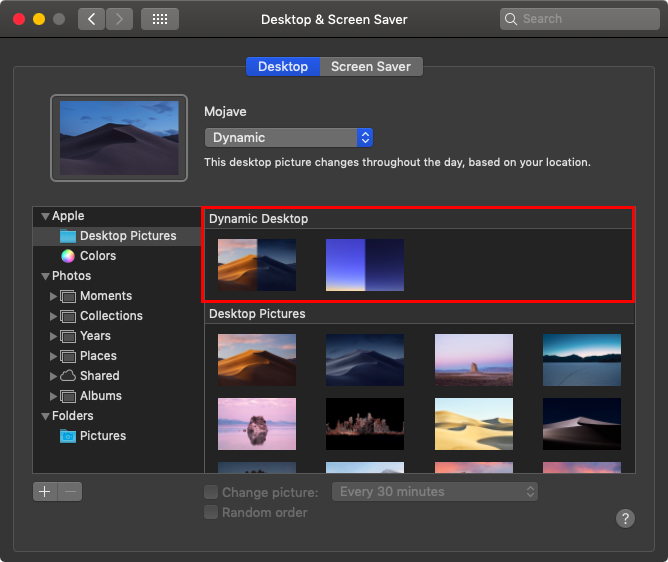
Dark mode may be useful, but Dynamic Desktop is just eye candy. Select either Mojave or Solar Gradients in System Preferences > Desktop & Screen Saver > Desktop, and your wallpaper will change throughout the day.
Finder Stacks and Groups
Turning to more practical changes, Mojave’s Finder boasts a few new features to help you better navigate a cluttered Desktop and overflowing folders. Control-click the Desktop and choose Use Stacks, and the Finder will combine all the related icons on your Desktop into stacks. It collects them by kind by default, but you can instead have it group them by various dates or even by tags. Click a stack to see what’s inside.

Groups are like Stacks, but within a Finder window. With a Finder window open, choose View > Use Groups, and note that you can use the View > Group By submenu to change the grouping from kind to application, date, size, and tag.

Quick Actions in the Finder and Quick Look
The Finder’s new tricks go even further, with Quick Actions. Controlled in System Preferences > Extensions > Finder, these quick actions let you rotate or mark up a document within the Finder’s preview pane or a Quick Look window (select a file and press the Space bar). Other quick actions let you create PDFs and trim video.
Most useful of these is the Markup quick action, which gives you most of Preview’s editing tools—cropping, annotating, and more—right in a Finder or Quick Look window.

Still and Video Screen Captures, with Editing
Markup also features prominently in Mojave’s new screen capture interface. You’ve long been able to press Command-Shift-3 for a screenshot of the entire screen and Command-Shift-4 for a portion of the screen. Now, press Command-Shift-5 for an interface to those capabilities, plus video screen recording, which was also possible before with QuickTime Player.

These capabilities may not be new, but they’re a lot easier to use in Mojave, and there are a few new options, such as being able to keep the same size selection across multiple screen captures and include the pointer in screenshots.
Continuity Camera with iPhone
 Have you ever wanted to insert a photo or scanned page into an email message or document? Mojave makes this easier with Continuity Camera, a feature that lets you use your iPhone within a Mac app. In Mail, for instance, start a new message, and then choose File > Insert from iPhone > Take Photo/Scan Documents. Either way, your iPhone immediately switches to the appropriate photo or scanning mode, and the resulting photo or scan lands in your message.
iOS Apps: News, Stocks, Voice Memos, Home
Apple has been emphatic that it is not planning to retire macOS in favor of iOS. However, the company does want to make it easier for developers to write apps that run in both operating systems. As the first phase of that strategy, Apple has ported four iOS apps to the Mac: News, Stocks, Voice Memos, and Home.

They look a little different from their iOS cousins, as they should, but they work similarly, and you can sync their settings and data between your devices via iCloud (look in System Preferences > iCloud on the Mac and in Settings > Your Name > iCloud in iOS).
There are a variety of other small changes throughout Mojave and in Apple’s standard apps, and we’ll share more of those in future posts, so stay tuned!
Social Media: There’s a lot going on in macOS 10.14 Mojave, so read on to learn about Dark mode, Dynamic Desktop, Stacks, Groups, Quick Actions, and even four apps that Apple brought over from iOS.


 In the “it’s about time” department, iOS 12 beefs up Do Not Disturb so it works more the way people do. When you bring up Control Center and force-touch the Do Not Disturb button, it expands to let you turn on Do Not Disturb for 1 hour, for the rest of the day, or until you leave your current location. The beauty of these new options is that they disable Do Not Disturb automatically so you don’t have to remember—and potentially miss important notifications. Plus, a new Bedtime option in Settings > Do Not Disturb dims the display and silences overnight notifications until you unlock your device in the morning.


 When you register your fingerprints with Touch ID or train Face ID to recognize your face, it’s reasonable to worry about that information being stored where attackers—or some government agency—could access it and use it for nefarious purposes. Apple was concerned about that too, so these systems don’t store images of your fingerprints or face, but instead mathematical signatures based on them. Those signatures are kept only locally, in the Secure Enclave security coprocessor that’s part of the CPU of the iPhone and iPad—and on Touch ID-equipped laptops—in such a way that the images can’t be reverse engineered from the signatures.
 People with medical conditions can be concerned about health information impacting health insurance bills or a potential employer’s hiring decision. To assuage that worry, Apple lets you choose what information ends up in Health app, and once it’s there, encrypts it whenever your iPhone is locked. Plus, any Health data that’s backed up to iCloud is encrypted both in transit and when it’s stored on Apple’s servers.
 A linchpin in Apple’s approach to privacy is its control over the App Store. Since developers must submit apps to Apple for approval, Apple can enforce stringent guidelines that specify how apps can ask for access to your data (location, photos, contacts, etc.). This isn’t a blanket protection—for instance, if you allow a social media app <cough>Facebook<cough> to access your contacts and location, the company behind that app will get lots of data on your whereabouts and can even cross-reference that with the locations of everyone in your contact list who also uses the service.