Before iOS 12, you’d tap the camera button in a Messages chat in order to share either a brand-new photo or a photo that had already been taken. In iOS 12, Apple changed things so tapping the camera button only lets you take a fresh photo. To find and send a photo that’s already in Photos, use the Photos mini-app in Messages. If necessary, tap the Apps button to the left of the message field to show the Messages apps, and then tap the Photos button to see a list of recent photos. Tap one or more to add them to the message, and you’re ready to send!
Did You Know iOS 12 Lets You Add a Second Person to Face ID?
Touch ID lets users register up to five fingers that can unlock an iPhone, which has long been a boon for those who share access to their iPhone with trusted family members. However, users of the iPhone X haven’t been able to give a second person Face ID-based access, forcing those people to wait for Face ID to fail and then tap in a passcode manually. iOS 12 lifts that limitation, allowing a second person to register their face with Face ID on the iPhone X and the new iPhone XR, XS, and XS Max. To set this up, go to Settings > Face ID & Passcode. Enter your passcode and tap Set Up an Alternate Appearance. Then give your iPhone to the person who should have access and have them follow the simple setup directions.
The Secret Keyboard Shortcut for Comparing Before/After Edits in Photos on the Mac
Photos on the Mac provides so many editing tools that it’s easy to lose track of how an edited image compares to the original. You can always use the Revert to Original command and then undo it, but that’s fussy. Instead, Photos provides a Show Original button in the upper-left corner, between the window controls and the Revert to Original button. Click and hold it to see your original image; let up to see the edited version again. Even easier, press the M key on your keyboard. The only thing either of those techniques won’t do is show the effect of cropping; to see the uncropped original, press Control-M. And if you just want to see how a particular set of adjustment controls affected the image, click its blue checkmark
to turn it off and back on.
Apple Moved Control Center in iOS 12 on the iPad—Here’s Where to Find It
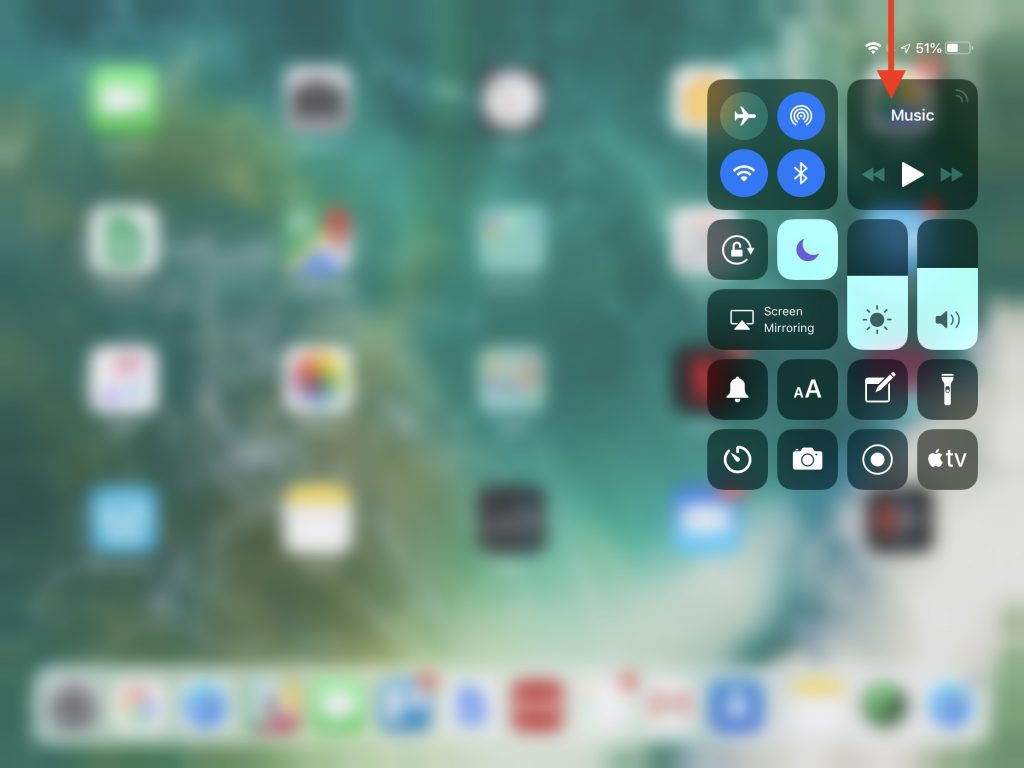
Although most of what’s new in iOS 12 are new features, one change for change’s sake may throw you. In iOS 11 on an iPad, you would bring up Control Center by swiping up from the bottom of the screen, just like on all iPhones other than the iPhone X. With iOS 12, however, Apple brought the iPad in line with the iPhone X and the recently released iPhone XR, XS, and XS Max. Swiping up from the bottom of the screen on the iPad now reveals the Dock, and if you continue swiping, the App Switcher. But no Control Center! To bring up Control Center, swipe down from the upper-right corner of the screen—use the Wi-Fi and battery icons as a reminder.
Make Safari Tabs Easier to Identify by Adding Icons
Do you end up with so many tabs in Safari that it becomes impossible to read the truncated tab titles? There’s no shame in that, and Safari 12—which comes with macOS 10.14 Mojave and is a free update for 10.12 Sierra and 10.13 High Sierra—now offers an option to add an icon representing the Web site to each open tab. Called a favicon, this tiny image is usually carefully designed to identify its site and makes it easier to pick out the tab. To enable the feature, open Safari > Preferences > Tabs and select “Show website icons in tabs.” Unlike other Web browsers, Safari never shrinks a regular tab to just the icon, so you’ll always see the icon and some text.
Finally! iOS 12 Lets You Use Google Maps or Waze in CarPlay
Before iOS 12, Apple Maps was the only mapping app you could run on the dashboard in a CarPlay-equipped automobile. But Maps doesn’t always work well, and some people prefer directions from Google Maps or the Google-owned Waze. Once you upgrade your iPhone to iOS 12 and update to the latest version of Google Maps or Waze for iOS, you’ll be able to use those apps on your CarPlay screen. Happy navigating!
Make More Space for Documents by Putting Your Dock on the Side of Your Mac’s Screen
By default, Apple locates the Dock at the bottom of the Mac’s screen. If that location interferes with you seeing as much of your document windows as you’d like, you can set it to appear only when you move the pointer to the bottom edge of the screen. But there’s a better way: put the Dock on the side of the screen where there’s plenty of horizontal room and it won’t get in the way of most document windows. Open System Preferences > Dock, and select Right or Left from the Position on Screen radio buttons.
The post Make More Space for Documents by Putting Your Dock on the Side of Your Mac’s Screen appeared first on TidBITS Content Network.
Remember That You Can Search for Nearly Anything in Your Photos Library
Apple’s Photos app on the Mac can identify thousands of different objects in your photos, so it’s easy to find photos based on their content. You can find objects (cars and trains), scenery (beaches and forests), and even some events (weddings and parades). This is both big fun and useful for those times when you can’t remember when you took a photo, but do remember what’s in it, like a cat, camera, or carousel. To carry out a search like this, type the search term into the Search field on the right side of the Photos toolbar. From the list that appears, choose the Category result. In macOS 10.13 High Sierra’s version of Photos, you can filter your results from the Showing menu at the upper right of the window. The feature isn’t perfect, so you may see some odd results or miss some photos, but it’s way faster than browsing manually!
Here’s How to Load the Desktop Version of a Web Site on an iPhone or iPad
Some Web sites have separate desktop and mobile versions, each theoretically providing the best browsing experience for its platform. Unfortunately, mobile Web sites sometimes leave out necessary features or hide content. That’s especially annoying if you’re browsing on an iPad, where the desktop site would work fine. If you run across such a site while browsing in Safari on the iPhone or iPad, you can ask for its desktop version. Press and hold the Reload button at the right side of the address bar, and then tap Request Desktop Site. If the site allows such a request, as do Wikipedia and the New York Times, the desktop version loads (to read the small text, you may need to pinch out to zoom the page).
A Hidden Trick that Lets You Navigate Your iPhone with One Hand
Unless you can palm a basketball, you may not be able to use an iPhone single-handed. But sometimes one hand is all you can spare. If you find yourself in such a situation, give Reachability a try. On a Touch ID–based iPhone, tap (don’t press) the Home button twice to slide the iPhone’s interface halfway down the physical screen, bringing everything into reach of your thumb. On the Face ID–equipped iPhone X, put your thumb in the bottom of the screen—about at the top edge of the Dock if you were on the Home screen—and swipe down. You can use apps normally for a tap or two, and then they’ll expand back to the full screen to show the full interface. If Reachability is off (or if you want to turn it off), go to Settings > General > Accessibility.