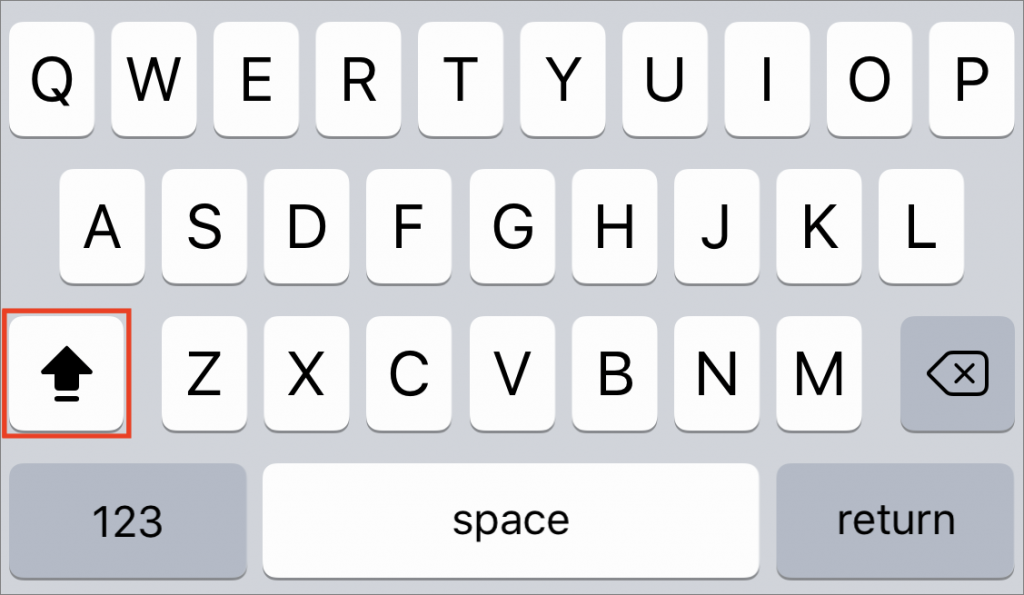
The Caps Lock key on Mac keyboards often feels extraneous, since it’s easy enough to hold the Shift key while typing multiple capital letters for acronyms like HIPPA or when you want to shout GET OFF MY LAWN! But if you need to do that on an iPhone or iPad, it’s annoying to keep tapping the Shift key to switch to the uppercase keyboard for each letter. Luckily, Apple has baked a time-saving trick into its onscreen keyboard. Tap the Shift key twice in a row to lock it on, type the letters you need, and tap it again to unlock it. Notice that when Shift is locked on, a horizontal line appears beneath the arrow on the Shift key.
iOS 12 Supports Password Managers for Faster Password Filling
For security reasons, we always recommend that you use a password manager like 1Password or LastPass to generate, store, and enter strong passwords in your Web browser. We hope you’ve been doing that because iOS 12 has a fabulous new feature that lets you enter passwords from third-party password managers in addition to iCloud Keychain. It makes logging in to Web sites—and iOS apps!—vastly easier than before.
Set Up AutoFill
To begin, you need to enable the feature. Go to Settings > Passwords & Accounts > AutoFill Passwords. Tap the AutoFill Passwords switch to turn the feature on, and select your password manager in the list below.
Two notes. First, the iOS app for your password manager must be installed for it to appear in the list. Second, although you can also allow iCloud Keychain to fill passwords, it’s not worth the extra confusion unless you have a lot of passwords stored only in iCloud Keychain.
Log In to a Web Site in Safari
Now it’s time to try the feature. Navigate to a Web site where you need to log in, and for which your password manager has stored your credentials. Then follow these steps:
- Tap in the username or password field.
- iOS 12 consults your password manager, and if it finds a username/password pair that matches the domain of the site, it displays the username for the site in a blue button or in the QuickType bar above the keyboard. Tap it, and unlock the password manager using your password, Touch ID, or Face ID. iOS fills in your credentials.
- Tap to continue the login process.
If you have multiple accounts for the same site, you may see several of them in the QuickType bar, but if the one you want doesn’t appear, or if none appear, tap the key icon to see all available passwords. If none are right even still, tap the name of your password manager at the bottom of the list to open and search it manually.
Log In to an App
The process of logging in to an app is often similar to logging in to a Web site, as with the Dropbox and Netflix apps, but iOS 12 doesn’t know how to match every app with an associated account in your password manager. For an app that iOS 12 can’t identify, like the Pixabay app, follow these steps instead:
- Tap in the username or password field.
- In the QuickType bar, tap the key icon to open your password manager.
- If necessary, unlock it with your password, Touch ID, or Face ID.
- Search in the password manager for the associated account.
- Tap the account to autofill it in the app’s login fields.
Password Manager Limitations
As welcome as iOS 12’s new support for password managers is, it’s lacking in two important ways:
- The autofill integration is limited to usernames and passwords, so if a site requires an additional field for login, you’ll have to enter that information manually. Similarly, it won’t enter credit card numbers or other information the password manager can autofill when used on a Mac.
- The password manager can’t automatically create new accounts or generate new passwords, as all password managers can do on the Mac. You can do both manually, but the process is so clumsy that it may be easier to wait and do it on a Mac later, or use an easily typed password temporarily until you can change it to something stronger on your Mac later.
Despite these annoyances, iOS 12’s support for third-party password managers is a huge step forward for anyone who wants quick access to the same login credentials on an iPhone or iPad.
Social Media: For those who rely on a password manager like 1Password or LastPass, iOS 12’s new support for third-party password managers makes it easier to log in to Web sites in Safari and iOS apps. Here’s how:
Here’s How to Make Screenshots and Screen Recordings with Mojave’s New Interface
You probably fall into one of two camps: people who haven’t the foggiest idea what pressing Command-Shift-3 or Command-Shift-4 do on the Mac, and those who use those keyboard shortcuts regularly to take screenshots. Either way, macOS 10.14 Mojave makes it easier than ever to create a still image of what’s on your Mac’s screen and to record a video of actions you take on the screen. (And don’t worry, the old shortcuts still work just as they always have.)
For those who aren’t screenshot takers, why would you want to? The big reason is to share something you’re looking at, perhaps to send a friend a map to where in a park you want to meet or to tell tech support about the error dialog you keep getting. And a screen recording is a great way to show an employee how to perform a task without having to write it all up.
To start with Mojave’s new tools, press Command-Shift-5 and look at the controls that appear in a floating control bar. (If you open it accidentally, click the X button or press Escape to close it.)
Screenshots
The first three buttons help you take screenshots, with a few welcome enhancements over the Mac’s longstanding screenshot capabilities. The resulting screenshot will always be in PNG format.
- Capture Entire Screen: Click the first button and then click anywhere to make a screenshot of the entire screen. If you have a second monitor attached to your Mac, you can click anywhere on that screen to capture it instead.
- Capture Selected Window: To focus on a particular window, click the second button and then click the camera pointer on the desired window. This also works with dialogs and menus; make sure they’re visible before invoking the screenshot controls. A tip: press the Option key when clicking the camera pointer to capture the object without its drop shadow.
- Capture Selected Portion: What if neither of those is quite right? Click the third button, drag out, position, and resize the selection rectangle over the spot you want, and click Capture on the control bar. Note how the rectangle shows the dimensions of the image it will create as you resize—that can be useful.
There’s also an Options menu on the control bar. Click it to choose which folder or app should receive the screenshot and if you need a 5- or 10-second timer to get the screen looking right first. You can also choose to show a floating thumbnail of the screenshot in the lower-right corner of the screen for quick markup or trashing, remember the size and location of the selection rectangle, and show the pointer in the screenshot.
Screen Recordings
The fourth and fifth buttons are for creating screen recordings, and they’re similar to the screen capture choices. When you select one of them, the contents of the Options menu change, and the Capture button changes to Record. The movie will always be a QuickTime movie using the H.264 codec.
- Record Entire Screen: Click the fourth button and then Record to start recording actions on the entire screen.
- Record Selected Portion: The problem with recording the entire screen is that the resulting file can get big. To focus on a small area of the screen, click the fifth button. Then drag out, position, and resize the rectangle in which the recording will take place, and finally, click Record.
However you start a recording, you can stop it in one of two ways. A stop button always appears on the menu bar; click it to finish and save the recording. On a smaller laptop screen, it’s possible for the menu bar button to be obscured, so here’s an alternative method: press Command-Shift-5 again, and the recording controls are replaced by a stop button.
You can record yourself speaking while you make a movie of what’s happening on the screen. To do that, open the Options menu and choose Built-in Microphone. Another special movie recording option is Show Mouse Clicks, which puts a dark circle around the pointer in the recording whenever you click.
That’s it! Mojave’s new screenshot and screen recording controls offer more options and are easier to use than the previous techniques, as long as you remember the Command-Shift-5 keyboard shortcut to bring them up. Practice that a few times, and you’ll be ready the next time you want to capture a funny dialog or strange occurrence on your Mac.
So What Are All Those Stacks of Notifications in iOS 12?
It can be easy to become overwhelmed by iOS notifications, particularly if you have chatty friends or apps. In iOS 12, Apple corralled notifications by grouping them into stacks so you no longer see an endless screen of alerts. To expand a stack of notifications on either the Lock screen or in Notification Center (swipe down from the top of the screen), tap the stack. Once you’ve expanded a stack, you can tap Show Less to restack it, tap the X button to remove the entire stack, or tap any individual notification to open it. By default, iOS 12 groups notifications intelligently, which might entail separate stacks for different Messages conversations, for instance. If that’s still too much, you can go to Settings > Notifications > App Name > Notification Grouping and tap By App to collect every notification from the app into the same stack.
The Secret Keyboard Shortcut for Comparing Before/After Edits in Photos on the Mac
Photos on the Mac provides so many editing tools that it’s easy to lose track of how an edited image compares to the original. You can always use the Revert to Original command and then undo it, but that’s fussy. Instead, Photos provides a Show Original
Use Continuity Camera to Scan Documents and Take Photos Right into Mac Documents
Have you found yourself composing an email message on your Mac while staring glumly at the receipt or document you need to scan and attach to the message? Adding that scan to the message isn’t impossible, but until macOS 10.14 Mojave, it hasn’t necessarily been easy.
It’s super simple now, thanks to a new Mojave feature called Continuity Camera. It lets you take pictures or scan documents with an iPhone or iPad running iOS 12 and have those images show up immediately on the Mac, either in a document or on the Desktop.
Continuity Camera Basics
Apart from Mojave and iOS 12, Continuity Camera requires that the devices be on the same Wi-Fi network, have Bluetooth turned on, and be logged in to the same Apple ID, which must use two-factor authentication. Continuity Camera also requires explicit support in apps, which means for the moment that it works only in Apple’s apps, including the Finder, Mail, Messages, Notes, TextEdit, Pages, Keynote, and Numbers. We aren’t aware of any third-party apps that support it yet.
How you access Continuity Camera can vary by app, but the most common approach is to Control- or right-click where you want the scan or photo to go. Look either for commands for Take Photo and Scan Documents, or for an Import from iPhone or iPad submenu, under which those commands will be replicated for each device.
The Take Photo and Scan Documents commands may also appear in the File menu or in an Insert menu. Plus, Mail composition windows have a drop-down menu on the right side of the toolbar that includes those commands.
Should you import directly into an app, or onto the Desktop? It’s up to you, of course, but adding a file to the Desktop that you can then drag to its eventual destination gives you more options for reuse or modification, along with backup. That could be important since the photos and scans aren’t stored on the iPhone or iPad.
Using Continuity Camera
Follow these steps to use Continuity Camera to take a photo or scan a document to your Mac. Because it’s the most likely scenario, we’ll describe importing to the Desktop from an iPhone, but the steps are the same for importing into any supported app or from an iPad.
First, Control-click the Desktop and choose either Import from iPhone > Take Photo or Import from iPhone > Scan Documents. A dialog appears on the Mac screen, telling you to use the iPhone to take the photo or scan the document. The iPhone displays a variant of the Camera app automatically.
If you’re taking a photo, you can switch between the rear- and front-facing cameras, pinch out to zoom, or enable the flash with the flash button. All you need to do is tap the shutter button. If the photo is blurry or otherwise unusable, tape Retake to try again, but if you like it, tap Use Photo. The picture shows up immediately on your Mac as a JPEG file.
If you’re instead scanning a document, you also get a Filters button that lets you set the scan type: color (the default), grayscale, black-and-white, or photo. By default, the scanning interface takes a picture automatically when it detects a document. If it moves too fast for you, tap Auto (at the upper right) to switch to Manual. Then tap the shutter button to capture the image, after which you may drag the circles to identify the document corners better. Then tap Retake or Keep Scan. If it’s a multi-page document, flip the page and continue scanning to add more pages. When you’re done, tap Save to send the document to your Mac as a PDF.
That’s it! The first time or two might seem a little awkward, but once you get the hang of Continuity Camera, it’s a wonderfully quick way to get a scan or photo onto your Mac.
Finally! iOS 12 Lets You Use Google Maps or Waze in CarPlay
Before iOS 12, Apple Maps was the only mapping app you could run on the dashboard in a CarPlay-equipped automobile. But Maps doesn’t always work well, and some people prefer directions from Google Maps or the Google-owned Waze. Once you upgrade your iPhone to iOS 12 and update to the latest version of Google Maps or Waze for iOS, you’ll be able to use those apps on your CarPlay screen. Happy navigating!
Make More Space for Documents by Putting Your Dock on the Side of Your Mac’s Screen
By default, Apple locates the Dock at the bottom of the Mac’s screen. If that location interferes with you seeing as much of your document windows as you’d like, you can set it to appear only when you move the pointer to the bottom edge of the screen. But there’s a better way: put the Dock on the side of the screen where there’s plenty of horizontal room and it won’t get in the way of most document windows. Open System Preferences > Dock, and select Right or Left from the Position on Screen radio buttons.
The post Make More Space for Documents by Putting Your Dock on the Side of Your Mac’s Screen appeared first on TidBITS Content Network.
Remember That You Can Search for Nearly Anything in Your Photos Library
Apple’s Photos app on the Mac can identify thousands of different objects in your photos, so it’s easy to find photos based on their content. You can find objects (cars and trains), scenery (beaches and forests), and even some events (weddings and parades). This is both big fun and useful for those times when you can’t remember when you took a photo, but do remember what’s in it, like a cat, camera, or carousel. To carry out a search like this, type the search term into the Search field on the right side of the Photos toolbar. From the list that appears, choose the Category result. In macOS 10.13 High Sierra’s version of Photos, you can filter your results from the Showing menu at the upper right of the window. The feature isn’t perfect, so you may see some odd results or miss some photos, but it’s way faster than browsing manually!
Let Your Fingers Do the Walking: 13 Essential Trackpad Tricks for Mac Users
A trackpad is not a mouse. In some ways, that’s obvious—you swipe your fingers on it, rather than dragging it around. Less obvious, however, are the many gestures that make using a trackpad on your Mac faster and more fun. These gestures aren’t limited to laptop users, thanks to Apple’s Magic Trackpad 2, which brings gesturing goodness to any desktop Mac. Here’s how to put your fingers to work.
Four Fingers on the Trackpad
The four-fingers-down gestures are dramatic and an easy way to appreciate the power of trackpad gestures, so we’ll start with them.
Say you have a lot of windows open, and you want to move them all aside quickly so you can open a file on the Desktop. Place your thumb and three fingers together on your trackpad and then spread them outward. Your windows scurry to the edges of the screen. To bring the windows back, reverse the gesture, pinching your fingers in toward your palm.
If you haven’t moved windows aside, pinching your thumb and three fingers together instead opens Launchpad, which shows icons for installed apps. Click an icon to open that app, or use the spreading four-fingered gesture to exit Launchpad.
Three Fingers on the Trackpad
Move three fingers horizontally on your trackpad and either nothing will happen, or you’ll switch to a different “desktop space.” This state of affairs is most easily seen by making an app full-screen. For instance, open Safari and click the green full-screen button at the upper left of the window. Safari takes over the entire screen, including the menu bar (to put it back, hover the pointer at the very top of the screen to see and click the green button again).
Now swipe left and right horizontally to switch in and out of the Safari space. As you make more apps full-screen, they’ll each create their own space. (If you’ve enabled Apple’s Dashboard, you may see it at the far left.)
What if you swipe vertically with three fingers? Swipe up to enter the All Windows view of Mission Control, which shows all open windows as thumbnails, plus desktop spaces in the top bar. Click any thumbnail to switch to it, or jump to any space by clicking it. You can also click the plus button at the upper right or drag any window into the top bar to create a new space. To move a space’s apps back to the current space, hover over a space on the top bar and click the close
If you haven’t invoked All Windows view, swiping down with three fingers instead invokes App Exposé view, which displays thumbnails of all open windows in the current app. Click any one to switch to it. Swipe right or left with three fingers while in App Exposé to switch between apps.
Finally, on older MacBooks that don’t have Force Touch-capable trackpads, tap with three fingers on words to look them up, on files to preview them with Quick Look, and more. With newer MacBooks, if you have “Force Click and haptic feedback” enabled in System Preferences > Trackpad > Point & Click, you can instead “force click” with one finger for these features. That involves clicking on something and then pressing firmly without letting up.
Two Fingers on the Trackpad
The two-fingered gestures are easy to get your head around:
- In Safari, swipe left on a page to go back in that tab’s page history or right to go forward.
- Also in Safari, tap two fingers on the trackpad to zoom in on the content. Another two-fingered tap zooms back out.
- In Photos, and some graphics apps, zoom in and out by pinching with two fingers, and rotate selected objects by putting two fingers on the trackpad and turning them. A two-finger pinch also zooms the page in Safari.
- To open Notification Center quickly, swipe left from off the right-hand edge of your trackpad. Swipe back to the right to close Notification Center.
Changing Your Preferences
If you need a refresher on all these gestures, open System Preferences > Trackpad. Look in the Point & Click, Scroll & Zoom, and More Gestures panes to see a video for each gesture. You can also adjust which ones are active and how many fingers they require.
With so many gestures on offer, it’s worth your time to explore everything you can do with your trackpad.
Social Media: Did you know that you can make your Mac dance (well, not literally) with two-, three-, and four-fingered gestures on the trackpad? Read on to learn more.