Apple’s Photos app on the Mac can identify thousands of different objects in your photos, so it’s easy to find photos based on their content. You can find objects (cars and trains), scenery (beaches and forests), and even some events (weddings and parades). This is both big fun and useful for those times when you can’t remember when you took a photo, but do remember what’s in it, like a cat, camera, or carousel. To carry out a search like this, type the search term into the Search field on the right side of the Photos toolbar. From the list that appears, choose the Category result. In macOS 10.13 High Sierra’s version of Photos, you can filter your results from the Showing menu at the upper right of the window. The feature isn’t perfect, so you may see some odd results or miss some photos, but it’s way faster than browsing manually!
Let Your Fingers Do the Walking: 13 Essential Trackpad Tricks for Mac Users
A trackpad is not a mouse. In some ways, that’s obvious—you swipe your fingers on it, rather than dragging it around. Less obvious, however, are the many gestures that make using a trackpad on your Mac faster and more fun. These gestures aren’t limited to laptop users, thanks to Apple’s Magic Trackpad 2, which brings gesturing goodness to any desktop Mac. Here’s how to put your fingers to work.
Four Fingers on the Trackpad
The four-fingers-down gestures are dramatic and an easy way to appreciate the power of trackpad gestures, so we’ll start with them.
Say you have a lot of windows open, and you want to move them all aside quickly so you can open a file on the Desktop. Place your thumb and three fingers together on your trackpad and then spread them outward. Your windows scurry to the edges of the screen. To bring the windows back, reverse the gesture, pinching your fingers in toward your palm.
If you haven’t moved windows aside, pinching your thumb and three fingers together instead opens Launchpad, which shows icons for installed apps. Click an icon to open that app, or use the spreading four-fingered gesture to exit Launchpad.
Three Fingers on the Trackpad
Move three fingers horizontally on your trackpad and either nothing will happen, or you’ll switch to a different “desktop space.” This state of affairs is most easily seen by making an app full-screen. For instance, open Safari and click the green full-screen button at the upper left of the window. Safari takes over the entire screen, including the menu bar (to put it back, hover the pointer at the very top of the screen to see and click the green button again).
Now swipe left and right horizontally to switch in and out of the Safari space. As you make more apps full-screen, they’ll each create their own space. (If you’ve enabled Apple’s Dashboard, you may see it at the far left.)
What if you swipe vertically with three fingers? Swipe up to enter the All Windows view of Mission Control, which shows all open windows as thumbnails, plus desktop spaces in the top bar. Click any thumbnail to switch to it, or jump to any space by clicking it. You can also click the plus button at the upper right or drag any window into the top bar to create a new space. To move a space’s apps back to the current space, hover over a space on the top bar and click the close button that appears. To exit All Windows view, swipe down with three fingers.
If you haven’t invoked All Windows view, swiping down with three fingers instead invokes App Exposé view, which displays thumbnails of all open windows in the current app. Click any one to switch to it. Swipe right or left with three fingers while in App Exposé to switch between apps.
Finally, on older MacBooks that don’t have Force Touch-capable trackpads, tap with three fingers on words to look them up, on files to preview them with Quick Look, and more. With newer MacBooks, if you have “Force Click and haptic feedback” enabled in System Preferences > Trackpad > Point & Click, you can instead “force click” with one finger for these features. That involves clicking on something and then pressing firmly without letting up.
Two Fingers on the Trackpad
The two-fingered gestures are easy to get your head around:
- In Safari, swipe left on a page to go back in that tab’s page history or right to go forward.
- Also in Safari, tap two fingers on the trackpad to zoom in on the content. Another two-fingered tap zooms back out.
- In Photos, and some graphics apps, zoom in and out by pinching with two fingers, and rotate selected objects by putting two fingers on the trackpad and turning them. A two-finger pinch also zooms the page in Safari.
- To open Notification Center quickly, swipe left from off the right-hand edge of your trackpad. Swipe back to the right to close Notification Center.
Changing Your Preferences
If you need a refresher on all these gestures, open System Preferences > Trackpad. Look in the Point & Click, Scroll & Zoom, and More Gestures panes to see a video for each gesture. You can also adjust which ones are active and how many fingers they require.
With so many gestures on offer, it’s worth your time to explore everything you can do with your trackpad.
Social Media: Did you know that you can make your Mac dance (well, not literally) with two-, three-, and four-fingered gestures on the trackpad? Read on to learn more.
Seriously Cool Features of macOS 10.14 Mojave You Won’t Want to Miss
With last year’s macOS 10.13 High Sierra, Apple made no sweeping changes, instead focusing on refinements and bug fixes. In keeping with the company’s alternating cycle of releases, this year’s macOS 10.14 Mojave boasts plenty of new features.
Dark Mode and Dynamic Desktop
In a major visual change, Mojave features a new Dark mode that reverses the standard black-on-white look with light gray text on a dark background throughout the interface—change it in System Preferences > General. If your eyes find white window backgrounds too bright, Dark mode will be a boon. Or, if the current bright approach doesn’t bother you, Dark mode may seem muddy and hard to read because of its reduced contrast.
Dark mode may be useful, but Dynamic Desktop is just eye candy. Select either Mojave or Solar Gradients in System Preferences > Desktop & Screen Saver > Desktop, and your wallpaper will change throughout the day.
Finder Stacks and Groups
Turning to more practical changes, Mojave’s Finder boasts a few new features to help you better navigate a cluttered Desktop and overflowing folders. Control-click the Desktop and choose Use Stacks, and the Finder will combine all the related icons on your Desktop into stacks. It collects them by kind by default, but you can instead have it group them by various dates or even by tags. Click a stack to see what’s inside.
Groups are like Stacks, but within a Finder window. With a Finder window open, choose View > Use Groups, and note that you can use the View > Group By submenu to change the grouping from kind to application, date, size, and tag.
Quick Actions in the Finder and Quick Look
The Finder’s new tricks go even further, with Quick Actions. Controlled in System Preferences > Extensions > Finder, these quick actions let you rotate or mark up a document within the Finder’s preview pane or a Quick Look window (select a file and press the Space bar). Other quick actions let you create PDFs and trim video.
Most useful of these is the Markup quick action, which gives you most of Preview’s editing tools—cropping, annotating, and more—right in a Finder or Quick Look window.
Still and Video Screen Captures, with Editing
Markup also features prominently in Mojave’s new screen capture interface. You’ve long been able to press Command-Shift-3 for a screenshot of the entire screen and Command-Shift-4 for a portion of the screen. Now, press Command-Shift-5 for an interface to those capabilities, plus video screen recording, which was also possible before with QuickTime Player.
These capabilities may not be new, but they’re a lot easier to use in Mojave, and there are a few new options, such as being able to keep the same size selection across multiple screen captures and include the pointer in screenshots.
Continuity Camera with iPhone
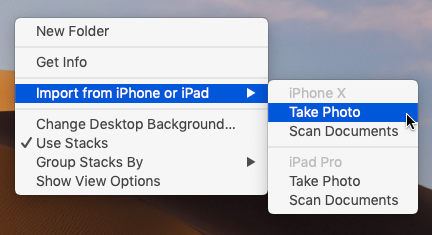
Have you ever wanted to insert a photo or scanned page into an email message or document? Mojave makes this easier with Continuity Camera, a feature that lets you use your iPhone within a Mac app. In Mail, for instance, start a new message, and then choose File > Insert from iPhone > Take Photo/Scan Documents. Either way, your iPhone immediately switches to the appropriate photo or scanning mode, and the resulting photo or scan lands in your message.
iOS Apps: News, Stocks, Voice Memos, Home
Apple has been emphatic that it is not planning to retire macOS in favor of iOS. However, the company does want to make it easier for developers to write apps that run in both operating systems. As the first phase of that strategy, Apple has ported four iOS apps to the Mac: News, Stocks, Voice Memos, and Home.
They look a little different from their iOS cousins, as they should, but they work similarly, and you can sync their settings and data between your devices via iCloud (look in System Preferences > iCloud on the Mac and in Settings > Your Name > iCloud in iOS).
There are a variety of other small changes throughout Mojave and in Apple’s standard apps, and we’ll share more of those in future posts, so stay tuned!
Social Media: There’s a lot going on in macOS 10.14 Mojave, so read on to learn about Dark mode, Dynamic Desktop, Stacks, Groups, Quick Actions, and even four apps that Apple brought over from iOS.
Tired of PDFs or Other Documents Opening in the Wrong App?
When you double-click a document, macOS uses the document’s file extension to figure out which app should open the file. So, by default, a PDF file called laser-squid.pdf opens in Preview because the Finder knows that everything with a .pdf extension should open in Preview. But what if you would prefer to open .pdf files in Adobe Reader, or you want comma-separated value (.csv) text files to open in Numbers? To change any mapping, select a file of the type in question and choose File > Get Info to open the Info window. In the Open With section, click the pop-up menu to choose the desired app and then click the Change All button.
A Simple Technique for Decluttering Your Reminders List
Productivity experts recommend offloading things you have to remember to a task-management app like Apple’s Reminders, which syncs your to-dos among your Mac, iPhone, iPad, and Apple Watch. That’s particularly helpful for tasks you want to be reminded of in a few months or next year, but then those far-in-the-future tasks—especially repeating ones!—clutter your main Reminders list. The solution? Create a Far Future Reminders list, and move reminders to it that aren’t relevant within the next month or so. Just make sure everything in Far Future Reminders is set to alert you on the appropriate day.
Apple Is Discontinuing Its Photo Printing Services—Here Are 7 Alternatives
Sad news: Apple is discontinuing its photo printing services, which enabled you to create and order physical prints, cards, calendars, and books from within Photos on the Mac. If you’re building such a project right now, be sure to place your order before September 30th, 2018. After that, Apple is directing users to download a Photos Project Extension from the Mac App Store. You’ll see this dialog whenever you click a project in Photos.
When you click the Open App Store button, Photos opens the App Store app and shows available Photos Project Extensions. (If you need to open this Mac App Store screen manually, search on appex:com.apple.photo-project
.) Most of these extensions are free, since they’ll make their money when you order projects.
These extensions aren’t exact replacements for Apple’s projects, so let’s look briefly at what they provide.
Mimeo Photos
The extension that comes closest to providing the same products and features as Apple’s print projects is Mimeo Photos, which can create cards, calendars, and books. It offers a wide array of themes.
Motif
Motif looks quite similar to Mimeo Photos, also enabling you to create cards, calendars, and books with selected photos, and it comes from RR Donnelley, the company that was previously Apple’s partner for print projects. It doesn’t offer as many themes or options as Mimeo Photos, but it has a better interface.
Shutterfly
Even though the popular Shutterfly photo service’s Web site lets you go beyond the basics to put your photos on a vast number of objects, such as pillows, candles, and trivets, the company’s Photos extension is limited to photo books. Happily, it provides quite a few different sizes and bindings, and numerous themes for each.
Fujifilm Prints & Gifts
The Fujifilm Prints & Gifts extension lets you order prints, cards, wall art, mugs and drinkware, magnets, T-shirts, puzzles, iPhone cases, and much more. However, it has a non-standard interface (basically the company’s Web site), and every time we switched out of the extension, it crashed and forgot which photo we’d had selected.
Mpix
Although Mpix seems to focus on prints, if you scroll down in the project list, the final option is Browse Mpix, which provides more possibilities, including photo books, calendars, collages, foil art prints, posters, keychains, magnets, playing cards, and business cards. Confusingly, with some of these items, Photos acts as nothing more than a window onto Mpix’s Web site, with no awareness of the photos you’ve selected.
WhiteWall
WhiteWall focuses entirely on prints, with high-end choices for exotic papers and options for mounting and framing. Supported sizes range from 8″ x 6″ up to 48″ x 36″. Unfortunately, the WhiteWall prices seemed high (a framed photo was between $130 and $530, depending on size), and once you select a particular paper or frame choice, there is no way to try another with the same photo without starting another project.
Wix
Unlike all the others, the Wix extension doesn’t put photos on physical products at all. Instead, it’s designed to create on-screen photo albums for Web sites designed with the Wix service. As such, it’s potentially extremely useful for Wix users, but not at all for everyone else.
It’s too bad that Apple is getting out of the print project business since the interfaces from these extensions tend not to be as good as what we’re used to from Apple. But if you like making yourself a calendar every year, you’ll probably do fine with Mimeo Photos or Motif, and the rest of the extensions do extend Photos’ printing capabilities in a big way.
Social Media: As of September 30th, you won’t be able to order prints, cards, calendars, or books from Apple in Photos. But several extensions do most of what Apple did, and others go well beyond!
Did You Know This Hidden Trick for Opening System Preferences Panes Directly?
The System Preferences app on the Mac contains about 30 icons, each leading to additional settings panes. Rather than opening System Preferences, scanning the collection of icons, and clicking the one you want, you can jump directly to the desired pane. Just click and hold on the System Preferences icon in the Dock, and choose a pane from the pop-up menu.
Here’s Why You Should Always Keep the Find My iPhone Feature Enabled
On the face of it, Apple’s Find My iPhone feature does what it says. If you lose your iPhone, you can identify its last known location by looking in the Find iPhone app or on the iCloud Web site, and you can make it play a sound. It’s great for tracking down a missing iPhone, whether you misplaced it in the house or left it behind at a restaurant.
But Find My iPhone does much more! For starters, it works with nearly any Apple device. You can use it to locate a missing Mac, iPad, iPod touch, Apple Watch, and even AirPods. Find My iPhone also helps protect your data if a device is stolen. It even works with Family Sharing to locate devices owned by anyone in your family—a boon to any parent with a forgetful teenager.
You must turn on Find My iPhone before your device goes missing!
- In iOS, tap Settings > Your Name > iCloud > Find My iPhone and enable Find My iPhone. (On the iPad, it’s called Find My iPad.) Also on that screen, turn on Send Last Location. Finally, go back to the main level of Settings, tap Privacy > Location Services, and make sure Location Services is turned on.
- On the Mac, open System Preferences > iCloud and select the Find My Mac checkbox—if you see a Details button beside Find My Mac, click it and follow its instructions for setting necessary preferences.
Be sure to practice viewing where your devices are located and playing tones on them so you’ll know what to do if a device goes missing.
Find My iPhone has a few tricks up its sleeve for when you want a device to show a message or if you think it was stolen:
- Lost Mode: When invoking this mode for an iOS device or Apple Watch, you’ll be asked to enter a phone number where you can be reached and a message. After that, Lost Mode will kick in as soon as the device is awake and has an Internet connection. Anyone who tries to use the device will see your message along with a place to enter the device’s passcode. If you get it back, you can enter the passcode to dismiss the message and use it normally.
- Lock: Available only for the Mac, the Lock feature enables you to protect an entire Mac with a 4-digit custom passcode. You can also enter a message that will appear on the Lock screen. This is a good choice if you think you’ll get your Mac back but would prefer that nobody mess with it in the meantime. Note that if you lock a Mac, you can’t erase it, as discussed next, so lock it only if you think it can be recovered.
- Erase: Even if your device has an excellent passcode or password, you might worry that a thief will access your data. Fortunately, you can erase your device. Erasing a device makes it impossible for you to see its location in Find My iPhone, so it’s a last-ditch effort.
- Activation Lock: If the stolen device is an iOS device or an Apple Watch, when you turn on Find My iPhone, you also enable Activation Lock. This feature prevents someone who has your passcode but doesn’t know your Apple ID and password from turning off Find My iPhone, erasing the device, or setting it up for a new user. In other words, Activation Lock makes it so there’s little reason to steal an iOS device or Apple Watch, since the stolen device can’t ever be used by anyone else. If you get the device back, you can restore your backup—you do have a backup, right?
Find My iPhone works only while the device has power, so if you think you’ve mislaid a device, try locating it right away, before the battery runs out. But even if you are unable to retrieve a lost device, you can prevent others from accessing your data or taking over the device.
Find Wasted Space with Storage Management
Between photos, videos, music, and downloads, it’s easy to fill up your Mac’s drive, particularly if it has fast but small flash storage. A MacBook Air might have only 128 GB of drive space, and that goes quickly. Numerous utilities exist to help you find and delete unnecessary files, like GrandPerspective, OmniDiskSweeper, and WhatSize, but as of macOS 10.12 Sierra, Apple provides a built-in tool to clean house: the Storage Management window.
Storage Management is hidden inside the System Information app and is most easily accessed by choosing > About This Mac, clicking the Storage button, and then clicking Manage…but wait! Before you click Manage, look at the About This Mac window’s Storage view.
storage-management-about-this-mac
Hover over each colored bar to see how much space is taken up by a particular type of data. The white space at the end of the bar is what’s still available. You can’t do much here, but the view gives you a quick overview of your drive usage.
When you click Manage, System Information launches, and the Storage Management window appears. (You can also open System Information manually and choose Window > Storage Management.) In the sidebar at the left, ignore Recommendations and look at the rest of the categories. They will vary a bit between Macs, depending on what apps you use, but they correspond to the colored bars you saw in the About This Mac window’s Storage view.
For some, mostly app-specific categories, like Mail and Photos, Storage Management merely tells you how much space the app’s data occupies and lets you either enable space optimization (downloading only recent attachments for Mail, and keeping only optimized photos on the Mac) or if that has been done already, open the app. To save more space, you must delete unnecessary data from within the app itself.
More interesting are the Applications, Documents, and iOS Files categories, all of which may contain gigabytes of unnecessary data. iOS Files, for instance, shows any device backups and software updates that are stored on your Mac’s drive. It’s worth keeping the latest backup of devices you still use, but many people have older backups and unnecessary updates kicking around.
The Applications category shown above lists your apps and is sorted by size by default. But try clicking the column header for Kind and scrolling down. You can probably delete most apps tagged as Duplicates or Older Versions. Similarly, click the Last Accessed column header to see which apps you haven’t launched in years. Many of them can probably go too. Plus, you can redownload anything tagged as coming from the App Store, so you can toss those apps if you want.
In Documents, you’ll see three buttons: Large Files, Downloads, and File Browser. Large Files focuses on files over 50 MB in size, Downloads shows you the contents of your Downloads folder (much of which you likely don’t need), and File Browser gives you a column view that’s sorted by file size and shows sizes next to each item. It’s great for trawling through your drive to find see what’s consuming all that space.
storage-management-documents
In any of these views other than File Browser, hover over any item and you see an X button for deleting the file and a magnifying glass button that reveals the file in the Finder. To delete multiple files at once, just Command-click or Shift-click to select them and then press the Delete key to remove them all at once. Storage Management gives you the combined size of all the selected files and warns you before deleting the files, so you can use this technique to preview how much space a multi-file deletion will save. In File Browser, select one or more files and either drag them to the Trash icon in the Dock, or press Command-Delete.
If your Mac’s drive is filling up—if it has less than 10 percent free space—consider using the Storage Management window’s tools to search out and delete files that are just wasting space.
All-Time most popular tips!
More great tips from the archives…
- Two Secret Key Combos for Forward Delete on the Magic and MacBook Keyboards
- iCloud Photo Library Users: Do NOT Turn Off iCloud
- Ever Wondered Which Words to Capitalize in a Title? Use Capitalize My Title!
- Tips for Setting Up a Comfortable and Effective Home Work Space
- Tips for Better Videoconferencing
- Set Your Preferred Name and Photo for Messages on iOS
- The Fastest Way to Change Wi-Fi Networks in iOS
- What to Put at the End of Your Emails
- Apple Business Manager Is a Win for Apple-Driven Workplaces
- Find Wasted Space with Storage Management
- Forrester Research and IBM Studies Show Macs Are Cheaper than PCs
- Being an Apple User Means You’re Not the Product
- How to Ask for Tech Support So You Get Good Answers Quickly
- Apple Business Manager Is a Win for Apple-Driven Workplaces
Did You Know You Can Customize the Columns in a Finder Window’s List View?
When a Mac folder contains a lot of files, the Finder’s List view often works best, since it lets you focus on a single folder and easily sort the contents by clicking the different columns: Name, Date Modified, Size, and Kind. But did you know that you can resize columns, rearrange them, and even add and remove columns? To resize a column, drag the vertical separator line to the right of its name. To move a column, click and hold on its name, and then drag it to the desired position. And to add or remove a column, Control- or right-click any column header and select or deselect the desired column. Choose from Date Modified, Date Created, Date Last Opened, Date Added, Size, Version, Kind, Comments, and Tags.