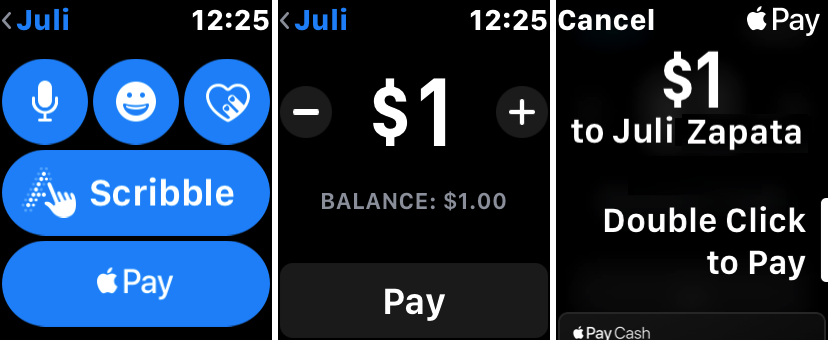
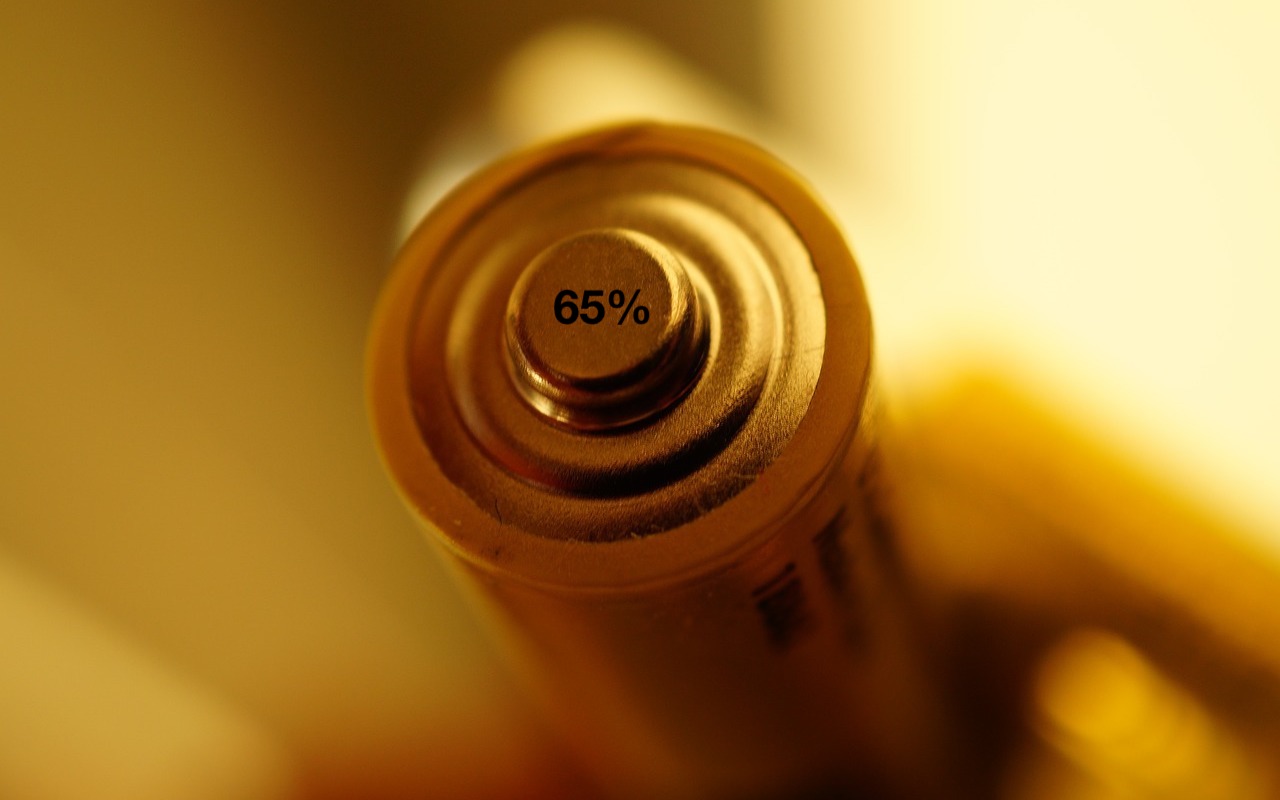
All iPhones pick up fingerprints, and it’s all too easy to get your iPhone dirty with ink, lotion, makeup, dirt, food, and oil. If you’re faced with an iPhone that needs cleaning, resist the urge to spray it with window cleaner, rubbing alcohol, or ammonia, or, even worse, to scrub it with baking soda or Borax. That’s because all iPhones have oleophobic—oil repellent—coatings on their glass surfaces that make it easy to wipe off fingerprints. You don’t want to remove that coating any faster than it will wear off normally, and cleaning products will strip it quickly. Instead, Apple recommends a soft, lint-free cloth such as you would use for glasses or camera lenses. By the way, even though the iPhone 7 and later have some level of dust and water resistance, it’s important to avoid getting moisture in the openings—most of the time, a lens cloth should be all you need.
Did You Know that Apple Pay Updates Your Credit Card Details Automatically?
File this as reason number 17 why Apple Pay is better than plastic. Let’s say your credit card expires and your bank sends you a new card with a revised expiration date. Or perhaps your bank replaces your card with one that has a new number. Either way, most credit card issuers automatically update the credit card expiration date and number in Apple Pay so you don’t have to make those changes yourself. (If your bank doesn’t do this, you’ll have to remove the old card and add the new one.) However, if you move or change your billing address, you’ll need to update that info yourself: in iOS, go to Settings > Wallet & Apple Pay; in macOS on a MacBook Pro with Touch ID, go to System Preferences > Wallet & Apple Pay.
What Is a Fusion Drive, and Why Should You Care?
There are two basic types of storage devices available today: hard disk drives and solid-state drives. For the lowest cost per gigabyte, you can’t go wrong with a hard drive, and they come in truly massive sizes—up to a whopping 8 terabytes. However, they’re relatively slow.
For speed, you want a solid-state drive, also known as an SSD. Because SSDs rely on flash storage, a type of non-volatile memory whose chips retain data without power, they’re lightning fast. But chips are more expensive than hard disk platters and read/write heads, so the $250–$300 that will get you an 8 TB hard drive is enough for only a 1 TB SSD.
In 2012, Apple came up with a compromise: the Fusion Drive. As its name suggests, a Fusion Drive melds a hard disk drive with flash storage to provide the best of both worlds. The user sees just a single volume, but behind the scenes, macOS automatically and dynamically moves frequently used files—notably those used by the operating system—to the flash storage portion of the Fusion Drive for faster access while keeping infrequently used files on the hard drive.
In essence, the Fusion Drive provides much of the speed of an SSD along with the capacity of a hard drive. What’s not to like?
There are some caveats. Good as a Fusion Drive is, it will never be as fast as a pure SSD, and you’ll probably notice that most when working with older files. Try editing some photos from last year in Photos and you’ll likely be working entirely on the slow hard drive.
Also, Apple provides the Fusion Drive as an option only for the iMac and Mac mini; there’s no room it in a modern MacBook. But not all Fusion Drives are created equal. They come in 1 TB, 2 TB, and 3 TB sizes, although not all iMac and Mac mini models can accept the larger Fusion Drives.
Originally, all Fusion Drives had 128 GB of speedy flash storage alongside the hard drive, but in 2015, Apple reduced the amount of flash storage in the iMac’s 1 TB Fusion Drive to a paltry 24 GB (the Mac mini’s 1 TB Fusion Drive still has 128 GB). The company subsequently increased it to 32 GB, but if you’re buying a new iMac and want better performance from a Fusion Drive, go for either 2 TB or 3 TB, both of which have 128 GB of flash storage.
One final note. As of this writing, macOS 10.13 High Sierra will not convert a Fusion Drive to Apple’s new APFS file system. We anticipate that will change at some point in the next year, and APFS might make Fusion Drives even a bit faster.
All that said, if you want the best performance and can afford the cost, get an SSD. If you need more space than an SSD can provide, consider using the SSD internally and adding an external hard drive connected via USB 3 or Thunderbolt 3. Barring that, a Fusion Drive—particularly one with 128 GB of flash storage—remains a good compromise. Honestly, we can’t currently recommend a hard disk drive as the primary storage for a Mac unless low cost is paramount. Hard drive performance just isn’t good enough.
Twitter: Looking for the best compromise between speed and capacity for an iMac or Mac mini? Consider a Fusion Drive.
Facebook: Although there’s no question that an SSD will provide the best performance on an iMac or Mac mini, if you need more space, consider a Fusion Drive.
Project Management Showdown Office 365 vs. G Suite
Comparing Project Management Solutions from Microsoft and Google
Getting tasks done efficiently is a top priority for any modern business. A huge part of driving efficiency is implementing strategic procedures for project management. A good project management platform can make a huge difference for business owners and allow them to keep on top of ongoing tasks and track project progress.
As technology continues to evolve, a variety of software programs are available to help business owners better manage projects. There are free and priced options, but for business owners who already use a variety of applications, adding on another platform for project management probably seems like another task in and of itself.
That’s why many business owners are looking to their existing software platforms for tools to help optimize project management. However, many don’t know where to start and aren’t even aware of what’s available to them. Since Microsoft’s Office 365 and Google’s G Suite are the leading for-business software platforms, let’s break down the customized project management solutions for each platform.
Microsoft Office 365: Fully Compatible Project Management Tools On & Offline
It’s no secret that Microsoft has long been at the forefront of technology for business. Office 365 is an incredibly popular platform used by professionals across the globe. Office 365 is feature rich and has countless applications that help business owners better manage tasks and streamline processes.
However, Microsoft has recently unveiled a new app, appropriately named Microsoft Project, that can be easily added on to an Office 365 platform. The new app doesn’t require additional software licenses and users are able to easily subscribe to the app for a low monthly fee. Microsoft Project is designed for full integration with all Office 365 apps and makes it easier than ever to manage all core business tasks from a centralized location.
Let’s break down the key features and benefits of Microsoft Project for Office 365:
- Task Management with a Birds-Eye View
The great thing about Microsoft Project is the way it consolidates all business projects onto a single screen. This gives business owners and administrators the ability to have a ‘birds-eye’ view of everything that’s happening at a given time. All projects can be titled, and a corresponding project plan can be attached.
This way, no matter the project, administrators can keep tabs on progression and potential challenges. Furthermore, when and if issues arise, administrators can easily access, review and/or change project plans to help get things moving. This makes it easier than ever for business leaders to stay in tune with employees and fill gaps as needed to streamline efficiency.
- Integrated for Server & Cloud
In true Microsoft fashion, Project is designed to be compatible with both server and Cloud versions of Office 365. Microsoft knows that some businesses prefer the Cloud, while others are sticking with on-server platforms. No matter the preferred style, Project is designed as a dynamic task management solution for either.
The greatest thing about the Cloud version is that it allows for anytime, anywhere access to Project. Since users don’t need on-premise software installed, they can log in anytime using a web-browser to check in on project updates and progress.
- Customizable Templates
Just like Office 365, Project is jam-packed with features that can be customized to suit the needs and preferences of any modern business. A project is equipped with a variety of pre-made, built-in templates to optimize project management including work breakdown charts, task and duration logs, assigned resources lists and more.
Including templates makes it easier than ever for business administrators to create new projects and immediately start organizing assignments, timelines, and resources. Templates can be customized to reflect project-specific issues and/or company regulations and employee expectations.
- Business Intelligence
Finally, to really optimize project management potential, Project features can be used to develop strategic insight into business operations. As you make and manage project templates, the application will identify consistencies and implement them into new templates – no matter who is creating them.
The application also creates critical path schedules as well as critical chain and event chain methods which provides strategic visuals of whose responsible for what and what the chain of command is for each project. Finally, Project is equipped with dynamic administrator controls that allow for access management and user classification.
G Suite: Project Management Designed for the Cloud-Loving Business User
While Microsoft is the long-held favorite, Google has been making waves lately with the new version of Google for Work, dubbed G Suite. The web-based platform is loaded with features much like Office 365 and is offered at varying budget-friendly price-points, depending on the size and shape of your business. G Suite boasts some of the same built-in project management features as Office 365, and following Microsoft’s lead, Google has also recently unveiled a new project management application called Wrike, designed to be fully compatible with G Suite.
Let’s break down the key features and benefits of Wrike for G Suite:
- Workload & Task Management
In Wrike, users have the ability to create blocks or sections of work necessary to complete larger goals. By breaking down big jobs into more manageable sub-sections, administrators can keep a better eye on tasks and overall project progression.
Wrike is also designed with real-time file editing capabilities and report generation tools so that information can flow easily and resources can be requested as needed. Finally, Wrike is designed with automation in mind and allows for tasks and resources to be automatically assigned when new projects are created.
- Real-Time Updates & Strategic Reporting
Wrike also has built-in updating and reporting capabilities that keep users informed of project updates and progression. The app includes a real-time newsfeed where all project news flows freely, as it happens.
There are reporting tools available for individual projects and overall team productivity which makes it easier than ever to identify weak spots and iron out efficiency challenges. Furthermore, sharing reports and project updates is made incredibly easy by the user dashboard feature that acts as a central hub for all project info.
- Collaboration
Of course, a huge part of any team project is the ability to communicate and collaborate. Whether a team member needs to check the information from an old email or send a project to a superior for approval, Wrike is designed with built-in collaboration tools that make creative and efficient teamwork a breeze.
Wrike offers email and calendar synchronization features that allow for a seamless transmission of important data. There are also strategic mentioning tools that allow users to easily get the attention of specific team members with questions or updates. Finally, Wrike is designed with a dynamic proofing center that allows users to get final stamps of approval from management before updating a project’s status to complete.
- Integration
Last but not least, Wrike is designed specifically to be an integration powerhouse. In a modern business world, so many different software applications play a part in getting work done. Wrike offers compatibility with a huge variety of business apps which makes the synchronization of important data very simple.
No matter what companies are using third-party apps for, Wrike is designed to promote integration and seamless compatibility. Maybe a company uses Photoshop for design projects or Zapier for app consolidation. Wrike allows for integration with these apps – and countless others – to ensure the chain of information is never fragmented.
No matter which platform you use, both applications can be customized to support a dynamic project management solution. Taking the time to get to know the features that both Project and Wrike offer will help you implement a fail-proof approach to project management. Furthermore, by choosing a project management tool that’s fully integrated with your current platform, data remains centralized and keeping tabs on business tasks will be easier than ever.
If you use Microsoft’s Office 365 or Google’s G Suite and are looking to optimize the platform, use this outline as a guide for understanding each provider’s approach to project management. Then, it’s as easy as subscribing to the add-on of your choice and making your software platform work for you.
Print Labels for Your Holiday Cards with Apple’s Contacts App
If mailing your holiday cards (which you printed from Photos, right?) is made harder by having to write addresses on envelopes, you can skip the handwriting step this year with mailing labels. Although many people don’t realize this, it’s easy to print mailing labels on standard label stock using the Contacts app on the Mac. You can even add a personal touch by including a graphic and using a custom color and font choice. Here’s what you need to do:
- In Contacts, choose File > New Group to create an empty group into which you can collect your card recipients. Name the group something like Holiday Cards.
- Click All Contacts to see your full collection of contacts, and then drag your recipients from the center column to the Holiday Cards group. Note that you have to click and hold briefly before Contacts lets you start dragging a contact; if you drag too soon, Contacts assumes you want to select more contacts. You can drag contacts one at a time or select several at once and drag the entire selection. This doesn’t move contacts out of All Contacts—you’re just adding them to the Holiday Cards group, which functions much like an iTunes playlist.
- Once the Holiday Cards group is populated with all your recipients, click its name in the sidebar, and then choose File > Print to open the Print dialog.
- To set up your cards, you need to see details in the Print dialog, so at the bottom of the Print dialog, click the Show Details button (if it’s already called Hide Details, you’re all set). You also need to see the special controls for Contacts, so make sure Contacts is chosen from the pop-up menu underneath the page range fields. Then from the Style pop-up menu, choose Mailing Labels.
- Beneath the Style pop-up menu, make sure Layout is selected, and then in the Layout view, from the Page pop-up menus, choose the manufacturer of your labels and the number associated with the labels. (Avery 5160 is the most common label type and is readily available at office supply stores and online.)
- Click Label to switch to the Label view. From the Addresses pop-up menu, choose the type of address you’re using. Home is likely the most appropriate; if you choose All, Contacts will print both Home and Work addresses if available. You can also choose to print company and country here, and if you print country, you can exclude your own country, which makes it easy to include overseas friends and relatives without printing the country for most people.
- Although the defaults are fine, if you want, you can change the color of the label text, select a small image to print next to each contact, and change the font.
- It’s time to print, but not on your label stock just yet! Click the Print button to print a draft of your labels on plain paper. You’ll use this draft for two things—checking the addresses for accuracy and verifying that the labels will print properly on the label stock.
To check if the labels will print correctly, stack a page from the draft on top of a sheet of blank labels, and then hold them up to a bright light or sunlit window. You should be able to see whether the positioning is right—it should be in most cases. If not, make sure you’ve chosen the right label in the Print dialog, and if all else fails, create a custom label with your own margins and gutters to make it work. - Once you’ve fixed addresses for everyone who has moved recently and verified your positioning, you can print for real on your label stock.
That’s it! Most of the work comes in selecting people, making sure their addresses are right, and updating those that have changed—actually printing labels takes only a few minutes. As you stick your labels on envelopes, you can revel in the knowledge that it will go even faster next year!
Twitter: Thanks to Contacts being able to print mailing labels, there’s one less obstacle to sending holiday cards this year!
Facebook: If you hate addressing your holiday cards, check out this article to learn how to print mailing labels from your Mac.
What You Need to Know about Face ID on the iPhone X
Apple’s new iPhone X does away with the Home button, which has been a fixture since the original iPhone and has long served as the Touch ID sensor. To replace Touch ID, Apple developed a new facial recognition technology called Face ID. With Face ID, the iPhone X scans your face to authenticate you instead of using your fingerprint. It is truly amazing technology, but we’ve been getting questions that we’d like to answer here. If you have others, get in touch!
How does Face ID work?
Magic. Well, close. As science fiction author Arthur C. Clarke said, “Any sufficiently advanced technology is indistinguishable from magic.” Face ID is cutting-edge technology that uses Apple’s TrueDepth camera system to project over 30,000 invisible dots onto your face. Then it illuminates your face with infrared light and takes an infrared image. Finally, it translates that image into facial recognition data that’s encrypted and stored within the iPhone’s Secure Enclave (the data never leaves your iPhone).
Face ID updates its mathematical representation of your face over time to keep up with how your appearance changes.
How secure is Face ID?
Extremely. Apple claims that Touch ID’s false positive rate—the number of people who would have to try logging in to your iPhone before someone would succeed randomly—is 1 in 50,000. In contrast, Apple says that Face ID’s false positive rate is 1 in 1,000,000. It can’t be fooled by a picture or a simple mask, although a high-enough quality 3D reproduction of your face might get past it, just as a sufficiently good cast of your fingerprint could fool Touch ID.
However, Face ID has trouble distinguishing between identical twins and siblings who have nearly identical features. So if you have an evil twin, stick to a Touch ID-based iPhone or your passcode! The probability of an incorrect match is also higher with children under 13, since their facial features haven’t become sufficiently distinct yet.
By default, Face ID works only when you look at the iPhone X—it can’t be unlocked by your face when you’re sleeping.
How fast is Face ID?
Not quite as fast as Touch ID in current iPhones, but fast enough that you likely won’t notice. When you pick up your iPhone X so you can look at it, Face ID will, in most cases, have already recognized you.
This quick recognition is possible in part because the iPhone X can start scanning early, thanks to iOS’s Raise to Wake feature and a new Tap to Wake feature that automatically wakes the iPhone X when you touch the screen.
What if Face ID doesn’t work?
First off, things like wearing a hat, scarf, or glasses won’t confuse Face ID, nor will growing or shaving a beard. Thanks to that infrared camera, it even works in complete darkness. However, Face ID does fail occasionally. One reason for a Face ID failure is holding the iPhone X too close to your face—this is easy to do accidently if you’re nearsighted and not wearing your glasses. (Some sunglasses prevent Face ID from seeing your eyes, but you can work around that problem by disabling Require Attention for Face ID in Settings > Face ID & Passcode.)
To make Face ID retry a facial scan, hold the iPhone X at a normal viewing distance, tilt it away from you, and then tilt it back to your normal viewing position. If that doesn’t work, or if you want to let someone else use your iPhone, enter the passcode. Entering the passcode is always an option.
Alas, unlike Touch ID, which let you enroll up to five fingers (so family members could unlock your iPhone without using the passcode), Face ID lets you have only a single face.
Can I use Face ID for anything besides unlocking?
Yes, Face ID completely replaces Touch ID, so you can use it to authenticate when you’re using Apple Pay, or the App Store or iTunes Store. Plus, apps that previously relied on Touch ID, such as the 1Password or LastPass password managers, will automatically use Face ID instead.
We hope Apple can make the hardware necessary for Face ID cheaply enough to bring it to other devices as well. Wouldn’t it be nice if you could walk up to your Mac and have it automatically unlock because it had recognized your face?
Twitter: Curious about Apple’s new Face ID technology in the iPhone X? We have answers to your questions!
Facebook: If you’ve been wondering how the iPhone X’s Face ID facial recognition technology works, whether it’s secure, how fast it is, and more, we have answers to your questions.
Watch Out for Phishing Attacks Hidden in Your Email
One of the most important things you can do to stay safe on the Internet is to be careful while reading email. That’s because online criminals know that we’re all busy, and we often don’t pay enough attention to what we’re reading or where we’re clicking.
To take advantage of our inattention, these Internet information thieves forge email messages to look like they come from the likes of Apple, Facebook, and Amazon, along with well-known banks, payment services, retailers, and even government agencies. Even more dangerous are messages that appear to come from a trusted individual and include personal details—these messages are often targeted at executives and company managers. Generally speaking, these attacks are called phishing—you can see examples here.
The goal? Get you to click a link in the message and visit a malicious Web site. That site usually continues to masquerade as being run by a company or organization you trust. Its aim is to sucker you into revealing confidential information by asking you to log in, pay for a product or service, or fill out a survey. The site—or an attachment in the email message—might also try to install malware. Although macOS is quite secure, if you approve security prompts, it can still be infected.
Although phishing is a huge problem that costs businesses hundreds of millions of dollars every year, you can easily identify phishing messages by looking for telltale signs:
- Be suspicious of email messages, particularly from people you don’t know or from well-known companies, that ask you to click a link and do something with an online account.
- Look closely at email addresses and URLs (hover the pointer over a link to see the underlying URL). Phishing messages don’t use official domains, so instead of paypal.com, the addresses and links might use paypa1.com—close enough to pass a quick glance, but clearly a fake.
- Watch out for highly emotional or urgent requests. They’re designed to make you act without thinking. Take any such messages with a grain of salt.
- Channel your inner English teacher and look for poor grammar or odd phrasing, which are red flags for phishing messages. Email from real companies may not be perfect, but it won’t have multiple egregious errors.
So what do you do if you get a message that may be phishing for sensitive information? Most of the time you can just ignore it. If you’re worried that it might be legit, instead of clicking any links in the message, navigate to the site in question manually by typing the organization’s URL into your browser—use a URL that you know to be correct, not the one in the email message. Whatever you do, do not open attachments that you aren’t expecting and never send confidential information via email.
If you think you’ve fallen prey to a phishing attack and given away a password, you’ll want to change passwords on any affected accounts. If you’ve opened any attachments or approved any installs, run anti-malware software to determine whether your Mac has been infected. Contact us if you need help. And remember, regular backups protect you from a multitude of sins.
Twitter: Can you tell if you’ve been targeted by a phishing attack? Read on to learn how to identify malicious messages!
Facebook: Phishing attacks—email containing links that try to get you to reveal usernames, passwords, or credit card details—are all too common these days. Follow our advice to learn how to identify malicious messages.
Avoid Ransom Requests with a Unique iCloud Password
We’ve been hearing reports from people whose Macs have been locked remotely via Find My Mac, with the criminals responsible holding access to the Mac hostage until they receive a ransom in Bitcoin. First, if this happens to you, do not pay the ransom! Any Apple Authorized Service Provider or Apple Store can unlock your Mac for you if you bring it in and provide proof of purchase. Second, if you ever used your iCloud password on another site, change it immediately, since if that site was hacked, your iCloud account is now vulnerable. Unfortunately, Apple’s two-factor authentication, which is otherwise great, does not currently protect against this problem! Learn more at TidBITS.
Make Your Holiday Cards with Apple’s Photos App This Year
It’s that time of year again, when we realize that if we’re going to do holiday cards, we should get started. You can take the easy way out and buy a few packs of generic reindeer cards at the drugstore, but with a little work in Apple’s Photos app on the Mac, you can instead send cards personalized with your favorite family photos from the past year. Here’s how.
- Select photos. Although you can add photos to your card project at any time, it’s easiest to make a new album and then spin through last year’s photos, adding 20 or so of the best candidates to your album. Don’t be picky at this point because it’s easier to choose the final images from within the card layout.
- Create the card. Select all the photos in your new album with Edit > Select All, and choose File > Create > Card. Then select one of the three choices: a 5×7 folded letterpress card for $2.99 each, a 5×7 folded card for $1.49 each, or a 4×6 flat double-sided card for $0.99 each. They all include envelopes.
- Select a theme. Photos loads themes over the Internet automatically, so if you see just a few themes, wait until more appear. Choose Holidays from the pop-up menu at the top, and click either Landscape or Portrait to pick the orientation before selecting a theme and clicking Create Card in the upper-right corner.
It’s easy to change your choices while working on the card by clicking the button next to Buy Card.
- Choose layouts. Although every card starts with a default layout, most have alternatives. Would you prefer a single image on the front, rather than a four-photo layout? Click the Options button below the card to open the Layout Options panel, and click the desired layout.
- Add photos. To add a photo to a spot on the card, drag it from the photo collection at the bottom of the screen, which shows the contents of your album. Dragging a photo on top of an already-placed image replaces it, or you can drag a photo from the card back to the collection at the bottom. Buttons let you clear placed photos (helpful when starting over with a new theme), auto-fill photos for quick placement, switch between showing unused and placed photos, and add more photos to the project.
If Photos didn’t bring in all the photos from your album automatically, click the album in the sidebar, select all the photos, and drag them to the project entry in the sidebar. That’s much easier than adding them piecemeal via the Add Photos button. - Edit photos. When you click a photo on the card, the Photo Options panel appears so you can apply filters, edit the photo with all of Photos’ editing tools, or zoom and crop. After zooming a photo with the slider, you can drag it within its spot on the card to position the subject properly.
- Add and edit text. Some text boxes in the layout can be edited; just click inside and type. Others can’t be changed. If you need to tweak the font, size, color, or orientation of text, select it and make your adjustments in the Text Options panel that appears.
- Buy your card. Once you’ve adjusted everything to your liking, click the Buy Card button in the upper-right corner of the window. Click Add Shipping Address, select a contact (likely yourself) to send the cards to, and then enter how many cards you’d like. When you’re done, click Place Order.
Apple prints and mails you the cards, usually within a week or so. The print quality is, as you’d expect from Apple, top notch, and overall, the cards are a step up from those available from other photo services.
The hardest part of designing your own cards with Photos is figuring out which themes and layouts best match the photos you want to share. Some themes offer spots for only one or two photos, whereas others let you include a lot more, at the cost of making them much smaller. Similarly, some themes let you write a full letter, but others have room for just a few words of holiday cheer.
When you have a few minutes, sit down with a cup of eggnog and play with Photos’ card-making capabilities. Stay tuned, since we have another article about how to print labels for your cards coming soon!
Twitter: Don’t settle for tacky drugstore holiday cards—you can use Photos on your Mac to create fabulous custom cards.
Facebook: With just a few minutes of work in Photos on your Mac, you can make fabulous holiday cards—there’s no reason to settle for tacky drugstore cards this year!
Super Bad Apple Vulnerability
Hey –
Just wanted to give a heads up that anyone who is one of our support customers can sleep soundly tonight.
Within minutes of reading the breaking news of todays “Root” vulnerability, we had automagically patched all of the “Pro” and Total” support customers machines that were exposed to the vulnerability.
Want some numbers? Ok. Across our fleet of Pro and Total Support users (about 300ish), only 6 machines were vulnerable (2 of them were in our test lab) And by 4:00 pm today, we had a tested and pushed out a fix to all 6.
Why only 6 when we have 100’s under care? Well, thats because we carefully manage macOS and system updates, and except in extreme cases, we have been actively blocking user installs of Mac OS 10.13 High Sierra.
How bad is this vulnerability? Its bad, but someone would need to have access to your computer to do harm. We imagine that Apple will fix it quickly. And likely silently without user intervention.
Of the 300+ users that are on our Basic support plan, about 20 of them had been ignoring our “hold off on upgrading” warnings. Those users had emails in their inboxes within an hour or so that described the steps they needed to take to secure their machines.
Want some more info on the vulnerability?
Here’s what Apple had to say…
“We are working on a software update to address this issue, In the meantime, setting a root password prevents unauthorized access to your Mac. To enable the Root User and set a password, please follow the instructions here: https://support.apple.com/en-us/HT204012. If a Root User is already enabled, to ensure a black password is not set, please follow the instructions from the ‘Change the root password’ section.”
From AppleInsider
“Discovered earlier today, the flaw allows anyone to log in under a Mac’s “root” System Administrator without the need for a password. In practice, the exploit merely requires access to System Preferences, and can be performed in a matter of seconds. Nefarious users can also exploit the bug to bypass a Mac’s lock screen.
Beyond those who have direct access to a vulnerable Mac, the security hole also works remotely in certain scenarios where screen sharing, remote access or VNC sessions are enabled. Users should disable those features until Apple’s update arrives.
As AppleInsider reported when the vulnerability was first aired today, macOS High Sierra users can prevent unauthorized Mac access by disabling the Root User under System Preferences. Alternatively, and as Apple suggests, users can enable the Root account and set a password.
Apple failed to provide a release timeline, but considering the bug impacts system-level directories and is relatively easy to exploit, a software update should be out soon.“