
PSA: Hot Cars Can Kill iPhones

A Quick Way to Check Battery Levels on Your iPhone, Apple Watch, and AirPods
A Quick Way to Check Battery Levels on Your iPhone, Apple Watch, and AirPods
Apple’s Batteries widget is a little known but highly useful tool for quickly assessing which of your small Apple devices is lowest on power—something you may wish to do when traveling with only one charging cable. To access it, switch to Today view on the iPhone, accessible by swiping right on the Home screen or Lock screen. If the Batteries widget isn’t already there, scroll to the bottom, tap Edit, and tap the green + button to the left of Batteries in the list. Of course, if you just want to check the battery status on one device, that’s possible too. It’s easy to figure out how much power remains in your iPhone’s battery because of the indicator at the top right of the screen (swipe down on it to invoke Control Center and see the percentage on the iPhone X and later). On the Apple Watch, swipe up on the screen to see its battery percentage in Control Center. For AirPods, open the case and wait for the pop-up to appear on your iPhone’s screen.

(Featured image by Adam Engst)
More stuff you should know…
- The Secret Trick That Lets You Paste Phone Numbers into the Phone App
- iOS 12 Supports Password Managers for Faster Password Filling
- Want to Use Your Friends’ Nicknames in iOS? Here’s How
- iPhone Not Charging Reliably? Clean Its Lightning Port with a Toothpick
- Need to Charge Your iPhone or iPad More Quickly? Get a Higher Wattage Power Adapter
Is Your Photos Library Too Big? Here’s How to Move It to an External Hard Drive
SSDs are essential for ensuring optimal performance on a Mac, but because they’re expensive, many people don’t have as much built-in storage space as they would like. If your Photos library has grown to the point where your SSD is nearly full, it might be time to think about offloading it to an external hard drive. (Don’t put it on a drive that you’re using as a Time Machine destination because there could be permissions conflicts, and note that Apple doesn’t recommend storing a Photos library on a drive shared over a network.)
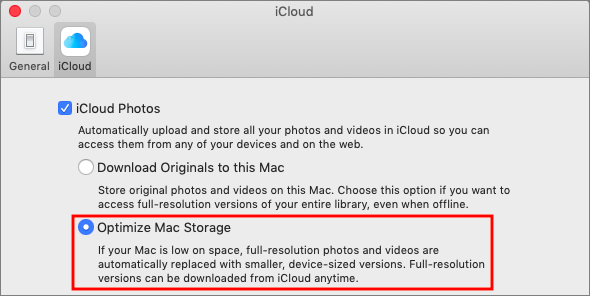
Before we explain how to offload your photos, we want to mention another way of reducing the Photos footprint on your drive. If you’re using iCloud Photos (previously called iCloud Photo Library) to sync photos and videos between your devices, the originals are all stored in iCloud. In Photos > Preferences > iCloud, you can enable Optimize Mac Storage, which swaps the full-resolution images for smaller versions, saving a boatload of space. However, you may find Photos somewhat slower to use, as it has to download full-resolution versions of images you work with, and you won’t have a local backup of the original images. So it’s an option, but it has tradeoffs.
For most people with burgeoning Photos libraries, a better approach is to offload the entire library to an external hard drive. This approach comes with tradeoffs too; accessing images from a hard drive is slower than getting them from an internal SSD, and you have to figure out how you’re going to back up that drive as well. Plus, the drive has to be available, connected, and turned on (so you have to listen to it) for you to use Photos at all, which might be especially annoying if you regularly work remotely on a notebook Mac.
To move your Photos library to an external drive, follow these steps:
- If it’s running, quit Photos.
- In the Finder, drag Photos Library, which is stored in your Pictures folder by default, to the external drive. A few answers to common questions:
- Where on the external drive should I put it? It doesn’t matter, but we recommend putting it at the top level so you are less likely to lose track of it in the future.
- I got an error—what should I do? If you see an error telling you that you don’t have permission to copy to that drive, select the drive’s icon in the Finder and choose File > Get Info to open the Info window. If necessary click the triangle next to Sharing & Permissions, and make sure “Ignore ownership on this volume” is selected. If it’s not, click the lock icon, enter an administrator name and password, and select the checkbox.

- How long will it take to copy? Quite some time, depending on how many photos you have. It’s best to do overnight or when you don’t need to use Photos.
- When it’s done copying, double-click the new Photos Library icon on the external hard drive to launch Photos and set it to open that new copy on future launches.
- If you use iCloud Photos, designate this new library as the System Photo Library by choosing Photos > Preferences > General and clicking the “Use as System Photo Library” button.
- Scroll through your photo collection and make sure all your photos are present—double-click a few of them to spot check that the actual images open properly.


Obviously, your original Photos library is still taking up space on your SSD, but it’s best to use the new version for a little while before deleting the old one, just in case. When you’re ready to do that, drag it from the Pictures folder to the trash and choose Finder > Empty Trash to reclaim the space.
Social Media: Running out of space on your internal drive? You can clear a bunch of space by moving your Photos library to an external hard drive—here’s how:
Catching up with Apple in May: New MacBook Pros, New iPod touch, OS Updates
Apple is well known for its splashy media events, now usually held in the Steve Jobs Theater at the company’s new Cupertino campus. But Apple reserves such events for major announcements. Smaller announcements, such as minor updates to particular product lines, operating system updates, or new repair programs, get only a press release, if that.
But just because a change doesn’t merit much fuss doesn’t mean it’s uninteresting—if you’ve been waiting for the right moment to buy a new Mac, for instance, an announcement of a small MacBook Pro revision might be exactly what you want to hear.
Here’s a roundup of Apple’s recent announcements in May 2019.
New MacBook Pro Models Feature Faster CPUs and New Butterfly Keyboards
Although Apple has a reputation for innovation, the company should also be lauded for its evolutionary changes, which are much more common. To wit, Apple quietly updated the 13-inch and 15-inch MacBook Pro models equipped with a Touch Bar with faster CPUs while keeping the prices the same.
You can now buy a 15-inch MacBook Pro with the latest 9th-generation 8-core Intel Core i9 processor, making it the fastest MacBook Pro ever—the previous model offered only a 6-core processor. The 15-inch models also offer faster graphics processors as options.

The 13-inch MacBook Pro models didn’t receive the same level of changes, but they gained slightly faster 8th-generation Intel processors that provide minor performance improvements.
Both models now come with the fourth generation of Apple’s controversial butterfly keyboard. We’ll have more on that issue soon.
Apple Launches MacBook Pro Repair Program for “Flexgate”
13-inch MacBook Pros from 2016 are susceptible to a display-related problem the press has dubbed “Flexgate.” According to Apple, affected Macs exhibit one or both of these symptoms:
- The display backlight continuously or intermittently shows vertical bright areas along the entire bottom of the screen.
- The display backlight stops working completely.
The problem is related to a flex cable connected to the display that’s too short and too fragile; some repair experts have suggested that failure is inevitable.
If your 13-inch Mac is showing either of these symptoms, you can now take advantage of Apple’s new 13-inch MacBook Pro Display Backlight Service Program to get a free repair. You can have your Mac fixed by Apple or an Apple Authorized Service Provider, and if you already paid for a repair, you can request a refund from Apple.
iOS 12.3 and tvOS 12.3 Add New TV App; iOS 12.3.1 Fixes Calling Bug; macOS Addresses ZombieLoad
As you’ve no doubt noticed in your Software Update notifications, Apple recently updated all its operating systems: iOS 12.3.1, macOS 10.14.5, watchOS 5.2.1, and tvOS 12.3. If you’re already running iOS 12 and macOS 10.14 Mojave, it’s fine to update.
iOS 12.3 and tvOS 12.3 are notable primarily because they include a new version of Apple’s TV app. This app now provides access to “channels,” by which Apple means subscription-based streaming video services like HBO and Showtime. Apart from letting you subscribe to such services inside the app and playing content from them in the app, the new app looks and works much like the previous version. The new app will also support Apple’s original content on the Apple TV+ service later this year.

Shortly after iOS 12.3 shipped, Apple released iOS 12.3.1, which fixes a critical bug that could prevent your iPhone from making or receiving phone calls. So if you upgraded to iOS 12.3, be sure to update to iOS 12.3.1 right away.
Similarly, it’s worth updating to macOS 10.14.5 to protect against a security vulnerability called ZombieLoad, and if you’re still running 10.12 Sierra or 10.13 High Sierra, be sure to install Security Update 2019-003 for the same protection.
New iPod touch Gains the A10 Chip and a 256 GB Configuration
Finally, Apple showed a little love to the littlest iOS device, the diminutive iPod touch. In the new model, Apple swapped the old A8 chip for a faster A10 chip that promises up to twice the performance. That added performance enables the new iPod touch to support Group FaceTime calls and enhanced augmented reality (AR) games.

The only other change in the iPod touch is that Apple now sells a 256 GB configuration for $399, joining the 32 GB configuration at $199 and the 128 GB configuration for $299.
(All images courtesy of Apple)
Social Media: If you haven’t been paying close attention, you might have missed Apple’s new MacBook Pros, new iPod touch, support for other streaming services in the TV app in iOS 12.3 and tvOS 12.3, and a repair program for “Flexgate.” Read on for details:
Can’t Remember When Your Warranty Expires? iOS 12.2 Lays It Out
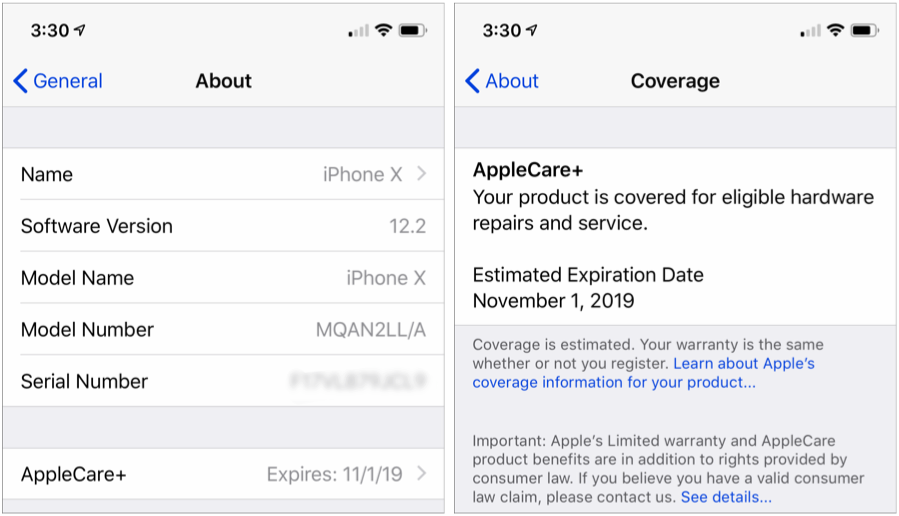
With luck, you should never need to check your iPhone’s or iPad’s warranty status. But bad things do happen to good devices. In iOS 12.2, Apple has just made it easier to figure out if your device is still under warranty or covered by AppleCare+. Go to Settings > General > About, where you’ll find a new entry that’s either called Limited Warranty (the basic Apple warranty) or AppleCare+ (the extended warranty you can buy). The entry shows the expiration date, and tapping it provides more details on the Coverage screen. If your iPhone or iPad doesn’t have AppleCare+ but is eligible for it, you can even buy it from this screen. You won’t see anything if your device is out of warranty and no longer eligible for AppleCare+.

iCloud Services Being Wonky? Check Apple’s System Status Page
Many Apple users rely on mac.com, me.com, or icloud.com email addresses, along with plenty of other iCloud-related services. So if you can’t send or receive email, if photos aren’t transferring via iCloud Photo Library, or if some other iCloud-related service isn’t responding, the first thing to do is check Apple’s System Status page. It’s updated every minute, and if it shows that the associated Apple service is having problems, you know to sit tight until things come back up. If everything is green, you’ll have to look elsewhere for a solution—or get in touch with us.
Collaborate with Colleagues in Google Docs
Collaboration is what all the cool kids—well, all the competitive businesses—are doing these days because it’s efficient and effective. See “Stop Mailing Files Around and Use Collaborative Apps” and for users of Apple’s iWork, “Collaborate with Colleagues in Pages, Numbers, and Keynote.” Today we’re going to look at collaborating using Google’s Web-based productivity suite, Google Docs, which businesses can use for free or as part of a G Suite subscription.
The Google Docs suite competes with Apple’s iWork and Microsoft’s Office 365, providing Google Docs for word processing, Google Sheets for spreadsheet work, and Google Slides for presentations. You can manage all your files in Google Drive. Although all are Web-based and work best on a Mac or other desktop computer, Google also makes iOS apps that let you work—a bit less flexibly—on an iPad or iPhone.
You’ll need a free Google account to create new documents, and for full-fledged collaboration, your colleagues will need Google accounts too. You can share documents with people who lack Google accounts or don’t want to sign in, but their comments and changes will be anonymous.
Invite Collaborators
Once your document is ready to share, you can invite collaborators by clicking the large Share button in the upper-right corner of the window.
Flexible permissions let you share with specific people, and for each person, set whether they can edit, comment on, or just view the document (below left). You can also add a note that will be sent with the invitation.

If that’s too specific—you’re sharing with a large group, for instance—click Get Shareable Link to turn on link sharing (above right). Then you can set the permissions for the link by clicking the down-pointing arrow next to “Anyone with the link can…” This works well for things like self-service signup spreadsheets. Copy the link and send it however you like, such as via Messages or to a mailing list.
If you add people over time, you can see who has access by clicking Advanced. That view also provides more owner controls, including the option to prevent commenters and viewers from downloading, printing, or copying.
When you’re done, click Send or Done.
Accept an Invitation
People you invite receive an email invitation and click the Open In button to start working on the document. With link sharing, all the recipient has to do is click the link.

The main gotcha is that recipients must sign in to their Google accounts if sharing has been restricted to specific people. A less common problem can occur when you send an invitation to someone at an email address that doesn’t match their Google account, which prevents them from collaborating. They can then request that you share the document with their Google account; click the Open Sharing Settings button in the request email to grant access.

Add and Change Data
Apart from the permissions that restrict collaborators to commenting or viewing, there are no limitations on what people can do in a shared document—all editors are equal, and Google Docs works the same whether a document has one person using it or ten.
You can see who is in the document by the little avatar icons in the menu bar. It also tells you when the last edit was, and Google Docs always shows where other users are working with a color-coded cursor and marks when other users have selected content in the document with a colored highlight box.

Add Comments
The beauty of comments in a collaborative scenario is that discussions can occur in context. To add a comment, select some text and choose Insert > Comment. Comments show up in the right-hand sidebar in Google Docs and Google Slides; in Google Sheets, the cell containing a comment gets a little yellow triangle in the corner, and the comment appears when you click the cell.

Google pioneered comment conversations, which allow collaborators to reply to each others’ comments and keep the discussion connected to the initial comment. You can edit or delete your own comments by clicking the stacked three-dot More menu. Do that for someone else’s comment and you can get a link to the comment—it’s useful if you need to point someone to the discussion.
To see all the comments in a stream, click the Comment History button in the menu bar, which looks like a speech balloon. It’s especially useful when reviewing comments in Sheets, where you would otherwise have to click all the little yellow triangles in cells.

View Versions and Suggested Changes
The main way to see who has done what in a document is by choosing File > Version History > See Version History. That displays a right-hand sidebar showing dates when the file was changed; click an entry to see the changes in the main pane. Arrows above the main pane let you highlight each change in turn. If you want to revert to the selected version (which will delete all subsequent changes!), click Restore This Version.

For Google Sheets and Google Slides, version history is all that’s available, which can be frustrating because when you’re reviewing edits in version history, you can’t make changes. As a workaround, open a second browser window so you can review changes in one window and make edits in another.
Google Docs (the word processor, in this case) offers another choice: Suggesting mode, which works more like Track Changes in Page or Word. Switch into it by clicking the pencil icon in the upper-right corner and choosing Suggesting. From then on, all edits are non-destructive and are color-coded by the person who makes them. They’re coupled with boxes in the right-hand sidebar that detail the change, provide  and X icons for accepting or rejecting the change, and offer a Reply field that enables discussions of each change—a brilliant feature.

If you want to be guided through all the suggested edits, or accept or reject changes all at once, rather than handling them one at a time in the right-hand sidebar, choose Tools > Review Suggested Changes.
When you’re done collaborating on a document, you can click the Share button and remove people or turn off link sharing. That immediately prevents others from making more changes.
When choosing a collaboration platform, you’ll generally pick what your colleagues use, whether that’s Google Docs, iWork, or Office 365. However, if you’re sharing with people whose platform and app details you don’t know, Google Docs is the best choice—Google accounts are common and the Google Docs apps work equally well on all computers. Plus, since Google Docs was built from the ground up for collaboration, it’s a mature solution that’s quick, easy, and effective.
Social Media: For quick, easy, and effective collaboration regardless of what apps or platforms people use, give Google Docs, Sheets, and Slides a try. We’ll help you get started here:
Clean Up Old Tabs in Safari in iOS with This Quick Trick
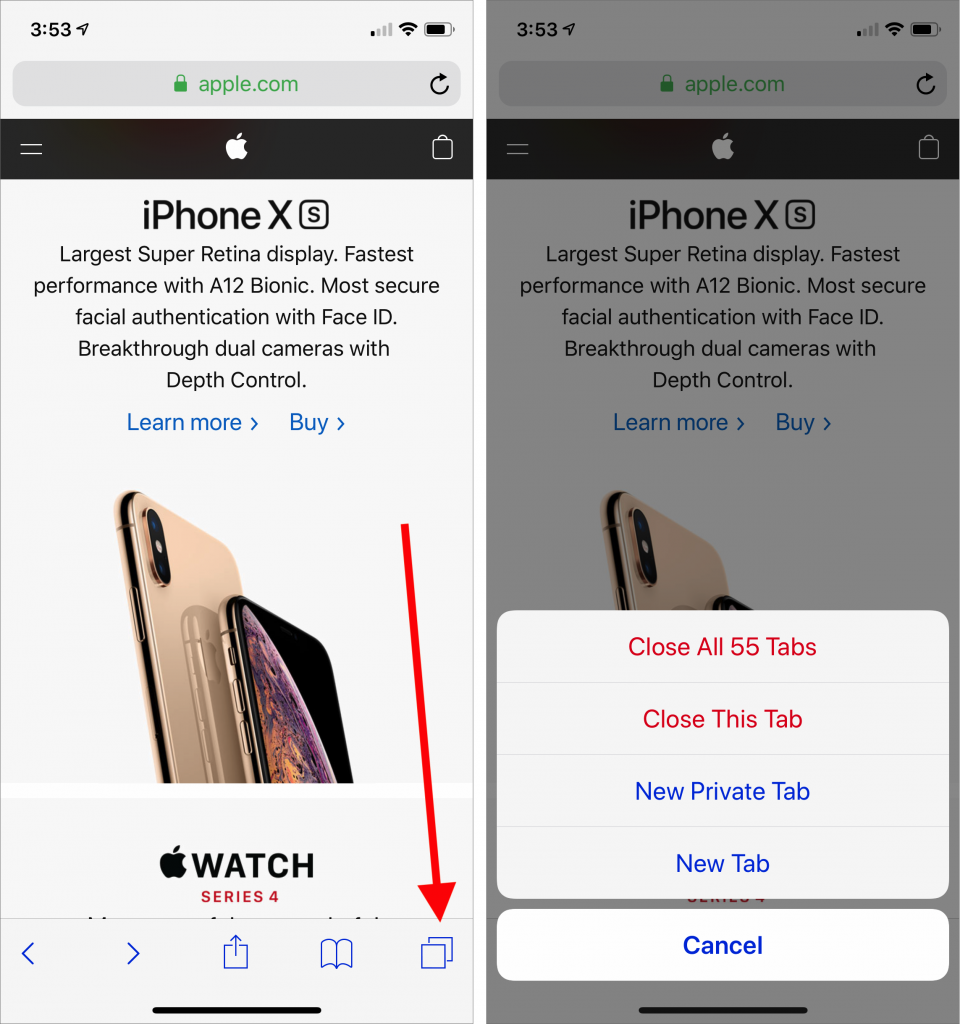
Every time you tap a link to open a Web page in Safari on your iPhone or iPad, it automatically opens a new tab. That’s fine until you realize that you have oodles of old tabs open, making it difficult to find any particular tab. To close all your old tabs in one fell swoop, press and hold on the tab button, then tap Close All X Tabs in the popover that appears.
Need to Merge Photos Libraries? Here Are Your Options
Photos makes it easy to create and switch between libraries. That’s good when photos need to be kept completely separate. For instance, a real estate agent might want to keep personal photos separate from house photos taken for work. But too much separation is annoying—you have to keep switching between libraries, and it’s easy to import new photos into the wrong one.
If you struggle with multiple Photos libraries, never fear—you can merge them. Unfortunately, the process is slow, can require a lot of disk space, and may result in the loss of some metadata. You have three options: merging through iCloud Photos, using the PowerPhotos utility, and merging by exporting and importing. Each has pros and cons.
Merge through iCloud Photos
Apple’s iCloud Photos service offers the best solution for merging libraries. The trick is that whenever you designate a library as your System Photo Library, Photos automatically uploads all images that aren’t already present, adding them to the photos already in iCloud Photos. It also retains all the metadata surrounding your photos—titles, keywords, albums, facial recognition, projects, and more.
On the downside, using iCloud Photos almost certainly won’t be free unless you have so few photos that the combined library will fit within the free 5 GB of iCloud space Apple gives everyone. Almost everyone will have to pay for additional storage space ($0.99 per month for 50 GB, $2.99 for 200 GB, or $9.99 for 2 TB) for at least the month in which you’re doing the merge. iCloud Photos is a good service, so it’s likely worth paying for anyway.
More problematic is that the iCloud Photos way of merging will be very slow. If you haven’t already started using it, it could take a week or more to upload many thousands of photos. Plus, it will probably download the entire cloud-based collection of photos to each library whose photos you want to merge, so you may need a lot of local disk space too.
If you haven’t previously used iCloud Photos, go to System Preferences > iCloud and click the Options button next to Photo. In the dialog, select iCloud Photos.

Now, starting with the smallest Photos library and working up in size, follow these steps for each library you want to merge:
- Double-click the Photos library to open it.
- In Photos > Preferences > General, click Use as System Photo Library. (If it’s dimmed out, that library is already set as the System Photo Library.)
- Wait for photos to upload. Scroll to the bottom of the Photos view to see the progress. A Pause link will appear there during uploading—click it if you need to keep Photos from overwhelming your Internet connection. Once the photos have all uploaded, go back to Step 1 with your next Photos library.

When you’re done, the last Photos library becomes the one you’ll keep, and you can delete the others. Needless to say, make sure you have good backups first!
Merge with PowerPhotos
The $30 PowerPhotos from Fat Cat Software provides a variety of extra capabilities when working with Photos. It helps you to create and manage multiple libraries, copy photos between libraries, find duplicates, and—most important for this topic—merge libraries.
Because PowerPhotos is working entirely on your Mac’s drive, it’s fast and it doesn’t require huge amounts of extra disk space. Unfortunately, unlike the iCloud Photos approach, which brings in both originals and any edits to those photos, PowerPhotos can import only your original photos or the versions that you’ve edited, not both. Plus, it can’t merge facial recognition data, smart albums, or print projects.
PowerPhotos provides an actual interface for merging too—choose Library > Merge Libraries to start.

In the window that appears, you have four tasks:
- Choose source libraries. You aren’t limited to merging just two libraries; you can pick multiple sources.
- Choose the destination library. This is the library you want to receive all the photos. If you want, you can create a new one.
- Configure duplicate handling. PowerPhotos can import just one of several copies of duplicate photos, or you can bring in all the duplicates if that’s important.
- Choose options. PowerPhotos can merge album contents, create an album from each source library, and create a backup before merging. Most important, though, is the choice of whether to merge your original photos or the edited versions.
Merge by Exporting and Importing
This final option is conceptually simple. You export all the photos from one library and then import them into another. It’s even what Apple recommends. The main thing it has going for it is that it’s free, and it will be faster than the iCloud Photos approach. It could also be useful if you want to copy a subset of photos between libraries, rather than merging all photos.
However, as with PowerPhotos, you have to choose between original and edited photos, and you’ll need a lot of extra disk space. Even worse, you’ll lose even more metadata, including albums, faces, and print projects. And if you export as JPEG, your photos may also suffer a slight quality drop as they’re recompressed.
For those who want to use this approach, Apple provides detailed instructions. In essence, you’ll click Photos in the sidebar to see everything, and then choose Edit > Select All. Then you’ll choose File > Export and either Export X Photos (to get the edited versions of images) or Export Unmodified Original for X Photos (to get the original images). Once everything has exported, you’ll switch libraries in Photos and then drag the folder of exported images back into Photos to import it.
Our nod goes to the iCloud Photos technique, but PowerPhotos is a fine utility for those who aren’t perturbed by its limitations. Of course, don’t start any merging without making backups first, and if you need help, don’t hesitate to call us.
Social Media: If you want to merge Photos libraries to avoid having to switch back and forth, there are several approaches you can take, but each comes with pros and cons. See them all at:

Beware Microsoft Office 365 Phishing Attacks!
We’re seeing an uptick in email phishing attacks purporting to come from Microsoft about Office 365. They’re quite convincing messages that tell users that their credit card payment has failed, that an account needs renewing, or that a password needs to be confirmed. Needless to say, they’re all complete scams, and clicking a link in them takes you to a malicious Web page that will try to steal your password or credit card details. As we noted in “Gone Phishing: Five Signs That Identify Scam Email Messages,” large companies never send email asking you to click a link in order to log in to your account, update your credit card information, or the like. Hover over links to see where they go before clicking anything, and stay safe out there!