
The keywording of images is both a laborious task, while you’re doing it, and one that will save you tons of time later when you search for images. That’s our way of saying, “take your medicine and do your keywording.”
Here is a quick tutorial walking you through creating and importing a text file of keywords into Adobe Lightroom 2. We also have a second tutorial for Importing Keywords into Adobe Bridge.
Step 1. Organize your keyword hierarchy in a text file.
To have a robust list of keywords, you may use keywords made for you by a stock photo agency or other service (like Controlled Vocabulary) or your own. If you’d like to build (or buy) a set of keywords, it’s best if they’re in some kind of hierarchy.
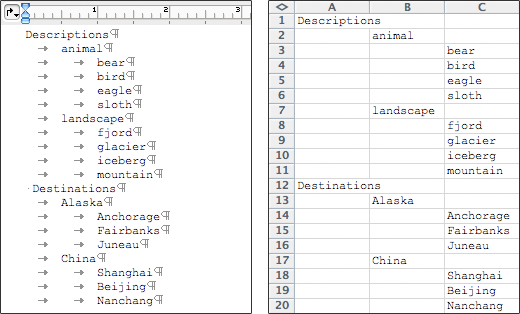
You can use the tools available in Bridge or Lightroom to create a list of keywords. For longer lists, you may create a text file to import many of your keywords at once. If you are proficient in Microsoft Excel, you may choose to use that tool to lay out a grid of keywords, then export them as a tab-delimited, plain text file which can be imported into either Bridge or Lightroom. Or bypass the middleman and compose a simple text file yourself.
Each keyword should be on its own line. Any keyword with one or more tabs before it is the “child” of the nearest keyword above it with fewer (or no) tabs before it.
Step 2. Import your keyword list into Lightroom.
To import a tab-delimited text file, choose Metadata > Import Keywords.

Tip: Choose Metadata >Export Keywords to save out a text file from your current Lightroom keywords.
Step 3. Apply Keywords in Lightroom 2.
 Just above the Metadata panel are the Keywording and Keyword List panels. Here is where you can quickly add keywords as they come to mind for selected images. As you add Keywords, they will appear in the Keyword List panel.
If you have many images to keyword, you may select them in the Grid view of the Library module, then select one or more keywords. These will then be applied to all the selected images.
You select a keyword in one of several ways. You may notice that the one you want is being suggested by Lightroom in the Keyword Suggestions section of the Keywording panel. These are 9 keywords that Lightroom suspects are likely appropriate based on similarities to other images with those keywords applied.
You can find the keyword listed alphabetically in the Keyword List panel. Be warned that you may have to click on a disclosure triangle to find a “child” keyword.
Tip: The easiest time to apply keywords is when you first import images into Lightroom. A rule you should try to obey when shooting is to keep each distinct shoot (scene, subject, etc) on separate media. In this way, when you download images, you can enter keywords that are appropriate to all the images on that card.
 Source: This tip comes directly from Photoshop CS4 Photographer’s Handbook, a new book written by our friend, Steve Laskevitch. Steve is founder of Seattle’s Luminous Works training center, and is currently the 3rd most highly rated Adobe Certified Instructors worldwide! Way to go Steve!
January 21, Steve will be our guest instructor for a special suggest-a-workshop topic: Introduction to Lightroom 2. This promises to be a great session. Join us in Seattle or online with our unique hybrid workshop/webinar format.