 Did you spend the extra for an "Extended" version of Photoshop CS4? If so, your copy of Photoshop sports a new 3D menu that you’ve never touched. (Tip: If you bought the bundle of CS4 that included Flash and Dreamweaver, you got Photoshop Extended in the deal.)
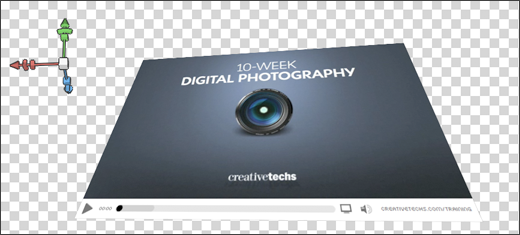
You’ll get your money’s worth today. This 3D Postcard trick lets your extra Photoshop investment finally pay off. This is a great trick for adding a sense of dimension to your portfolio when you need to show off flat screenshots, webpages, or examples of printed projects. Adjust your flat object in 3D space, add an appropriate shadow and you’re set!
Photoshop 3D Postcard Feature: Quick Video
Here is a quick video (no sound) that shows how you can use the new 3D Postcard feature. Here are the basic.
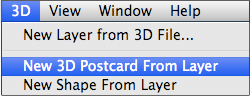
1. Select a Photoshop layer you want to convert into a postcard.
2. Choose 3D > New 3D Postcard From Layer.
3. Select the 3D Rotate Tool (shortcut: K) and start rotating your art.
Experiment and have some fun. It will feel odd at first, but once you starting playing around with this feature, you’ll discover all sorts of fun ways to put it to use.
Photoshop CS4 Extended 3D Axis
 If OpenGL is enabled on your computer, the 3D Axis tool will appear. This shows the current X, Y, and Z-axis orientation of your 3D model in space. You can use the 3D Axis as an alternative to the 3D position tools to move, rotate, or resize a 3D model in object space. (To change scene view, use the 3D camera tools.)
For more details on using this tool, read about Using the 3D Axis Tool in Adobe’s online help files. And enjoy yourself.
Source: First off, I’d like to extend a big thank-you to everyone who has been very patient over the dearth of tips over the last several months as I’ve been engrossed in improving our online classroom. This particular tip is one of my favorite quickie 3D techniques in Photoshop CS4 Extended. I use it all the time when illustrating certain types of screenshots or icons.