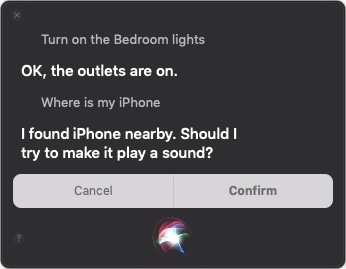
Siri on the Mac hasn’t been as useful as on iOS devices, but with macOS 10.14 Mojave, Apple enhanced the Mac version of Siri in a variety of ways. Apple says that Siri now knows about food, celebrities, and motorsports, but more interesting is how you can ask Siri to control your HomeKit devices (“Turn on the bedroom lights.”) and locate your iOS devices or AirPods via Find My iPhone (“Where is my iPhone?”).
Apple Has Disabled Group FaceTime to Prevent Pre-call Eavesdropping
A serious bug has been discovered in Apple’s Group FaceTime multi-person video chat technology. It allows someone to call you via FaceTime and then, with just a few simple steps, listen in on audio from your iPhone, iPad, or Mac while the call is ringing, before you have accepted or rejected it. To prevent the problem from being exploited, Apple says it has disabled Group FaceTime and promises a fix “later this week.”
In the meantime, if you’re still concerned (there were some reports of people being able to invoke the bug even after Apple disabled Group FaceTime), we recommend turning off FaceTime entirely in Settings > FaceTime in iOS and by launching the FaceTime app in macOS and then choosing FaceTime > Turn FaceTime Off. (Or just be quiet when a FaceTime call comes in.) Apple may be able to fix the problem without requiring users to update software; if iOS and macOS updates do prove to be necessary, we recommend that you install them sooner rather than later.
Use This Hidden Feature in Safari to Access Tabs on Your Other Apple Devices
Browser tabs. They breed like bunnies, and if you’re like us, you have oodles of tabs open on your Mac, iPhone, and iPad. But you may not know that Safari has a great tab-management feature that lets you access all the open tabs on all your devices. (Make sure to enable the Safari switch in System Preferences > iCloud on the Mac and in Settings > YourName > iCloud in iOS.) This tab overview is easiest to find on the iPad, where tapping the tab
Have You Learned iOS 12’s New Gestures on the iPad?
When Apple released iOS 12 in September 2018, the main change for iPad users was a revamped collection of gestures similar to those used by the iPhone X. As it turned out, these new gestures were in preparation for the release of the new 11-inch and 12.9-inch iPad Pro models that dropped the Home button and Touch ID in favor of Face ID. Just as with the iPhone X, the elimination of the Home button requires new gestures.
Luckily, Apple did a great job on these, so once you learn them, you’ll probably find them even faster to use than before. And if you’re still using an iPad with a Home button, rest assured that it still works as you expect.
Show the Home Screen
Although those whose iPads have a Home button will likely stick with pressing it to return to the Home screen, there’s a new universal gesture that works on all iPads running iOS 12. Just put your finger at the bottom edge of the screen and swipe up with a quick, decisive gesture that goes about a third of the way up.
Show the App Switcher
Again, those with a Home button on their iPads are accustomed to double-clicking it to bring up the app switcher that displays large thumbnails of recently used apps. But if you want to retrain yourself to use iOS 12’s new gesture, swipe up from the bottom to the middle of the screen (more slowly than the gesture for returning to the Home screen) and pause briefly until the thumbnails appear.
Switch Between Apps
iOS 12’s new trick for switching back and forth between apps is slightly different depending on whether you have an older iPad or one of the new 11-inch or 12.9-inch iPad Pro models. On the new iPad Pro, swipe left and right along the bottom edge of the screen to switch between previously used apps. (This is exactly the same gesture you’d use on the iPhone X, XR, XS, and XS Max.)
On an older iPad, however, you need to swipe up from the bottom edge of the screen just slightly—not even enough to display the entire Dock—and then swipe right or left.
Open Control Center
In iOS 11, Apple combined Control Center and the App Switcher, but in iOS 12, Control Center gets its own screen and its own gesture, again mimicking that of the iPhone X series. To open Control Center, swipe down from the top right corner of the screen. You need to start the swipe in the rightmost 10% or so of the screen—if your finger is too far to the left, you’ll open Notification Center instead.
Bonus Tip about the Dock in iOS 12
OK, so this isn’t a gesture, but’s a new feature of iOS 12 that’s available only on the iPad. By default, iOS 12 shows a divider on the right side of the Dock and three icons to its right. What’s the deal with those right-hand icons? Two of them are recent apps that you haven’t already dragged to the left side of the Dock. The third one might also be a recent app, or it might be an app you’ve used recently on your Mac or iPhone, at which point it will have a little badge in the corner indicating which machine it comes from.
If you dislike either of these features, you can turn them off separately. Disable the recent apps in Settings > General > Multitasking & Dock, and turn off the Handoff app in Settings > General > Handoff.
It can be tricky to pick up new ways of working, but if you sit down and play with iOS 12’s new gestures, you should get the hang of them quickly.
Social Media: If you use an iPad with iOS 12, take note of the new gestures that are necessary on the recently released 11-inch and 12.9-inch iPad Pro and available to all older iPads as well. Plus find out what the deal is with those new icons on the right side of the Dock!
The Secret Trick for Enabling Caps Lock When Typing in iOS
The Caps Lock key on Mac keyboards often feels extraneous, since it’s easy enough to hold the Shift key while typing multiple capital letters for acronyms like HIPPA or when you want to shout GET OFF MY LAWN! But if you need to do that on an iPhone or iPad, it’s annoying to keep tapping the Shift key to switch to the uppercase keyboard for each letter. Luckily, Apple has baked a time-saving trick into its onscreen keyboard. Tap the Shift key twice in a row to lock it on, type the letters you need, and tap it again to unlock it. Notice that when Shift is locked on, a horizontal line appears beneath the arrow on the Shift key.
iOS 12 Supports Password Managers for Faster Password Filling
For security reasons, we always recommend that you use a password manager like 1Password or LastPass to generate, store, and enter strong passwords in your Web browser. We hope you’ve been doing that because iOS 12 has a fabulous new feature that lets you enter passwords from third-party password managers in addition to iCloud Keychain. It makes logging in to Web sites—and iOS apps!—vastly easier than before.
Set Up AutoFill
To begin, you need to enable the feature. Go to Settings > Passwords & Accounts > AutoFill Passwords. Tap the AutoFill Passwords switch to turn the feature on, and select your password manager in the list below.
Two notes. First, the iOS app for your password manager must be installed for it to appear in the list. Second, although you can also allow iCloud Keychain to fill passwords, it’s not worth the extra confusion unless you have a lot of passwords stored only in iCloud Keychain.
Log In to a Web Site in Safari
Now it’s time to try the feature. Navigate to a Web site where you need to log in, and for which your password manager has stored your credentials. Then follow these steps:
- Tap in the username or password field.
- iOS 12 consults your password manager, and if it finds a username/password pair that matches the domain of the site, it displays the username for the site in a blue button or in the QuickType bar above the keyboard. Tap it, and unlock the password manager using your password, Touch ID, or Face ID. iOS fills in your credentials.
- Tap to continue the login process.
If you have multiple accounts for the same site, you may see several of them in the QuickType bar, but if the one you want doesn’t appear, or if none appear, tap the key icon to see all available passwords. If none are right even still, tap the name of your password manager at the bottom of the list to open and search it manually.
Log In to an App
The process of logging in to an app is often similar to logging in to a Web site, as with the Dropbox and Netflix apps, but iOS 12 doesn’t know how to match every app with an associated account in your password manager. For an app that iOS 12 can’t identify, like the Pixabay app, follow these steps instead:
- Tap in the username or password field.
- In the QuickType bar, tap the key icon to open your password manager.
- If necessary, unlock it with your password, Touch ID, or Face ID.
- Search in the password manager for the associated account.
- Tap the account to autofill it in the app’s login fields.
Password Manager Limitations
As welcome as iOS 12’s new support for password managers is, it’s lacking in two important ways:
- The autofill integration is limited to usernames and passwords, so if a site requires an additional field for login, you’ll have to enter that information manually. Similarly, it won’t enter credit card numbers or other information the password manager can autofill when used on a Mac.
- The password manager can’t automatically create new accounts or generate new passwords, as all password managers can do on the Mac. You can do both manually, but the process is so clumsy that it may be easier to wait and do it on a Mac later, or use an easily typed password temporarily until you can change it to something stronger on your Mac later.
Despite these annoyances, iOS 12’s support for third-party password managers is a huge step forward for anyone who wants quick access to the same login credentials on an iPhone or iPad.
Social Media: For those who rely on a password manager like 1Password or LastPass, iOS 12’s new support for third-party password managers makes it easier to log in to Web sites in Safari and iOS apps. Here’s how:
Getting Rid of an Old Mac? Follow These Steps to Prep It for Its Next Life
If a new Mac has recently arrived in your life, it may be time to hand your old Mac down to a friend or family member, pass it on to a coworker, or send it back to Apple for recycling. Here’s what to do.
Backup
Before anything else, make a backup, just in case. Do this even if you’ve already migrated your data to your new Mac, since it’s possible that data could have been corrupted during the transfer without you realizing. At minimum, update your old Mac’s Time Machine backup by clicking the Time Machine icon in the menu bar, and choosing Back Up Now. For extra safety, consider using an app like Carbon Copy Cloner or SuperDuper to make a bootable duplicate that will be easier to navigate if you need to recover a file.
Deauthorize iTunes and Other Apps
It’s uncommon for apps to have licensing schemes that are tied to your Mac’s hardware these days, but if you have any, such as those from Adobe, be sure to deauthorize or deactivate them.
However, there is one app that most people will need to deauthorize: iTunes. That’s because Apple allows you to play content purchased from iTunes only on up to five computers associated with your Apple ID, so be sure to deauthorize Macs that you won’t use again before passing them on.
To do this, open iTunes and choose Account > Authorizations > Deauthorize This Computer. Enter your Apple ID credentials when prompted.
If you’ve forgotten to do this, you can deauthorize all your computers once per year (and then add back those you still have). To do this in iTunes, choose Account > View My Account, and in the Apple ID Summary next to Computer Authorizations, click Deauthorize All.
Sign Out of iCloud
Next, you should sign out of iCloud to remove any connection between your iCloud account and the old Mac. Doing so disconnects the Mac from synchronization of your iCloud data.
To do this, open System Preferences > iCloud, and click the Sign Out button. If you’ve been syncing via iCloud Drive, Calendar, Contacts, Reminders, and so on, the Mac will ask if you want to keep the data on the Mac or delete it. Don’t bother deleting it since you’ll erase the Mac’s drive in a future step.
Sign Out of iMessage
Much as with iCloud, you should sign out of your iMessage account, at least if your Mac is running OS X 10.8 Mountain Lion or later. To do this, open Messages and choose Messages > Preferences > Accounts. Select your iMessage account and click Sign Out. (In 10.14 Mojave, instead of clicking Accounts in the toolbar, click iMessage.)
Unpair Bluetooth Devices
If you’re giving your Mac to another user along with its Bluetooth devices, such as a wireless keyboard and trackpad, you don’t need to do anything with them. However, if you plan to hang on to your Bluetooth devices and use them with another Mac, you should unpair them. That’s especially true if someone else in your home or office will be using the old Mac, since the device might end up working on multiple Macs, which could cause confusion.
Before you unpair a wireless keyboard and mouse or trackpad, however, make sure you have a wired keyboard and pointing device available, since you won’t be able to erase the drive and reinstall macOS without them. If you lack wired alternatives, don’t unpair your keyboard and pointing device.
To unpair Bluetooth devices, open System Preferences > Bluetooth, and in the list of devices either hover over a device or select it. Then click the X button to the right. When prompted, click Remove.
Erase the Drive and Reinstall macOS
Here’s the most important step—erasing the Mac’s drive. After all, you don’t want the next user to be able to access all your photos, documents, email, and more. Luckily, this is easy to do.
First, start up from macOS Recovery by holding down Command-R while the Mac boots. In the macOS Utilities window that appears, select Disk Utility and click Continue.
In Disk Utility, select the internal drive, click Erase in the toolbar, and in the dialog that appears, enter a new name, choose a format, and choose GUID Partition Map for the scheme. For the format, stick with the default, since the macOS installer will convert it later if necessary. Quit Disk Utility when you’re done.
Once the drive is erased, you’ll be returned to the macOS Utilities window, where you can select Reinstall macOS (or Reinstall OS X, if it’s an older Mac) and click Continue. Obviously, if you’re sending it back to Apple for recycling, there’s no reason to do this.
The installation process takes time, and when it’s done, the Mac will restart into the setup assistant. Press Command-Q at the Welcome screen to shut down. When the new user starts the Mac up again, they’ll be able to continue with the setup process. That’s it—now you’re ready to give the Mac to its next user.
Social Media: If you’re passing an old Mac on to a colleague, friend, or family member—or returning it to Apple for recycling—follow these steps to prepare it for its next stage in life and ensure that no one will be able to access your data.
This Is Hands-Down the Easiest Way to Give Someone Your Wi-Fi Network Password
You know the drill—a friend comes to visit and wants to get on your Wi-Fi network. You’ve written the password down somewhere, but where? Even if you have it handy, it’s a pain for your friend to type in. Since macOS 10.13 High Sierra and iOS 11, Apple’s operating systems can make connecting a lot easier. Have your guest choose your network, and then put their device next to one of your devices that’s awake and connected to the Wi-Fi network. As long as you have a card in your Contacts app whose name matches your friend’s My Card in their Contacts, your device should ask if you want to share the Wi-Fi password with them. Just tap Share Password when prompted and you’re done!
Don’t Use Rules in Apple’s Mail to Send “Out of Office” Replies
It’s helpful to unplug occasionally and ignore email while on vacation or otherwise away from your work routine. And it’s a good idea to set up a vacation auto-responder to tell correspondents what to do in your absence. It might be tempting to create such an auto-reply with a rule in Mail on the Mac, but resist the temptation! It’s way too easy to end up sending replies to every message from a mailing list or to addresses that will themselves reply back, causing a mail loop where each message generates another reply, ad infinitum. Instead, always set up such auto-responders in the server settings for your email provider, which are better about avoiding mail loops. Here are instructions for Gmail, iCloud, Outlook.com, Spectrum, Xfinity/Comcast, and Yahoo. If you use a different email provider, the instructions will likely be similar; check with your provider for details.