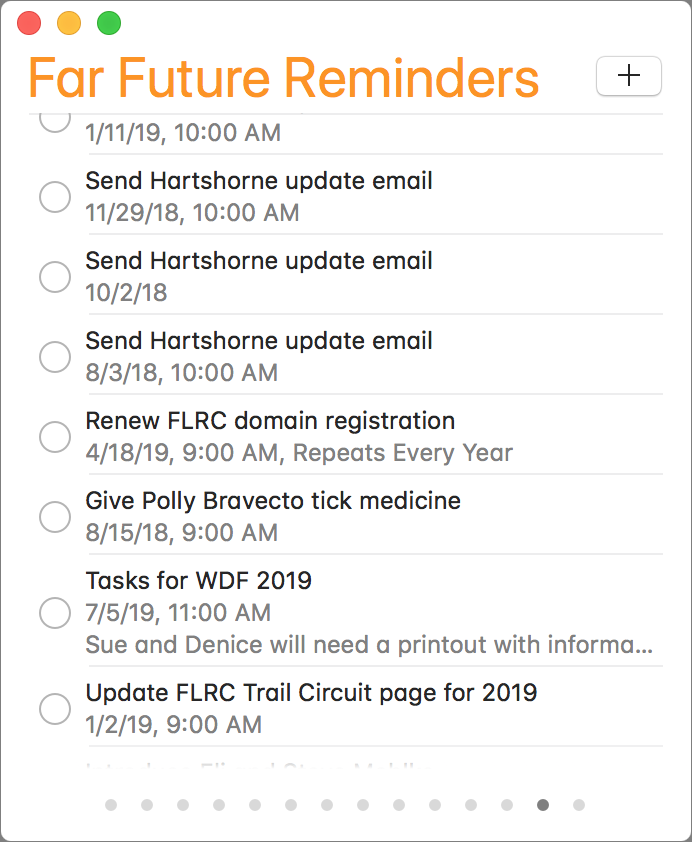
Productivity experts recommend offloading things you have to remember to a task-management app like Apple’s Reminders, which syncs your to-dos among your Mac, iPhone, iPad, and Apple Watch. That’s particularly helpful for tasks you want to be reminded of in a few months or next year, but then those far-in-the-future tasks—especially repeating ones!—clutter your main Reminders list. The solution? Create a Far Future Reminders list, and move reminders to it that aren’t relevant within the next month or so. Just make sure everything in Far Future Reminders is set to alert you on the appropriate day.
Apple Is Discontinuing Its Photo Printing Services—Here Are 7 Alternatives
Sad news: Apple is discontinuing its photo printing services, which enabled you to create and order physical prints, cards, calendars, and books from within Photos on the Mac. If you’re building such a project right now, be sure to place your order before September 30th, 2018. After that, Apple is directing users to download a Photos Project Extension from the Mac App Store. You’ll see this dialog whenever you click a project in Photos.
When you click the Open App Store button, Photos opens the App Store app and shows available Photos Project Extensions. (If you need to open this Mac App Store screen manually, search on appex:com.apple.photo-project
.) Most of these extensions are free, since they’ll make their money when you order projects.
These extensions aren’t exact replacements for Apple’s projects, so let’s look briefly at what they provide.
Mimeo Photos
The extension that comes closest to providing the same products and features as Apple’s print projects is Mimeo Photos, which can create cards, calendars, and books. It offers a wide array of themes.
Motif
Motif looks quite similar to Mimeo Photos, also enabling you to create cards, calendars, and books with selected photos, and it comes from RR Donnelley, the company that was previously Apple’s partner for print projects. It doesn’t offer as many themes or options as Mimeo Photos, but it has a better interface.
Shutterfly
Even though the popular Shutterfly photo service’s Web site lets you go beyond the basics to put your photos on a vast number of objects, such as pillows, candles, and trivets, the company’s Photos extension is limited to photo books. Happily, it provides quite a few different sizes and bindings, and numerous themes for each.
Fujifilm Prints & Gifts
The Fujifilm Prints & Gifts extension lets you order prints, cards, wall art, mugs and drinkware, magnets, T-shirts, puzzles, iPhone cases, and much more. However, it has a non-standard interface (basically the company’s Web site), and every time we switched out of the extension, it crashed and forgot which photo we’d had selected.
Mpix
Although Mpix seems to focus on prints, if you scroll down in the project list, the final option is Browse Mpix, which provides more possibilities, including photo books, calendars, collages, foil art prints, posters, keychains, magnets, playing cards, and business cards. Confusingly, with some of these items, Photos acts as nothing more than a window onto Mpix’s Web site, with no awareness of the photos you’ve selected.
WhiteWall
WhiteWall focuses entirely on prints, with high-end choices for exotic papers and options for mounting and framing. Supported sizes range from 8″ x 6″ up to 48″ x 36″. Unfortunately, the WhiteWall prices seemed high (a framed photo was between $130 and $530, depending on size), and once you select a particular paper or frame choice, there is no way to try another with the same photo without starting another project.
Wix
Unlike all the others, the Wix extension doesn’t put photos on physical products at all. Instead, it’s designed to create on-screen photo albums for Web sites designed with the Wix service. As such, it’s potentially extremely useful for Wix users, but not at all for everyone else.
It’s too bad that Apple is getting out of the print project business since the interfaces from these extensions tend not to be as good as what we’re used to from Apple. But if you like making yourself a calendar every year, you’ll probably do fine with Mimeo Photos or Motif, and the rest of the extensions do extend Photos’ printing capabilities in a big way.
Social Media: As of September 30th, you won’t be able to order prints, cards, calendars, or books from Apple in Photos. But several extensions do most of what Apple did, and others go well beyond!
Did You Know This Hidden Trick for Opening System Preferences Panes Directly?
The System Preferences app on the Mac contains about 30 icons, each leading to additional settings panes. Rather than opening System Preferences, scanning the collection of icons, and clicking the one you want, you can jump directly to the desired pane. Just click and hold on the System Preferences icon in the Dock, and choose a pane from the pop-up menu.
Here’s Why You Should Always Keep the Find My iPhone Feature Enabled
On the face of it, Apple’s Find My iPhone feature does what it says. If you lose your iPhone, you can identify its last known location by looking in the Find iPhone app or on the iCloud Web site, and you can make it play a sound. It’s great for tracking down a missing iPhone, whether you misplaced it in the house or left it behind at a restaurant.
But Find My iPhone does much more! For starters, it works with nearly any Apple device. You can use it to locate a missing Mac, iPad, iPod touch, Apple Watch, and even AirPods. Find My iPhone also helps protect your data if a device is stolen. It even works with Family Sharing to locate devices owned by anyone in your family—a boon to any parent with a forgetful teenager.
You must turn on Find My iPhone before your device goes missing!
- In iOS, tap Settings > Your Name > iCloud > Find My iPhone and enable Find My iPhone. (On the iPad, it’s called Find My iPad.) Also on that screen, turn on Send Last Location. Finally, go back to the main level of Settings, tap Privacy > Location Services, and make sure Location Services is turned on.
- On the Mac, open System Preferences > iCloud and select the Find My Mac checkbox—if you see a Details button beside Find My Mac, click it and follow its instructions for setting necessary preferences.
Be sure to practice viewing where your devices are located and playing tones on them so you’ll know what to do if a device goes missing.
Find My iPhone has a few tricks up its sleeve for when you want a device to show a message or if you think it was stolen:
- Lost Mode: When invoking this mode for an iOS device or Apple Watch, you’ll be asked to enter a phone number where you can be reached and a message. After that, Lost Mode will kick in as soon as the device is awake and has an Internet connection. Anyone who tries to use the device will see your message along with a place to enter the device’s passcode. If you get it back, you can enter the passcode to dismiss the message and use it normally.
- Lock: Available only for the Mac, the Lock feature enables you to protect an entire Mac with a 4-digit custom passcode. You can also enter a message that will appear on the Lock screen. This is a good choice if you think you’ll get your Mac back but would prefer that nobody mess with it in the meantime. Note that if you lock a Mac, you can’t erase it, as discussed next, so lock it only if you think it can be recovered.
- Erase: Even if your device has an excellent passcode or password, you might worry that a thief will access your data. Fortunately, you can erase your device. Erasing a device makes it impossible for you to see its location in Find My iPhone, so it’s a last-ditch effort.
- Activation Lock: If the stolen device is an iOS device or an Apple Watch, when you turn on Find My iPhone, you also enable Activation Lock. This feature prevents someone who has your passcode but doesn’t know your Apple ID and password from turning off Find My iPhone, erasing the device, or setting it up for a new user. In other words, Activation Lock makes it so there’s little reason to steal an iOS device or Apple Watch, since the stolen device can’t ever be used by anyone else. If you get the device back, you can restore your backup—you do have a backup, right?
Find My iPhone works only while the device has power, so if you think you’ve mislaid a device, try locating it right away, before the battery runs out. But even if you are unable to retrieve a lost device, you can prevent others from accessing your data or taking over the device.
Find Wasted Space with Storage Management
Between photos, videos, music, and downloads, it’s easy to fill up your Mac’s drive, particularly if it has fast but small flash storage. A MacBook Air might have only 128 GB of drive space, and that goes quickly. Numerous utilities exist to help you find and delete unnecessary files, like GrandPerspective, OmniDiskSweeper, and WhatSize, but as of macOS 10.12 Sierra, Apple provides a built-in tool to clean house: the Storage Management window.
Storage Management is hidden inside the System Information app and is most easily accessed by choosing > About This Mac, clicking the Storage button, and then clicking Manage…but wait! Before you click Manage, look at the About This Mac window’s Storage view.
storage-management-about-this-mac
Hover over each colored bar to see how much space is taken up by a particular type of data. The white space at the end of the bar is what’s still available. You can’t do much here, but the view gives you a quick overview of your drive usage.
When you click Manage, System Information launches, and the Storage Management window appears. (You can also open System Information manually and choose Window > Storage Management.) In the sidebar at the left, ignore Recommendations and look at the rest of the categories. They will vary a bit between Macs, depending on what apps you use, but they correspond to the colored bars you saw in the About This Mac window’s Storage view.
For some, mostly app-specific categories, like Mail and Photos, Storage Management merely tells you how much space the app’s data occupies and lets you either enable space optimization (downloading only recent attachments for Mail, and keeping only optimized photos on the Mac) or if that has been done already, open the app. To save more space, you must delete unnecessary data from within the app itself.
More interesting are the Applications, Documents, and iOS Files categories, all of which may contain gigabytes of unnecessary data. iOS Files, for instance, shows any device backups and software updates that are stored on your Mac’s drive. It’s worth keeping the latest backup of devices you still use, but many people have older backups and unnecessary updates kicking around.
The Applications category shown above lists your apps and is sorted by size by default. But try clicking the column header for Kind and scrolling down. You can probably delete most apps tagged as Duplicates or Older Versions. Similarly, click the Last Accessed column header to see which apps you haven’t launched in years. Many of them can probably go too. Plus, you can redownload anything tagged as coming from the App Store, so you can toss those apps if you want.
In Documents, you’ll see three buttons: Large Files, Downloads, and File Browser. Large Files focuses on files over 50 MB in size, Downloads shows you the contents of your Downloads folder (much of which you likely don’t need), and File Browser gives you a column view that’s sorted by file size and shows sizes next to each item. It’s great for trawling through your drive to find see what’s consuming all that space.
storage-management-documents
In any of these views other than File Browser, hover over any item and you see an X button for deleting the file and a magnifying glass button that reveals the file in the Finder. To delete multiple files at once, just Command-click or Shift-click to select them and then press the Delete key to remove them all at once. Storage Management gives you the combined size of all the selected files and warns you before deleting the files, so you can use this technique to preview how much space a multi-file deletion will save. In File Browser, select one or more files and either drag them to the Trash icon in the Dock, or press Command-Delete.
If your Mac’s drive is filling up—if it has less than 10 percent free space—consider using the Storage Management window’s tools to search out and delete files that are just wasting space.
All-Time most popular tips!
More great tips from the archives…
- Two Secret Key Combos for Forward Delete on the Magic and MacBook Keyboards
- iCloud Photo Library Users: Do NOT Turn Off iCloud
- Ever Wondered Which Words to Capitalize in a Title? Use Capitalize My Title!
- Tips for Setting Up a Comfortable and Effective Home Work Space
- Tips for Better Videoconferencing
- Set Your Preferred Name and Photo for Messages on iOS
- The Fastest Way to Change Wi-Fi Networks in iOS
- What to Put at the End of Your Emails
- Apple Business Manager Is a Win for Apple-Driven Workplaces
- Find Wasted Space with Storage Management
- Forrester Research and IBM Studies Show Macs Are Cheaper than PCs
- Being an Apple User Means You’re Not the Product
- How to Ask for Tech Support So You Get Good Answers Quickly
- Apple Business Manager Is a Win for Apple-Driven Workplaces